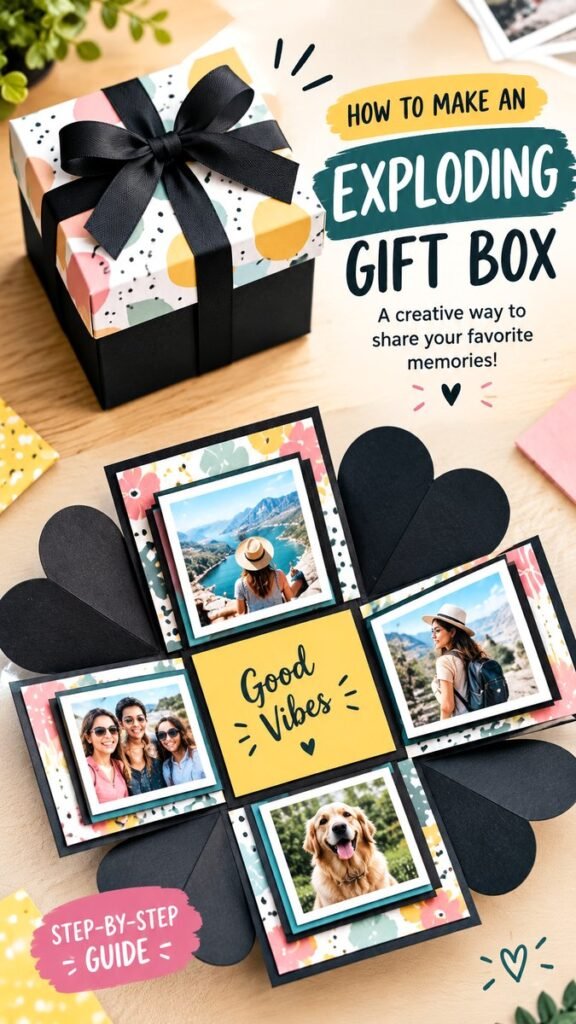
Looking for a meaningful way to celebrate an anniversary without relying on a generic store-bought present? A handmade exploding gift box can turn favorite memories, photographs, and heartfelt messages into one unforgettable keepsake. This creative DIY anniversary gift for him combines the excitement of opening a gift with the sentimental value of a personalized photo album, making it a wonderful project for couples who want to celebrate their story in a thoughtful way.
The finished box may look like an ordinary wrapped present at first, but when the lid is removed, the sides unfold to reveal layers of photographs, decorative paper, messages, and small surprises. That interactive element makes an exploding gift box especially fun for an anniversary. It feels less like opening a conventional present and more like discovering a collection of shared memories.
Key Takeaways
- Create a personalized anniversary gift using photographs, paper, messages, and decorative details.
- Customize each section around meaningful memories, milestones, or moments you have shared.
- Use coordinated colors and patterned paper to give the finished gift a polished appearance.
- Add handwritten notes to make the project feel personal rather than mass-produced.
- Choose photos that tell a story instead of simply filling every available space.
- Take your time with measuring, folding, and layering for a clean final result.
Why an Exploding Gift Box Makes a Great Anniversary Gift
An anniversary is a celebration of time spent together, so a gift that highlights memories can feel particularly appropriate. An exploding gift box gives you plenty of room to showcase photographs and personal messages while keeping the overall presentation playful and surprising.
Unlike a traditional card or photo frame, this DIY project unfolds in several directions. The recipient can discover one panel, then another, revealing pictures and decorations as the box opens. The experience itself becomes part of the gift.
Important: The strongest handmade anniversary gifts do not need to be complicated. A small collection of meaningful photographs and sincere handwritten words can have more emotional impact than a project filled with unnecessary decorations.
A Gift Built Around Your Story
The design shown in this project uses several photo panels arranged around a central decorative section. That structure creates natural opportunities to tell a story. You could begin with an early memory, continue through favorite experiences, and finish with a message about the future.
For a milestone anniversary, consider organizing the photographs chronologically. For a more casual celebration, group them by theme instead. Favorite trips, funny moments, celebrations, everyday memories, and photographs of people or pets can all become part of the design.
Materials for a DIY Anniversary Exploding Gift Box
The beauty of this craft is that you can adapt the materials to suit your preferred style and the supplies you already have. A basic version can be made with sturdy cardstock, decorative scrapbook paper, photographs, adhesive, scissors, a ruler, and a pencil.
- Heavy cardstock for the box structure and flaps
- Patterned or colored scrapbook paper for decorative layers
- Printed photographs in several sizes
- Craft glue, double-sided tape, or photo-safe adhesive
- Scissors or a paper trimmer
- Ruler and pencil for accurate measurements
- Ribbon for decorating the lid
- Stickers, lettering, labels, or small embellishments
- Black, white, or metallic pens for handwritten messages
You do not need every item on the list. The most important supplies are sturdy paper, photographs, adhesive, and something to write with. Extra embellishments can be added after the basic structure is complete.
Choosing the Right Paper
Cardstock is particularly useful because the box needs enough structure to hold its shape. Decorative scrapbook paper can then be layered on top to introduce color and personality.
The reference design uses a striking combination of dark panels and colorful patterned paper. You can recreate the visual contrast with your own palette without copying the original design. Soft neutrals, favorite team colors, earthy tones, bright modern colors, or a simple black-and-white scheme can all work beautifully.
How to Plan Your Exploding Gift Box
Before cutting anything, spend a few minutes planning the overall arrangement. This simple step can prevent crowded panels and make the finished project much easier to assemble.
1. Gather Your Favorite Memories
Start by selecting the photographs you want to use. Aim for a variety of moments rather than several nearly identical pictures. A mix of portraits, adventures, celebrations, candid snapshots, and everyday memories can make the finished box feel like a miniature scrapbook of your relationship.
If you are creating the box for an important anniversary milestone, consider including photographs from different stages of your time together. Even simple pictures can become meaningful when they represent a specific chapter or shared experience.
2. Sketch the Layout
Draw a quick plan showing where photographs, messages, decorative papers, and embellishments will go. Think about which elements should be visible immediately and which ones should be discovered as the recipient explores the box.
A central panel can hold a large message, while surrounding panels can feature photographs. Smaller flaps can be reserved for short notes, dates, inside jokes, favorite quotes, or tiny surprises.
3. Measure and Cut Carefully
Accuracy matters when making a paper box. Use a ruler to keep edges straight and mark fold lines lightly before creasing them. Take your time with the cutting stage because uneven edges can affect how the box opens and closes.
Keep the paper structure sturdy enough to support the decorations. If you plan to add several photographs to one panel, consider using thicker cardstock or reinforcing the base with an additional layer.
4. Decorate the Individual Panels
Once the basic structure is ready, begin layering decorative paper and photographs. Leave enough breathing room around each element so the finished box does not become visually overwhelming.
Photo mats are an easy way to make pictures stand out. Mounting a photograph on a slightly larger piece of contrasting cardstock creates a simple frame and adds dimension without requiring complicated crafting techniques.
Expert Insight
- Give each panel a purpose so the design feels intentional.
- Mix photographs with blank space and short messages to create visual balance.
- Use one consistent accent color throughout the box to connect the different sections.
Creative Ways to Personalize an Anniversary Gift for Him
The best part of a DIY anniversary gift is the opportunity to customize it around the person receiving it. Instead of making every panel purely decorative, use the available space to include details that feel specific to your relationship.
Add Short Handwritten Messages
Write a few sentences about individual photographs. Explain why you remember a particular moment, describe something funny that happened, or simply write what you appreciate about the person.
Short messages are often easier to read and can make the box feel more spontaneous. You could create small notes such as “One of my favorite days,” “This still makes me smile,” or “Another memory I would choose every time.”
Create a Memory Timeline
A timeline can turn the exploding gift box into a visual journey. Begin with an early photograph and gradually move through important moments. Depending on the size of the project, you could include a first adventure, favorite trip, celebration, new home, shared hobby, or another meaningful chapter.
You can keep the timeline simple by adding small dates beneath the photographs. This creates an organized look while helping the recipient remember when each moment happened.
Include a Centerpiece Message
The center of the opened box naturally becomes a focal point. Use it for a short anniversary message, a favorite phrase, the number of years you are celebrating, or a few words that summarize your relationship.
Because the center attracts attention, keep the message large and easy to read. A simple handwritten phrase can work just as well as elaborate lettering.
How to Make the Finished Gift Look Polished
A handmade project can look professional when the design has consistency. Choose two or three main colors and repeat them throughout the box. This creates visual connection between the lid, panels, photo mats, and decorative accents.
Layering is another easy technique. Place a photograph on cardstock, add a patterned layer underneath, and mount both onto the main panel. Small differences in size create depth and make each photograph stand out.
Pro Tip: Do not try to decorate every inch of the box. Intentional empty space gives photographs and messages room to stand out and makes the entire project easier to appreciate.
Keep the Lid Simple
The lid creates the first impression, so a ribbon, patterned paper, and a clean label can be enough. A bold exterior paired with a detailed interior creates a fun contrast when the recipient opens the box.
You can also add a small phrase to the top, such as “Our Memories” or “Open for a Surprise.” Keep the wording short so the design remains clean.
Anniversary Gift Ideas to Add Inside
Photographs do not have to be the only surprise. Depending on the available space, you can incorporate small paper-based additions that make the box even more personal.
- Mini love notes tucked behind photographs
- A list of favorite memories
- A handwritten anniversary message
- Small paper pockets containing notes
- Favorite dates or milestones
- A list of things you look forward to doing together
- Printed snapshots from memorable adventures
Keep anything added to the box lightweight. The structure is designed to unfold, so bulky objects can interfere with the movement of the panels or make the finished gift difficult to close.
Tips for Creating a Meaningful DIY Gift for Him
When making an anniversary gift for him, focus on personalization rather than trying to create a traditionally romantic design. Think about the colors, hobbies, memories, places, and experiences that are meaningful to him.
A clean masculine color palette can work well if that suits his style, but there is no need to limit yourself to dark colors. The most important consideration is whether the finished project feels connected to the recipient.
Consider adding photographs that reflect shared interests or memorable experiences. If you both enjoy traveling, create a travel-themed section. If food, music, sports, outdoor activities, or simple weekend moments are important to you, let those memories influence the design.
Make the Experience Part of the Present
An exploding gift box is special because it encourages the recipient to slow down. Instead of opening a package and immediately seeing the entire gift, he discovers the project one panel at a time.
Arrange your favorite photographs so there is something interesting to discover at every stage. Start with an appealing cover, reveal a few photographs on the first opening, and reserve an especially meaningful photograph or message for the center.
Common DIY Gift Box Mistakes to Avoid
Even simple paper crafts can become frustrating when the planning stage is skipped. Fortunately, most common problems are easy to prevent.
- Using weak paper: Choose cardstock that can handle repeated opening and closing.
- Overloading the panels: Too many layers can make the box bulky and difficult to fold.
- Skipping measurements: Accurate cuts and folds help the finished box open smoothly.
- Using too many patterns: A limited color palette keeps the design cohesive.
- Adding photographs too early: Test the structure before permanently attaching your favorite pictures.
- Forgetting the lid: Make sure the completed box still closes securely after all decorations are added.
A Thoughtful Anniversary Keepsake Made by Hand
A DIY exploding gift box combines creativity, photographs, and personal memories in a format that feels both playful and sentimental. It is more than a paper craft because every photograph and message can represent a part of your shared story.
You can make the project as simple or elaborate as you like. A few carefully selected photographs and a heartfelt note can create a beautiful result, while additional patterned papers, layers, pockets, and embellishments can turn it into a detailed scrapbook-style keepsake.
The most important thing is to make choices that feel personal. Use memories that genuinely matter, select a color palette that suits his style, and write messages in your own voice. Those details are what transform a handmade project into a meaningful anniversary present.
At a Glance
- Choose meaningful photos first.
- Plan the panel arrangement before decorating.
- Use sturdy cardstock and coordinated paper.
- Add short handwritten messages for personality.
- Keep the design balanced and easy to open.
Conclusion: Create an Anniversary Gift He Will Remember
When you want anniversary gift ideas for him that feel personal, a handmade exploding gift box is a creative way to bring favorite memories together. The combination of photographs, decorative paper, heartfelt messages, and an unexpected unfolding design makes the finished project feel like an experience rather than an ordinary present.
Take your time choosing the memories, keep the layout organized, and personalize the colors and messages around the person receiving it. Whether you are celebrating a first anniversary or a major milestone, the finished box can become a keepsake worth opening again and again.
Final Tip: The most memorable DIY anniversary gifts are built around genuine moments. Choose photographs that make you both smile, add words that sound like you, and let the memories become the main decoration.