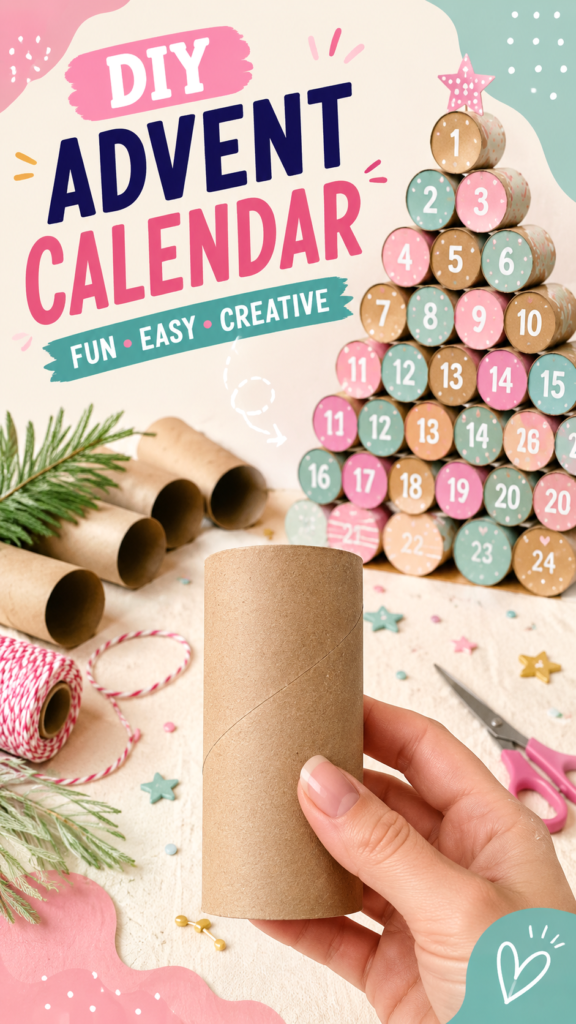
A DIY advent calendar is one of those holiday crafts that turns simple materials into something genuinely special. With a few cardboard tubes, colorful paper, craft supplies, and a little imagination, you can create a cheerful countdown that adds excitement to every day leading up to Christmas. This easy advent calendar idea is especially appealing because it combines creativity, recycling, and personalization in one fun project.
Key Takeaways
- Cardboard tubes can become the foundation of a creative DIY advent calendar.
- A simple color palette can make recycled materials look polished and festive.
- Each calendar section can hold a small treat, note, activity, or surprise.
- Personal decorations make the finished countdown feel more meaningful.
- This craft can be adapted for children, families, classrooms, or seasonal home decor.
Why DIY Advent Calendar Ideas Are So Popular
The best Christmas crafts do more than look pretty. They create a small experience that people can enjoy throughout the holiday season. A handmade advent calendar does exactly that. Instead of simply purchasing a ready-made countdown, you can build something that reflects your preferred colors, crafting style, and family traditions.
The design shown by this type of project centers on an everyday cardboard tube transformed into part of a festive countdown. That makes the idea approachable for beginners. You do not need an elaborate collection of specialty materials to get started. The basic structure can be built from materials that are inexpensive, easy to find, or already sitting in your craft supplies.
Important: The charm of a DIY advent calendar comes from the anticipation it creates. The finished project does not need to be perfectly symmetrical or professionally made. A thoughtful handmade design often feels warmer and more personal than something mass-produced.
What You Need for a Cardboard Tube Advent Calendar
One reason this advent calendar craft works so well is its simple material list. The cardboard tubes provide a lightweight structure that can be decorated and arranged in many different ways. You can keep the project minimal or add more decorative details depending on the look you want.
Useful supplies can include:
- Clean cardboard tubes
- Colored paper or cardstock
- Glue or double-sided adhesive
- Scissors
- Markers or lettering pens
- Ribbon, string, or decorative twine
- Small stickers or paper embellishments
- Paint or craft paper for adding color
- Small treats, notes, or activity cards for the finished calendar
You can also introduce seasonal details such as paper stars, tiny bows, dots, snow-inspired shapes, or simple botanical accents. The goal is not to use every possible decoration. A limited palette and a few repeated details can create a much more cohesive result.
Choosing a Color Scheme
Color is one of the easiest ways to make a homemade advent calendar look intentional. A cheerful palette of pink, mint, teal, cream, and natural cardboard creates a playful contemporary appearance. If that combination is not your style, you can easily switch to classic red and green, soft neutrals, icy blues, warm whites, or earthy tones.
Try selecting two or three main colors and using one neutral shade to balance them. Repeating the same colors across numbers, labels, decorations, and wrapping details will help the entire calendar feel connected.
How to Create Your DIY Advent Calendar
The project can be approached as a flexible craft rather than a strict recipe. The basic idea is to transform individual cardboard tubes into small compartments and then arrange them into a decorative countdown. Take your time with the preparation stage because a neat foundation makes the decorating process much easier.
1. Gather and Prepare the Tubes
Start by collecting enough clean cardboard tubes for the number of countdown spaces you want to create. A traditional advent calendar has 24 spaces, although there is no rule saying your project must follow that exact format.
Inspect each tube and remove loose pieces or rough edges. If necessary, gently flatten or shape the cardboard so the tubes sit neatly together. Keeping the materials consistent will make the finished arrangement easier to organize.
2. Decide on the Arrangement
Before gluing anything together, experiment with different layouts. Tubes can be arranged in rows, stacked into a pyramid, placed inside a larger frame, or organized into a tree-inspired shape. A pyramid arrangement creates a particularly eye-catching centerpiece because the structure naturally becomes narrower toward the top.
Place the tubes on a flat surface and move them around until you are happy with the composition. This simple planning step can prevent unnecessary adjustments later.
3. Decorate the Individual Compartments
This is where the project becomes personal. Cover the tubes with colored paper, paint them, add patterned details, or leave some of the natural cardboard visible for contrast. You can give every compartment a slightly different appearance while maintaining a consistent color palette.
Numbering is an important part of the design because it turns a collection of decorated tubes into a countdown. Use clear, easy-to-read numbers and place them where they can be seen at a glance. Large numbers work particularly well if the calendar will be displayed in a busy room.
4. Add the Daily Surprises
The contents do not need to be expensive. Small treats are an obvious choice, but an advent calendar can also contain handwritten notes, jokes, encouraging messages, family activities, craft prompts, or simple ideas for enjoying the holiday season together.
Think about the person receiving the calendar. A child might enjoy tiny craft supplies or activity cards, while an adult may appreciate thoughtful notes, favorite treats, or small reminders to take a relaxing moment during a busy month.
5. Assemble and Display the Calendar
Once the tubes are decorated and filled, arrange them into the chosen shape. Secure the pieces carefully so the calendar remains stable when individual compartments are opened or removed from the arrangement.
Choose a display location where the calendar can become part of the seasonal decor. A craft table, shelf, entryway, desk, or family gathering area can work well. The best location is somewhere visible enough to encourage the daily countdown without getting in the way of normal activities.
Expert Insight
A strong handmade calendar usually has one repeating design element. Consistent numbers, matching labels, coordinated colors, or repeated shapes can make a collection of simple cardboard pieces look like a finished decorative project.
Creative Ways to Personalize an Advent Calendar
Once you understand the basic structure, there are countless ways to make the project your own. Personalization is especially useful when you are making an advent calendar as a family craft or handmade gift.
Make It Activity-Based
Instead of filling every compartment with an object, add a small activity prompt. Ideas might include making a seasonal craft, decorating cookies, writing a card, watching a favorite holiday movie, taking a winter walk, or creating a handmade decoration.
This approach shifts the focus from receiving something each day to creating a shared moment. It can also make the calendar more affordable because many of the surprises cost little or nothing.
Create a Minimalist Version
If colorful crafts are not your preference, keep the cardboard natural and use one accent color for the numbers. Add simple paper labels and a small amount of twine for a clean handmade appearance.
A minimalist advent calendar can blend easily with existing home decor. Neutral cardboard paired with cream, soft green, muted blue, or warm red can create a sophisticated seasonal look without overwhelming the room.
Make It Colorful and Kid-Friendly
For children, brighter colors and playful patterns can make the countdown even more exciting. Let kids decorate some of the individual tubes with stickers, drawings, paper shapes, or their own lettering.
Giving children a role in creating the calendar can be just as enjoyable as opening it later. It also turns a simple recycled-material craft into a creative holiday activity.
Simple Tips for a Better DIY Advent Calendar
A few practical decisions can make the finished project more attractive and easier to use. You do not need complicated techniques. Small improvements in planning, spacing, and organization can have a noticeable effect.
- Plan before gluing: Test the complete arrangement first so you know how the compartments will fit together.
- Keep numbers visible: Use strong contrast and simple lettering so each day is easy to identify.
- Balance the colors: Repeat your chosen shades throughout the design rather than using a different color for every element.
- Keep surprises lightweight: Cardboard tubes are best suited to small items, notes, and treats.
- Think about placement: Build the calendar around the space where you plan to display it.
- Leave room for personality: Handmade imperfections can make the project feel more charming and unique.
Pro Tip: If you are making several calendars as gifts, prepare the decorative elements in batches. Cut the numbers, labels, and paper accents together before assembling each calendar. This saves time while still allowing every finished piece to have its own personality.
Why Recycled Materials Work So Well
Using cardboard tubes for Christmas crafts gives ordinary household materials a second purpose. Rather than treating them as disposable items, you can turn them into part of a seasonal decoration that remains useful and visually appealing.
This kind of project is also accessible. Cardboard is lightweight, easy to decorate, and simple to cut or shape. It provides a blank surface for paper, paint, markers, labels, and other craft materials.
More importantly, recycled craft projects encourage creativity without requiring a large budget. The finished advent calendar gets its character from the arrangement and decoration rather than from expensive materials.
Ideas for Filling the Countdown
The contents are where you can make the calendar especially thoughtful. Mix different types of surprises so every day feels a little different.
- Short handwritten messages
- Small holiday treats
- Family activity suggestions
- Simple craft challenges
- Compliments or encouraging notes
- Mini stationery items
- Small decorations
- Ideas for kind or helpful seasonal activities
You can also organize the contents around a theme. A craft-focused calendar could contain a different creative prompt each day. A family calendar could encourage shared activities. A self-care calendar could feature simple reminders to slow down and enjoy the season.
A Fun Christmas Craft for All Ages
DIY advent calendar ideas are appealing because they can be adjusted to different skill levels. Beginners can focus on decorating cardboard tubes with paper and numbers, while experienced crafters can experiment with more elaborate structures, patterns, and embellishments.
The craft can also become a group project. One person can prepare the tubes, another can decorate them, and someone else can create the daily notes or surprises. Sharing the work makes the process more social and gives everyone a role.
For Kids
Keep the decorating process simple and let children choose colors and patterns. Adult supervision is appropriate when using scissors, adhesives, or other craft tools.
For Families
Use the compartments to create a shared countdown filled with activities and little moments rather than focusing only on physical gifts.
For Craft Lovers
Experiment with layered paper, coordinated patterns, decorative lettering, textured materials, and creative arrangements to create a more elaborate centerpiece.
Quick Points
- Recycle cardboard tubes into useful holiday decor.
- Choose a simple color palette for a polished look.
- Number every compartment clearly.
- Fill spaces with treats, notes, or activities.
- Customize the design to match your home or recipient.
Conclusion: Make the Countdown Your Own
A homemade advent calendar does not need complicated supplies or advanced crafting skills to make an impression. Cardboard tubes, simple decorations, clear numbers, and thoughtful surprises can come together to create a festive countdown that feels personal from the very first day.
The real appeal of this DIY advent calendar idea is its flexibility. You can make it colorful and playful, soft and minimalist, or completely personalized for a particular family member. Fill it with tiny treats, handwritten notes, creative challenges, or shared activities, and the calendar becomes more than seasonal decor. It becomes part of the holiday experience.
If you are looking for an easy Christmas craft that is budget-friendly, creative, and enjoyable to personalize, this cardboard tube advent calendar is a wonderful place to start. Gather your materials, choose your colors, arrange your compartments, and create a countdown that brings a little more anticipation and creativity to each December day.
Tags
DIY Advent Calendar Advent Calendar Ideas Christmas Crafts DIY Christmas Decor Holiday Crafts Cardboard Tube Crafts Christmas DIY span style=”display:inline-block; background:#f2e9f5; color:#60486a; padding:8px 13px; margin:4px; border-radius:20px; font-size:14px;”>Holiday Countdown