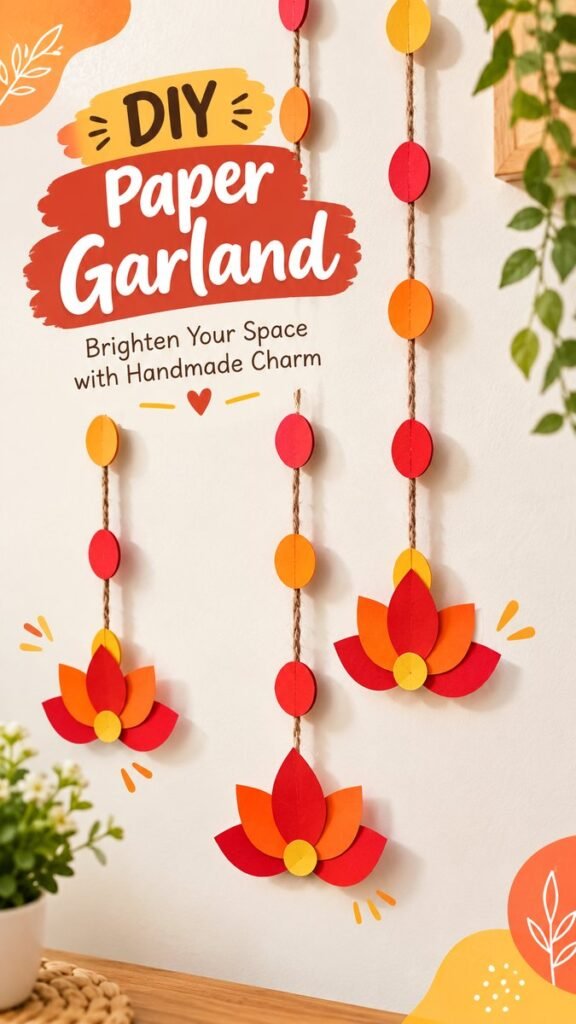
Brighten your home with a cheerful handmade decoration that feels colorful, creative, and wonderfully festive. This Diwali DIY paper garland is a simple craft idea that turns basic paper, twine, and a few easy shapes into eye-catching wall decor. With warm shades of red, orange, and yellow, layered paper flowers, and playful hanging circles, it brings plenty of personality to an otherwise simple space.
The beauty of this project is its versatility. You can hang a paper garland on a blank wall, above a table, beside a doorway, or in a cozy corner that needs a little extra color. It is also easy to customize, making it a wonderful choice for anyone who enjoys handmade decorations and approachable craft projects.
Key Takeaways
- Create colorful Diwali DIY decor with simple craft materials.
- Use red, orange, and yellow paper for a warm festive palette.
- Layer paper shapes to give flowers more dimension and visual interest.
- Arrange hanging garlands at different lengths for a dynamic display.
- Customize the colors, shapes, and spacing to suit your room.
- Keep the project budget-friendly while achieving a polished handmade look.
Why This Diwali DIY Is Worth Making
Decorating for a festive occasion does not always require complicated materials or elaborate techniques. Sometimes, a few sheets of colorful paper and some twine can create a surprisingly attractive result. This Diwali DIY is a great example of how simple craft elements can work together to transform a plain wall.
The design combines repeated circular paper pieces with larger flower-inspired shapes. That repetition creates a visual rhythm, while the layered flowers act as decorative focal points. Because the individual elements are relatively simple, the finished garland looks creative without requiring advanced crafting skills.
Important: The strongest part of this decoration is the balance between repetition and variation. Repeated paper circles create consistency, while layered flowers add larger focal points that keep the arrangement from looking flat.
Materials for a Simple Paper Garland
One reason this craft is so approachable is that you can work with basic supplies. You do not need a large collection of specialized tools to create a similar decorative effect.
- Colored craft paper or cardstock in red, orange, and yellow
- Natural-colored twine or decorative string
- Scissors
- Craft glue or double-sided adhesive
- A pencil for marking shapes
- A ruler for spacing and measuring
- A small round object for tracing circles
- Optional decorative paper for additional accents
Cardstock is particularly useful when you want the paper flowers and circles to hold their shape. Lightweight craft paper can also work, especially if you prefer a softer, more delicate appearance.
Choosing the Right Color Palette
The reference design uses a warm combination of red, orange, and yellow. These colors work especially well together because they create contrast while maintaining a cohesive appearance. You can recreate that energetic feeling or adapt the palette to your existing room decor.
For a bold look, combine deep red with bright orange and golden yellow. For a softer decoration, use muted terracotta, peach, mustard, and warm cream. If your room already contains colorful furniture or artwork, consider choosing two main colors and one accent shade so the garland does not compete with the rest of the space.
How to Make the Diwali DIY Paper Garland
The process can be broken into a few straightforward stages. Preparing the pieces before assembling the garland makes the project easier and helps you maintain consistent shapes.
1. Prepare the Paper Circles
Start by tracing circles onto your colored paper. You can use a small cup, lid, or another round household object as a template. Cut several circles in different colors and keep them grouped by shade.
The circles do not have to be perfectly identical. In fact, small variations can make a handmade garland feel more natural. However, keeping most pieces within a similar size range will give the final arrangement a cleaner appearance.
2. Create the Layered Flowers
Next, prepare the larger flower-inspired decorations. Cut simple petal shapes from red and orange paper. You can make rounded petals, pointed petals, or a combination of both. Layer the shapes so that contrasting colors remain visible around the edges.
Place a smaller contrasting circle in the center of each flower. This center helps visually connect the different paper layers and gives the decoration a finished appearance.
Make Each Flower Slightly Different
You can vary the petal arrangement from one flower to another. One flower might have a red center petal surrounded by orange pieces, while another can reverse the colors. This small change keeps a repeated garland from appearing overly uniform.
3. Prepare the Twine
Cut several pieces of twine according to the area where you plan to display the decoration. Leaving some extra length at both ends gives you room to attach the garland securely.
The design shown in the image uses several vertical strands rather than one horizontal line. This is a particularly effective approach for decorating a tall, empty wall because it draws the eye downward and fills vertical space without making the room feel crowded.
4. Attach the Paper Circles
Arrange the circles along each piece of twine. Keep the spacing relatively consistent, but feel free to vary the colors. Alternating red and orange with occasional yellow accents creates a lively pattern.
If you want the circles to appear dimensional, fold each one gently along the center before attaching it. Layering folded pieces can create a subtle three-dimensional effect that catches light and produces interesting shadows on the wall.
5. Add the Paper Flowers
Attach the larger flowers toward the lower sections of selected strands. Placing the flowers at slightly different heights creates a more relaxed composition. You can also add one flower to some strands and two to others depending on the size of your display area.
Make sure the adhesive is secure before hanging the strands. If you are using lightweight paper, a small amount of glue is generally enough. Avoid adding excessive adhesive because it can make paper curl or become difficult to reposition.
Expert Insight
Think about the wall as part of the design. A little empty space between strands helps each paper flower stand out. Instead of covering every available area, create a balanced arrangement with intentional gaps.
Creative Ways to Customize Your Diwali DIY
Once you understand the basic structure, there are many ways to make the garland your own. The same technique can produce very different results depending on the colors, shapes, and arrangement you choose.
Try Different Paper Shapes
Circles are easy to cut and create a playful appearance, but they are not your only option. Try leaves, diamonds, hearts, stars, or simple geometric shapes. Combining circles with another shape can add visual variety while keeping the craft easy to assemble.
Experiment With Layering
Layering is one of the easiest ways to make paper decor look more sophisticated. Place larger petals behind smaller ones, slightly offset each layer, and finish with a contrasting center. Even simple shapes can look dimensional when they overlap thoughtfully.
Change the Garland Length
Short strands work well for small decorative corners, while longer strands can make a larger wall feel more complete. For a balanced display, use several strands with slightly different lengths rather than cutting every piece exactly the same.
Where to Display Your Handmade Garland
A handmade paper garland can work in many parts of the home. Because the design is lightweight and compact, it is especially useful for temporary seasonal decorating.
- Entryway: Add colorful strands near the entrance to create a welcoming first impression.
- Living room: Fill an empty wall with several vertical strands.
- Dining area: Place the garland on a nearby wall to complement a festive table setting.
- Bedroom: Use a smaller arrangement as a cheerful seasonal accent.
- Craft corner: Display the finished project alongside other handmade decorations.
Before attaching anything to the wall, consider the surface and choose an appropriate removable hanging method when necessary. This is particularly helpful if you are decorating a rented space or want to remove the display after the celebration.
Tips for a More Polished Finished Look
A handmade project does not need to look complicated to feel polished. Consistency, spacing, and thoughtful color choices make a significant difference.
- Prepare all paper pieces before beginning the final assembly.
- Use a simple color pattern to keep the strands visually connected.
- Leave enough space between larger flowers and smaller paper circles.
- Mix symmetrical and slightly irregular elements for a natural handmade feel.
- Step back occasionally while arranging the strands to check the overall balance.
- Use clean cuts and secure adhesive points for a neat result.
Pro Tip: Photograph your completed decoration in soft natural light. The layered paper pieces create gentle shadows, which can make the colors and dimensional details much more noticeable in photos.
Make This Craft a Fun Group Activity
Paper crafts are often more enjoyable when everyone can contribute. One person can trace circles, another can cut petals, and someone else can arrange the colors. Dividing the project into small tasks makes the process feel relaxed rather than overwhelming.
You can also create a small selection of flower designs before assembling the final garland. This gives everyone an opportunity to experiment with shapes and color combinations. Once the pieces are ready, arranging them becomes part of the creative process.
How to Keep the Decor Budget-Friendly
One of the best things about this Diwali DIY is how easily it can be adapted to materials you already have. Look through leftover scrapbook paper, construction paper, cardstock, or other colorful craft supplies before buying anything new.
You can also reuse templates. Once you create one petal or circle template that you like, trace it repeatedly instead of measuring every piece individually. This saves time and helps maintain a cohesive look.
A Simple Craft With a Big Visual Impact
The finished decoration demonstrates how small handmade details can completely change the atmosphere of a room. The warm paper colors immediately draw attention, while the natural twine adds a simple handcrafted texture. Together, these materials create an inviting decoration without relying on complicated construction.
The vertical format is especially useful when decorating narrow walls or tall spaces. Rather than spreading the design across a wide area, multiple strands create movement from top to bottom. The larger flowers then provide visual anchors that keep the arrangement interesting.
At a Glance
- Easy handmade wall decoration
- Warm red, orange, and yellow color palette
- Simple paper shapes and layered flowers
- Customizable for different rooms and wall sizes
- Great for creative seasonal decorating
Conclusion
This colorful Diwali DIY paper garland is proof that beautiful festive decor can start with simple materials and a little creativity. The combination of bright paper circles, layered flowers, and natural twine creates a cheerful display that can instantly bring warmth and personality to a plain wall.
Whether you are looking for an easy weekend craft, a budget-friendly decorating project, or a handmade accent for a festive gathering, this idea is easy to adapt. Change the colors, experiment with different shapes, adjust the strand lengths, and create an arrangement that fits your own space.
Most importantly, enjoy the process. Handmade decorations do not have to be perfectly identical to look beautiful. A little variation gives the finished garland character and makes it feel genuinely personal. Gather your paper, prepare your twine, and start creating a colorful display that makes your space feel extra special.
Tags
Diwali DIY Diwali Decor Paper Garland Paper Crafts Festive DIY DIY Wall Decor Handmade Decor Festive Crafts