Denim DIY projects are a fun way to give old jeans a completely new look while creating something that feels personal and on trend. One of the most eye-catching ideas is transforming a pair of classic straight-leg jeans into a relaxed barrel-inspired silhouette. With a few thoughtful adjustments, basic sewing supplies, and a little creativity, an ordinary pair of denim can become a statement piece for your everyday wardrobe.
Key Takeaways
- Repurposing jeans is an easy way to experiment with denim style.
- A barrel-inspired shape creates a relaxed, curved silhouette.
- Measure carefully before making permanent cuts or stitches.
- Keep the original seams whenever possible for a polished finish.
- Simple details such as rolled cuffs can change the overall look.
- Old denim can become a useful foundation for creative fashion projects.
What Is a Denim DIY Barrel Jeans Project?
A denim DIY barrel jeans project focuses on changing the shape and styling of a familiar pair of jeans to create a wider, rounded silhouette through the leg. Barrel jeans are known for their relaxed appearance, with a shape that feels more sculptural than a traditional straight or skinny fit. The result can look modern without requiring an entirely new wardrobe.
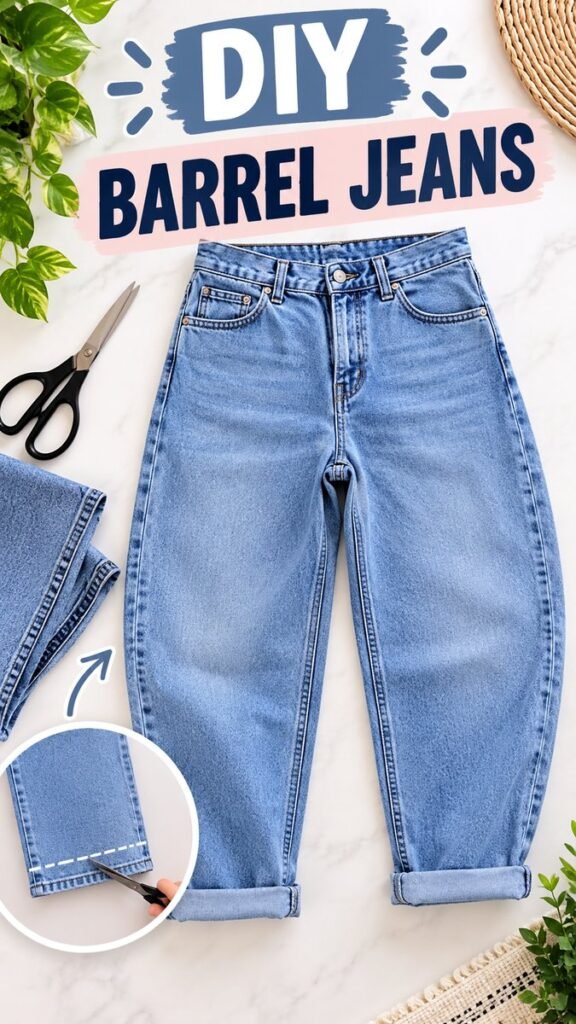
The inspiration shown here centers on a light-wash pair of jeans and a straightforward DIY approach. The visual includes scissors, denim fabric, and a marked cutting area, suggesting that the transformation begins with carefully modifying the existing garment. The emphasis is on accessible upcycling rather than complicated tailoring.
This makes denim DIY especially appealing for anyone who has jeans sitting unworn in a closet. Instead of discarding a pair because the original cut feels outdated, you can explore ways to reshape it and create something more current.
Why Try a Denim DIY Project?
One of the biggest advantages of a denim DIY project is flexibility. You are not limited to whatever styles happen to be available in stores. An existing pair of jeans gives you a starting point, and you can adjust the proportions, length, finish, and styling details according to your preferences.
DIY denim projects can also be a practical way to make better use of clothing you already own. A pair that is too long, too straight, or simply no longer exciting can become the foundation for an entirely different look.
Important: The most successful denim transformations usually begin with planning rather than cutting. Try the jeans on, decide where you want the new shape to sit, and mark your intended changes before removing any fabric.
A Creative Way to Refresh Your Wardrobe
Changing the silhouette of jeans can make a familiar outfit feel completely different. A relaxed barrel shape pairs naturally with simple tops, fitted sweaters, oversized shirts, sneakers, boots, and casual jackets. Because denim is so versatile, one modified pair can work across many everyday outfits.
A Beginner-Friendly Fashion Experiment
You do not need to begin with an elaborate sewing project. Start by understanding the existing construction of the jeans. Look at the outer seams, inseam, hem, waistband, pockets, and areas where the fabric naturally folds. These details can help you decide which sections should remain untouched and which areas can be modified.
How to Plan Your Denim DIY Transformation
Good preparation can make the difference between a clean-looking result and a difficult repair. Before reaching for the scissors, lay the jeans flat and inspect them carefully. Make sure the fabric is clean, dry, and free from anything that could interfere with marking or measuring.
- Choose a pair of jeans with enough fabric and a comfortable waistband.
- Try them on and identify the areas where you want the silhouette to change.
- Use fabric chalk or a removable marker to outline your planned adjustment.
- Compare both legs carefully so the finished shape remains balanced.
- Make small changes first instead of removing too much fabric at once.
- Test the fit before completing permanent stitching.
The jeans shown in the concept have a light blue wash that works particularly well with a casual, contemporary aesthetic. However, the same approach can be explored with darker washes, faded denim, or even jeans featuring subtle distressing.
Tools and Materials for Denim DIY
A basic denim alteration does not require a huge collection of equipment. Having the right tools nearby simply makes the process easier and more precise.
- One pair of denim jeans
- Fabric scissors
- Measuring tape or ruler
- Fabric chalk or removable fabric marker
- Sewing machine or strong hand-sewing supplies
- Matching or contrasting thread
- Straight pins or fabric clips
- Iron for pressing seams
Sharp fabric scissors are particularly useful because denim is thicker than many common clothing fabrics. Dull scissors can create uneven edges and make controlled cutting more difficult.
If you plan to sew the altered sections, choose thread that complements the existing stitching. Classic gold, tan, navy, or matching blue thread can help the finished work blend naturally into the original garment.
Expert Insight
- Preserving original seams can make a DIY alteration look much more polished.
- Temporary markings let you test proportions before committing to a permanent change.
- Work gradually because removing fabric is easy, but adding it back is much harder.
Creating a Barrel-Inspired Jeans Shape
The defining feature of barrel-inspired denim is the shape through the leg. Instead of following a perfectly straight line from hip to ankle, the silhouette gradually expands and curves before narrowing again toward the lower leg. This creates a relaxed shape with more visual volume.
When adapting jeans yourself, the goal is not necessarily to create an exaggerated curve. A subtle adjustment can be enough to give an ordinary pair of jeans a more distinctive profile. The exact amount of shaping will depend on the original garment and the fit you want.
Mark Before You Cut
Put the jeans on and use removable chalk to indicate where you want the leg to change shape. Then take them off and lay them flat. Check both sides before cutting, making sure your markings are consistent.
The cutting detail shown in the visual provides a useful reminder that even a simple alteration should be approached with precision. A clean guideline helps keep the modification controlled and prevents accidental unevenness.
Make Small Adjustments
It is tempting to cut aggressively when experimenting with old jeans, but gradual changes offer much more control. Remove a small amount, reassess the shape, and test the garment again. If the fit still needs adjustment, you can continue refining it.
This approach is especially helpful when you are working with a favorite pair. Even though the project is intended to be creative, preserving the original denim wherever possible gives you more options throughout the process.
How to Get a Clean DIY Finish
After shaping the jeans, pay attention to the finishing details. Raw edges can work for certain intentionally distressed designs, but a neat hem and carefully pressed seams can create a more refined appearance.
If the project involves shortening the jeans, measure both legs before cutting. A small difference in length can become surprisingly noticeable once the garment is worn.
Keep the Original Character of the Denim
One reason upcycled jeans can look authentic is that the original construction remains visible. Pocket shapes, rivets, belt loops, contrast stitching, and natural fading all contribute to the character of the garment. Rather than trying to make the jeans look completely new, let some of those details remain part of the design.
Press as You Work
An iron can make a major difference during a denim alteration. Pressing folds and seams helps the fabric settle into its new shape and makes sewing more manageable. Always use an appropriate heat setting for the denim and test a small area when necessary.
Styling Your Finished Denim DIY Jeans
Once the jeans are finished, the fun moves from the sewing table to the wardrobe. A barrel-inspired silhouette naturally becomes the focal point of an outfit, so simple styling can work beautifully.
- Pair light-wash denim with a fitted white or neutral top.
- Add a cropped jacket to highlight the shape of the jeans.
- Try sneakers for an easy casual outfit.
- Wear ankle boots for a slightly more structured look.
- Add a simple belt to emphasize the waistline.
- Experiment with tucked-in shirts and relaxed sweaters.
Rolled cuffs, as suggested by the visual styling, can also make the finished jeans feel more casual. The exposed ankle creates a different proportion and can help showcase sneakers, loafers, or boots.
More Denim DIY Ideas to Try
Once you start working with denim, there are plenty of ways to continue experimenting. The same pair of old jeans can inspire several different creative directions, depending on the condition of the fabric and the tools available.
Denim Hem Updates
Changing the length is one of the simplest denim alterations. A cropped hem, rolled cuff, or clean finished edge can completely change the proportions of a pair of jeans.
Denim Patchwork
Small denim scraps can be saved for future projects. They can become patches, decorative panels, pockets, accessories, or other fabric details. Combining slightly different washes can create an interesting layered effect.
Creative Pocket Details
Pockets are one of the most recognizable features of jeans, making them useful for DIY customization. Consider changing their placement, adding decorative stitching, or incorporating contrasting denim in a future project.
Common Denim DIY Mistakes to Avoid
DIY clothing projects are a learning experience, and mistakes are part of the process. Still, a few simple precautions can help you avoid unnecessary problems.
- Cutting without measuring: Always mark the intended change first.
- Removing too much fabric: Start conservatively and refine gradually.
- Ignoring both sides: Compare the legs regularly for balanced proportions.
- Skipping a fit test: Try the jeans on before making final stitches.
- Forgetting seam allowance: Leave enough fabric where a new seam will be created.
- Using dull scissors: Sharp tools produce cleaner and more controlled cuts.
Pro Tip: Take photos of the jeans from the front and side while testing the shape. A quick visual check can reveal proportions that are difficult to notice when you are looking down at the garment yourself.
Why Upcycling Denim Is Worth Exploring
Upcycling gives clothing another opportunity to be useful. Instead of treating an older garment as finished simply because its original style no longer works, you can experiment with its fabric, construction, and details.
Denim is particularly suited to creative reuse because it is recognizable, durable, and visually versatile. Even when the fit changes, the familiar texture and stitching can remain part of the finished design.
A denim DIY project also encourages a more personal approach to fashion. Rather than choosing a garment solely because it is currently available, you can build something around your own preferences. The result does not have to be perfect to be interesting. Small variations are often what make handmade clothing feel unique.
At a Glance
- Start with a comfortable pair of jeans you are willing to modify.
- Plan the new silhouette before making any permanent cuts.
- Use fabric chalk, measuring tools, and sharp scissors for precision.
- Preserve original denim details whenever possible.
- Test the fit several times before completing the final finish.
Final Thoughts on Denim DIY
Denim DIY is an inviting way to experiment with personal style while making better use of clothing already in your wardrobe. A simple pair of jeans can become something much more distinctive when you carefully reshape the silhouette, refine the hem, and preserve the details that give denim its character.
The barrel-inspired approach is especially appealing for anyone who wants a relaxed, contemporary shape without starting from scratch. The process encourages creativity, patience, and thoughtful design. Whether you are an experienced sewing enthusiast or simply curious about trying your first jeans alteration, begin with small changes and let the original garment guide the project.
Most importantly, treat the process as an opportunity to experiment. Measure carefully, make gradual adjustments, test the fit, and enjoy seeing an ordinary pair of jeans develop a completely different personality. With a few basic tools and a creative mindset, your next denim DIY project can turn an overlooked pair of jeans into a fresh wardrobe favorite.