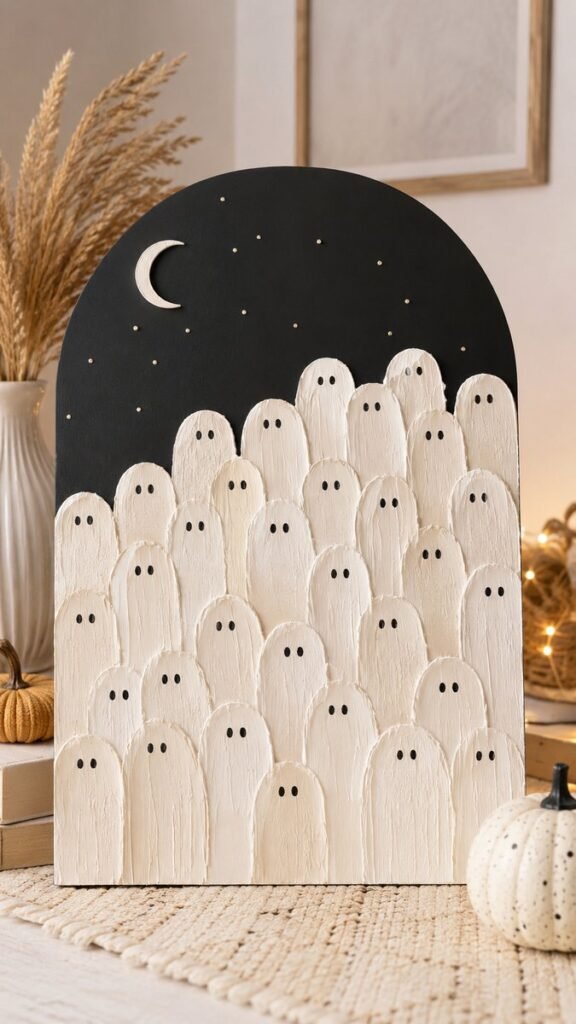
Looking for a DIY wall art decor idea that feels creative, cozy, and full of personality? A textured ghost wall hanging is a fun way to turn a simple seasonal concept into eye-catching handmade art. The layered white ghosts, dark arched background, and soft handmade texture create a playful contrast that works beautifully with modern Halloween decor. Best of all, this type of project can be adapted to suit your own home, whether you prefer neutral fall styling, bold spooky accents, or minimalist seasonal decor.
This DIY wall art idea proves that Halloween decorations do not need to be crowded with bright colors or overly dramatic details. By combining simple ghost shapes with texture, depth, and a strong background, you can create a decorative piece that feels artistic enough to display as part of your regular home styling. It is a great project for craft lovers who enjoy handmade decor, textured art, and easy seasonal DIY projects.
Key Takeaways
- A textured ghost design adds depth and handmade character to DIY wall art decor.
- A dark background creates strong contrast and helps light-colored shapes stand out.
- Repeating simple shapes can create an impressive layered composition.
- Neutral Halloween decor can feel stylish, cozy, and easy to blend into modern interiors.
- This project can be customized with different sizes, colors, textures, and display styles.
Why Textured Ghost Wall Art Is a Standout DIY Decor Idea
There is something especially appealing about wall art that combines simplicity with visible texture. The individual ghosts in this design are not perfectly flat or identical. Their irregular surfaces and slightly varied shapes make the artwork feel handmade and dimensional. That texture becomes an important part of the design, adding visual interest without requiring complicated patterns or excessive decoration.
Ghosts are also ideal subjects for beginner-friendly seasonal art because their silhouettes are naturally simple. A rounded top and flowing lower edge can immediately suggest a ghost, especially when paired with small dark eyes. This makes the design approachable for many different crafting skill levels. You do not need advanced drawing abilities to create a recognizable and charming result.
The clustered arrangement is another reason this style works so well. Instead of relying on one large central figure, the artwork uses many smaller shapes placed close together. The repetition creates rhythm and makes the piece feel fuller. Each ghost contributes to the overall pattern while still having a little individual character.
Important: One of the easiest ways to make simple DIY wall art look more polished is to focus on contrast and texture. Even basic shapes can feel visually interesting when they are layered against a darker surface and finished with visible dimensional details.
The Appeal of Neutral Halloween Home Decor
Traditional Halloween decorating often features bright orange, deep purple, and bold black. Those colors can be fun, but they do not always blend easily with every interior style. A softer palette built around cream, ivory, charcoal, beige, and warm natural tones offers a more flexible alternative.
In this type of DIY wall art decor, the pale ghosts create a strong visual contrast against the dark background while still maintaining a calm and cohesive look. The surrounding warm lighting, natural textures, and neutral decorative accents help the seasonal theme feel integrated rather than overwhelming.
Neutral Halloween decor is particularly appealing for people who enjoy cozy interiors, modern farmhouse styling, minimalist spaces, or soft autumn decorating. It allows you to celebrate the season while maintaining the overall color palette of your home.
A Seasonal Piece That Can Still Feel Artistic
What makes handmade wall art especially versatile is that it can function as both a decoration and a creative statement piece. The ghost design is seasonal, but the composition also resembles a textured art installation. The repeated forms, negative space, and strong color contrast give the project a sculptural quality.
This approach is useful when you want your seasonal decor to feel intentional. Rather than filling every surface with separate decorations, one larger handmade artwork can become a focal point. Place it on a shelf, mantel, console table, or decorative corner to create an instant seasonal moment.
How to Plan Your DIY Ghost Wall Art
Before starting any DIY wall art project, it helps to think about the final composition. The materials may be simple, but planning the arrangement can make a major difference in the finished appearance.
Choose a Strong Background Shape
An arched panel creates a soft, modern silhouette that works beautifully with the rounded shapes of the ghosts. The curved top adds height and visual elegance, helping the artwork feel more decorative than a standard rectangular craft board.
You can also adapt the idea using a rectangle, circle, oval, or irregular handmade shape. The key is to choose a background that provides enough open space for the lighter elements to stand out.
Experiment With Ghost Sizes
A collection of identical shapes can look clean and graphic, but using several different sizes often creates more depth. Larger ghosts can form the base of the composition, while medium and smaller shapes can fill the spaces above and between them.
Varying the height also helps prevent the arrangement from looking too rigid. Think of the ghost shapes as a layered crowd. Allow some to overlap while others remain slightly separated.
Tip: Avoid Making Every Shape Perfect
Small differences in width, height, edge shape, and surface texture can make handmade art feel more natural. A little irregularity adds character and reinforces the handcrafted look.
Build Texture Into the Design
Texture is one of the strongest visual features of this DIY wall art style. A smooth white surface would still communicate the ghost theme, but textured material creates shadows and highlights that change depending on the light in the room.
You can explore a variety of safe craft-friendly approaches depending on the supplies you enjoy working with. Thick paint, lightweight modeling materials, textured paper, fabric, or layered craft surfaces can all create dimensional effects. The goal is not to make every line uniform. Soft vertical marks and subtle unevenness can give the ghosts a flowing appearance.
Expert Insight
Texture works best when it supports the overall design instead of competing with it. Keep the color palette simple and let the raised surface, layered forms, and lighting create the visual interest.
Creating Depth With Layered Shapes
Layering is an effective technique for making DIY wall decor look more substantial. When some ghost shapes overlap, the viewer naturally perceives a sense of depth. The design begins to feel less like a flat pattern and more like a small sculptural scene.
Start by arranging the larger shapes first. These create the visual foundation of the composition. Next, add medium-sized pieces to fill obvious gaps. Finally, use smaller shapes where needed to complete the upper edges or create variation.
Do not worry about making the spacing perfectly symmetrical. A slightly organic arrangement often suits textured handmade decor better than a rigid grid. Step back occasionally and view the entire composition from a distance. This makes it easier to spot areas that feel too empty or overly crowded.
Pro Tip: When arranging repeated elements, create visual movement by varying height and overlap. Your eye should travel naturally across the entire artwork rather than stopping at one perfectly uniform row.
Simple Details That Bring the Ghosts to Life
One of the most charming aspects of this project is its restraint. The ghosts do not need complicated facial expressions. A pair of small dark eyes is enough to make each shape instantly recognizable.
This minimalist approach has several advantages. It keeps the artwork cohesive, prevents the design from becoming visually busy, and allows the texture to remain the main feature. Simple details also make the project easier to customize for different decor styles.
For a softer and more playful result, keep the eyes small and evenly spaced. For a more whimsical handmade appearance, vary them slightly from one ghost to another. You can also leave a few figures without facial details if you want the texture itself to take center stage.
Let Lighting Enhance the Texture
Warm ambient lighting can make a dramatic difference in textured wall art. Side lighting or nearby decorative lamps can highlight raised areas and create subtle shadows. This is especially effective with pale materials placed against a dark background.
When styling the finished piece, consider placing it where it will receive soft natural light during the day and warm accent lighting in the evening. The changing light can make the handmade texture more noticeable and give the display extra depth.
Ways to Customize This DIY Wall Art Decor
The basic concept can easily be adapted to different tastes. That flexibility is one of the reasons seasonal DIY art remains so popular. You can keep the same layered composition while changing the colors, background, scale, or decorative details.
- Modern minimalist: Use a black, white, and beige palette with very clean shapes.
- Cozy autumn: Add warm neutral accents, soft lighting, pumpkins, and natural textures nearby.
- Playful Halloween: Use more expressive ghost faces and mix in subtle seasonal shapes.
- Rustic handmade: Choose a weathered background and emphasize imperfect texture.
- Contemporary art: Experiment with abstract shapes, monochromatic colors, and dramatic contrast.
You can also adjust the size of the project. A small version could work as shelf decor, while a larger panel could become a focal point above a mantel or console table. Consider creating several coordinating pieces if you enjoy gallery wall styling.
How to Style Handmade Ghost Art in Your Home
Once your DIY wall art is complete, styling helps connect it with the rest of your seasonal decor. The artwork shown here pairs naturally with warm lighting, pumpkins, woven textures, books, and neutral accessories. These supporting elements reinforce the cozy Halloween atmosphere without distracting from the main piece.
Create a Cozy Shelf Display
Place the wall art against the back of a shelf or console and layer smaller objects in front. A few pumpkins, a textured vase, or a stack of books can add depth. Try mixing smooth and rough surfaces for a more interesting arrangement.
Use Negative Space
You do not need to surround the artwork with dozens of decorations. Leaving some open space helps the piece stand out. This is especially important when the wall art already contains many repeated elements.
Coordinate Colors Instead of Matching Everything
Rather than trying to match every object exactly, choose a small family of complementary tones. Cream, charcoal, beige, warm brown, and muted orange can create a cohesive autumn display while still allowing individual pieces to have their own character.
Why Handmade Seasonal Decor Feels So Special
DIY decor offers something that store-bought pieces cannot always provide: the freedom to create exactly what fits your space. You can choose the size, color palette, texture, and overall mood. A project like this can be adjusted for a small apartment, a large family room, a cozy entryway, or a carefully styled seasonal shelf.
Handmade projects can also become part of a seasonal tradition. Each year, you can create a new decorative piece, update an older design, or experiment with a different theme. Over time, those projects can form a collection of decor that reflects your changing style and creativity.
The beauty of simple DIY wall art is that the process can be just as enjoyable as the finished result. Arranging shapes, experimenting with texture, and styling the completed piece all provide opportunities to make creative decisions without needing to follow a strict formula.
Tips for Making DIY Wall Art Look More Professional
Even an easy craft project can have a polished finish when a few design principles are considered from the beginning.
- Choose one main focal point. Let the overall ghost arrangement remain the visual star.
- Limit the color palette. A smaller range of colors usually creates a more cohesive result.
- Repeat key elements. Repeated shapes create consistency and visual rhythm.
- Add variation carefully. Change size and placement while maintaining the same general style.
- Consider the surrounding decor. Think about where the finished artwork will be displayed before deciding on its final size and colors.
Another useful strategy is to photograph your arrangement before permanently attaching or finishing the elements. Looking at a photo can make compositional issues easier to notice because it gives you a little distance from the project.
At a Glance
- Simple ghost silhouettes are easy to adapt into creative seasonal wall art.
- Raised texture adds dimension without requiring a complicated design.
- A dark background creates bold contrast with light decorative elements.
- Layering different sizes makes the artwork feel fuller and more dynamic.
- Neutral styling helps Halloween decor blend into modern homes.
Final Thoughts on DIY Ghost Wall Art Decor
Creative seasonal decorating does not have to mean filling your home with complicated projects or expensive accessories. A simple DIY wall art decor idea built around texture, repetition, and contrast can make a memorable statement. This layered ghost design is playful enough for Halloween while remaining stylish enough to complement a cozy, neutral home.
Whether you recreate the concept with your own materials or use it as inspiration for a completely different seasonal theme, the most important element is personal creativity. Experiment with shapes, surfaces, colors, and arrangements until the finished piece feels right for your space.
Creative takeaway: Great DIY wall art does not need complicated details to make an impact. A strong color contrast, interesting texture, and thoughtfully repeated shapes can transform a simple idea into a beautiful handmade focal point.
Use this project as inspiration to explore textured art, Halloween DIY crafts, handmade home decor, and creative seasonal styling. With a few simple design choices, your wall art can bring warmth, personality, and a touch of playful charm to your home throughout the fall season.
Tags
DIY Wall Art Decor Halloween DIY Ghost Decor Textured Wall Art Handmade Home Decor Neutral Halloween Decor Fall DIY Projects