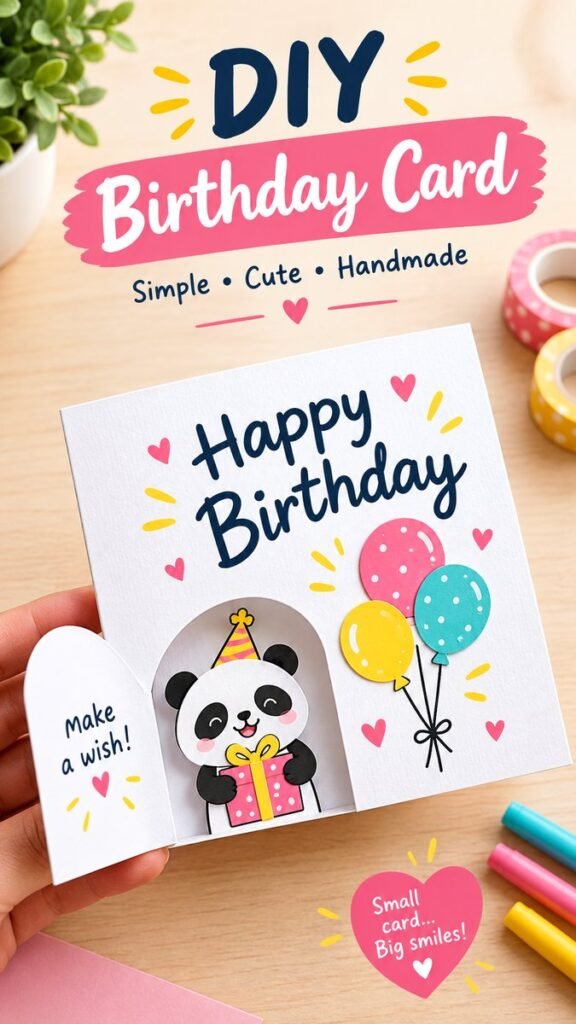
Handmade birthday cards have a special charm that store-bought cards simply cannot replicate. A thoughtful DIY birthday card can turn a simple sheet of paper into a cheerful keepsake filled with color, personality, and creativity. This playful design combines a bright handmade cover, colorful balloons, sweet hearts, hand-lettered birthday wishes, and a fun pop-up character to create a card that feels both personal and memorable.
Whether you are making a birthday card for a child, friend, family member, or someone who appreciates handmade gifts, this style offers plenty of inspiration. You do not need complicated tools or advanced crafting skills. With cardstock, colorful paper, markers, scissors, adhesive, and a little imagination, you can create a handmade birthday card that looks polished while still feeling warm and personal.
Key Takeaways
- A DIY birthday card can be simple while still looking creative and special.
- Pop-up elements add dimension and make the card more interactive.
- Bright balloons, hearts, flowers, and playful characters create a cheerful birthday theme.
- Hand-lettered messages give homemade cards a personal touch.
- Layered paper decorations can create impressive results without complicated supplies.
- Small details often make a handmade greeting card feel truly unique.
Why Handmade Birthday Cards Feel So Special
A birthday card does more than deliver a message. It gives you an opportunity to show someone that you took time to create something specifically for them. That personal effort is what makes handmade birthday cards so appealing.
A simple design can become meaningful when you choose colors, decorations, and wording that suit the recipient. You might use their favorite colors, add a tiny drawing connected to an inside joke, or create a playful character that matches their personality.
Important: The most memorable DIY birthday cards do not have to be complicated. A clear message, thoughtful colors, and one creative feature can make a much stronger impression than a design crowded with decorations.
The Charm of a DIY Birthday Card Design
The featured style works because it balances several playful elements without losing the main birthday message. The large “Happy Birthday” lettering immediately communicates the purpose of the card, while small hearts, colorful balloons, and a cheerful handmade character add personality.
This is a useful approach for anyone learning how to make birthday cards at home. Instead of trying to decorate every available space, choose one main focal point and build the rest of the design around it.
Start With a Strong Focal Point
For a birthday card, the greeting is usually the natural focal point. Large hand-lettered words such as “Happy Birthday” can instantly attract attention. Use a bold handwritten style or a clean brush-lettering effect, then leave enough open space around the words so they remain easy to read.
If you are not confident with lettering, write the message in pencil first. Once you are happy with the placement, trace it with a dark marker or fine-tip pen. This simple technique can make handmade lettering look much more polished.
Add Colorful Decorative Elements
Color is one of the easiest ways to make a DIY birthday card feel festive. Bright pinks, yellows, blues, and other cheerful shades work beautifully for birthday crafts. You can use colored cardstock, markers, paint, patterned paper, or small paper cutouts.
Balloons are especially useful because their shapes are instantly recognizable and strongly associated with celebrations. Hearts, stars, flowers, dots, and small decorative marks can also fill empty areas without overwhelming the main message.
How to Create a Handmade Birthday Card
Creating a card inspired by this playful style can be broken into a few manageable steps. The exact design can be changed according to your materials and the person receiving the card.
1. Choose Your Card Base
Begin with a piece of sturdy cardstock. White or a soft neutral shade provides a clean background for colorful decorations, while pastel cardstock can create a softer look.
Fold the cardstock carefully in half and press along the crease. A crisp fold gives the finished birthday card a neat appearance and makes it easier to position the decorations.
2. Plan the Front Layout
Before gluing anything down, arrange your main pieces on the card. Decide where the birthday greeting will go and where you want balloons, hearts, flowers, or other decorative elements.
Planning the layout first prevents the front from becoming too crowded. It also gives you a chance to experiment with different color combinations before committing to the final arrangement.
3. Create a Fun Pop-Up Feature
The interactive character in the design adds an especially playful element. A simple pop-up figure can be created from cardstock by cutting a basic shape and attaching it to a folded support inside the card.
You can make the character as simple or detailed as you like. A friendly animal, birthday cake, gift box, balloon, cupcake, or party hat can become the centerpiece of the inside of the card.
Keep the Pop-Up Structure Simple
If this is your first pop-up card, avoid complicated mechanisms. A basic folded tab can provide enough movement to make the design interesting. Test the mechanism several times before attaching the final decoration.
4. Add a Personal Birthday Message
The inside of the card is the perfect place for a short handwritten message. A simple “Make a wish!” or “Hope your birthday is full of smiles!” can complement the playful artwork.
For someone close to you, add a few sentences that mention a shared memory, a favorite activity, or something you appreciate about them. Personal words can make even a very simple handmade card feel much more meaningful.
Expert Insight
Think of your card as a small composition rather than a blank space that needs filling. Choose one main message, one focal illustration, and a few supporting decorations. This creates visual balance and keeps the handmade design easy to enjoy.
Easy Materials for DIY Birthday Cards
You can create beautiful handmade birthday cards with supplies that are easy to find. You do not need an extensive craft collection to get started.
- White or colored cardstock
- Colored construction paper
- Black and colorful markers
- Scissors
- Paper glue or double-sided tape
- Pencils and erasers for planning
- Colored pens for lettering
- Small stickers or paper decorations
Optional supplies such as patterned paper, washi tape, gel pens, stamps, and craft punches can provide additional texture and variety. However, simple materials are often enough to create a charming result.
Creative Ideas for Personalizing Handmade Birthday Cards
One of the biggest advantages of making birthday cards yourself is the freedom to customize every detail. You can adapt the basic concept to different ages, personalities, and celebrations.
For Kids
Use bright colors, friendly animals, playful characters, balloons, cupcakes, stars, and oversized lettering. Interactive pop-up features are particularly fun because the recipient can open the card and discover something unexpected.
For Friends
Create a design based on a shared interest or favorite activity. You can add tiny illustrations, humorous messages, colorful patterns, or a miniature version of something meaningful to your friendship.
For Family Members
A warm handwritten message can take center stage. Combine it with simple flowers, hearts, balloons, or a small handmade illustration. Soft colors can create a gentle look, while bright colors can make the card feel energetic and celebratory.
For a More Minimal Style
You do not have to use many decorations. A clean card with bold lettering, one small illustration, and a few carefully placed accents can look modern and elegant. This approach is especially useful if you enjoy simple paper crafts.
Tips for Making Your Card Look Polished
A handmade project does not need to look perfectly manufactured. Still, a few simple techniques can make your birthday card appear cleaner and more intentional.
- Measure before cutting. Light pencil marks can help keep shapes consistent.
- Test your layout. Arrange pieces without glue before making them permanent.
- Use a limited color palette. Three or four main colors are often enough.
- Keep lettering readable. Make the birthday greeting large enough to stand out.
- Let the design breathe. Empty space can make important elements more noticeable.
- Use strong adhesive. Especially when attaching pop-up pieces or layered paper.
Pro Tip: Add dimensional details selectively. A raised balloon, layered flower, or pop-up character can create depth without requiring a complicated construction. One or two dimensional features can often become the visual highlight of the entire card.
Making DIY Birthday Cards More Creative
Once you are comfortable with the basic format, experiment with different techniques. Layering is an easy way to add depth. Cut balloons from several colors of paper and overlap them slightly. Add small highlights with a white pen to give them a playful illustrated appearance.
You can also experiment with texture. Folded paper, small paper circles, patterned scraps, fabric ribbon, and decorative tape can all introduce visual interest. The goal is not to use as many materials as possible, but to choose details that support the overall birthday theme.
Another fun option is to create a surprise inside the card. A hidden message, small pop-up element, pull tab, or removable paper decoration can make opening the card part of the experience.
Why Simple Paper Crafts Work So Well
Paper is one of the most accessible crafting materials, which makes handmade birthday cards a practical project for beginners. It is inexpensive, easy to cut, and available in countless colors and patterns.
Paper crafts also allow you to make changes as you work. If a design does not look right, you can rearrange the pieces before gluing them down. That flexibility makes DIY card making enjoyable rather than intimidating.
The visual style of a cheerful birthday card also translates well to different skill levels. Someone new to crafting can create a simple version with lettering and balloons, while a more experienced crafter can add layered illustrations, pop-up mechanisms, and detailed paper characters.
At a Glance
- Choose sturdy cardstock for a reliable card base.
- Make the birthday greeting the main visual focus.
- Use balloons, hearts, flowers, or characters for cheerful decoration.
- Add one interactive feature for extra surprise.
- Finish with a personal handwritten message.
A Handmade Card Worth Giving
Making birthday cards by hand is a simple way to turn an ordinary greeting into something personal. The colorful artwork, playful details, and pop-up elements create a card that feels like a small handmade gift rather than just a message on paper.
You can keep the design bright and playful, make it soft and minimal, or adapt it completely to the person you are celebrating. What matters most is the thought behind the design. A few carefully chosen colors, a cheerful illustration, and a heartfelt message can create a birthday card that the recipient will want to keep.
So gather some cardstock, choose a fun color palette, and start experimenting. Whether you are making your first simple birthday card or developing a more detailed handmade paper craft, there are endless ways to turn a few basic supplies into something memorable.
Conclusion
DIY handmade birthday cards are a creative, accessible way to celebrate someone special. From bold “Happy Birthday” lettering and colorful balloons to playful pop-up characters and personalized messages, small details can make a big difference.
The best part is that there is no single right way to make one. Start with a simple layout, choose a few cheerful colors, and add details that reflect the person receiving the card. With a little creativity, even basic paper supplies can become a thoughtful birthday keepsake filled with personality and care.
Tags
DIY Birthday Cards Handmade Birthday Cards Birthday Card Ideas Paper Crafts DIY Greeting Cards Pop Up Cards Easy Card Making Handmade Crafts