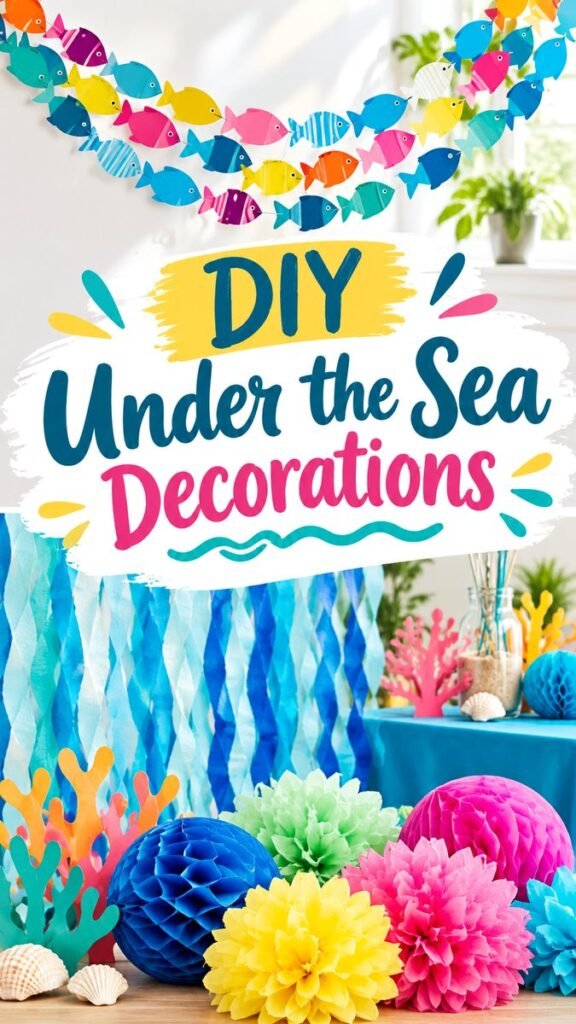
Bring the magic of the ocean indoors with cheerful DIY under the sea decorations that turn an ordinary room into a colorful underwater celebration. The inspiration here combines bright paper fish, flowing blue streamers, handmade coral shapes, tissue pom-poms, honeycomb decorations, shells, and playful ocean colors to create a lively party atmosphere without relying on complicated supplies.
Whether you are planning an under the sea birthday party, a summer celebration, a classroom activity, or simply want a fun ocean-inspired display, these decorating ideas offer plenty of room for creativity. The best part is that many of the visual elements can be made with simple paper, tissue, streamers, cardboard, and craft supplies.
Key Takeaways
- Create an underwater atmosphere with layers of blue and turquoise decorations.
- Use colorful paper fish to add movement and personality to walls and ceilings.
- Mix coral, shells, streamers, tissue flowers, and honeycomb shapes for texture.
- Choose a bright ocean-inspired palette with pink, yellow, teal, blue, and coral accents.
- Layer decorations at different heights to make a small party space feel more immersive.
Create an Under the Sea Party Atmosphere
The easiest way to make an under the sea theme feel convincing is to think beyond individual decorations. Instead of placing a few ocean-themed pieces around the room, create several layers that work together. Blue streamers can suggest flowing water, while paper fish can appear to swim across the walls. Coral cutouts and colorful paper flowers can fill lower areas and create the impression of an underwater reef.
The reference design uses a particularly cheerful approach rather than a dark or realistic ocean look. Bright colors make the theme feel playful and suitable for children, family celebrations, and craft-friendly events. Turquoise and blue provide the foundation, while hot pink, yellow, orange, green, and coral create energetic contrast.
Important: The strongest underwater decorations are not necessarily the most complicated ones. Repeating simple shapes, colors, and textures throughout the room can create a much bigger visual impact than using one elaborate centerpiece.
Start With a Simple Ocean Color Palette
A thoughtful color palette instantly makes DIY under the sea decorations look more coordinated. Start with two or three shades of blue, then introduce a few lively accent colors. Deep blue can represent the ocean, turquoise can add brightness, and pale blue can soften the background.
From there, add coral pink, sunny yellow, bright green, orange, and magenta. These shades work especially well for handmade decorations because they make basic paper shapes look vibrant and festive.
- Ocean blues: Use these for backdrops, streamers, and hanging details.
- Turquoise: Add it to fish, waves, coral, and table decorations.
- Coral and pink: Use them for flowers, reef shapes, and statement accents.
- Yellow: Bring in cheerful highlights that resemble tropical ocean life.
- Green: Use sparingly for seaweed and natural-looking details.
DIY Paper Fish Garlands
One of the most eye-catching elements in an under the sea party is a school of colorful paper fish. The design can be as simple as a basic fish silhouette cut from cardstock, but repeating that shape in different colors and patterns makes it look much more impressive.
Try making fish in several sizes rather than cutting every piece identically. Add stripes, dots, simple scales, contrasting tails, or geometric patterns with scraps of colored paper. You can also alternate solid-colored fish with patterned ones to create visual rhythm.
How to Arrange the Fish
Instead of hanging one straight row, create curved strands that travel across a wall. Several overlapping garlands can look like schools of fish swimming through the room. Place a few smaller fish higher up and larger fish closer to the main display to create depth.
- Cut fish shapes from colorful cardstock or lightweight craft paper.
- Add simple patterns using paper scraps, markers, or decorative shapes.
- Attach the fish to string, ribbon, or another suitable hanging material.
- Vary the spacing so the garland feels natural rather than rigid.
- Hang several strands at different heights for a layered underwater effect.
For a more polished look, repeat the same few colors throughout the garland. This keeps the display playful while preventing it from becoming visually chaotic.
Make a Flowing Ocean Backdrop
A backdrop can completely transform a party area. Blue and turquoise streamers are especially useful because their vertical movement resembles water and creates an instant ocean-inspired setting.
Choose several shades and hang them side by side. Let some pieces remain straight while gently twisting others. Uneven lengths can make the backdrop feel more organic. You do not need every strand to match perfectly.
For an especially colorful display, add a few lighter streamers among darker blue ones. The variation gives the backdrop more depth and makes the decorations stand out in photographs.
Expert Insight
Think of your backdrop as the water behind the reef. Keep the background relatively simple, then place brighter fish, coral, shells, and flowers in front of it. This creates contrast and helps your main decorations remain easy to see.
Add DIY Coral and Seaweed
Coral and seaweed details help fill empty spaces and make an ocean-themed setup feel more complete. They can be created from paper, cardboard, craft foam, tissue paper, or other lightweight materials.
For coral, cut branching shapes in several colors. Bright orange, pink, yellow, and turquoise work particularly well with a playful party palette. Place coral pieces around the bottom of the backdrop, on a dessert table, or beside other decorations.
Seaweed can be represented with long strips of green paper. Cut the strips into wavy shapes and arrange them in groups. Different shades of green will make the display more interesting.
Layer the Reef for More Depth
A common decorating mistake is placing everything at the same height. Instead, create a foreground, middle ground, and background. Streamers can sit behind the display, fish can occupy the middle area, and larger coral or tissue decorations can sit in front.
This simple layering technique makes handmade decorations look fuller and more dimensional. It is particularly useful when decorating a photo area or the wall behind a party table.
Pro Tip: Use larger decorations near the bottom and smaller hanging details toward the top. This creates a natural visual flow and gives the room a more immersive underwater feeling.
Use Tissue Flowers and Honeycomb Decorations
Large tissue flowers and honeycomb shapes are a great way to add volume without making the project overly complicated. Their rounded forms contrast beautifully with flat paper fish and narrow streamers.
Choose a few bold colors and group the decorations together rather than scattering every color evenly. A cluster of pink, yellow, green, and blue pieces can resemble a colorful coral reef.
These decorations are also useful for filling large areas. If a wall feels empty after adding your fish garland, a few oversized tissue flowers can quickly create a stronger focal point.
Create a Colorful Reef Cluster
Try combining different shapes in one display. Place a large blue honeycomb ball beside bright tissue flowers, then add smaller coral cutouts and a few shells around the base. The contrast between smooth, folded, crinkled, and flat materials makes the arrangement more visually engaging.
You can also repeat this arrangement in smaller groups around the room. Repetition helps different decorations feel like part of one cohesive theme.
Simple Table Decorations for an Ocean Theme
The same DIY ideas can easily move from the wall to the party table. Cover the table with a blue or turquoise cloth, then add handmade coral shapes, shells, paper flowers, and small ocean-inspired decorations.
A few simple glass containers can also become part of the display. Fill them with decorative craft materials that match your color palette, or use them to hold small paper elements. Keep the arrangement low enough that guests can still see across the table.
If the party includes a dessert or snack table, use the backdrop as the main visual feature and keep the tabletop decorations coordinated. This creates a clear focal point without overwhelming the space.
Easy DIY Under the Sea Decorations on a Budget
You do not need expensive party supplies to achieve this colorful look. Paper is one of the most versatile materials for an ocean-themed decorating project. Cardstock can become fish and coral, while tissue paper can become flowers and reef-inspired shapes.
Streamers are another inexpensive way to cover a large area quickly. By combining several colors, you can create a rich backdrop without needing complicated construction.
- Reuse colored paper scraps for fish patterns and small details.
- Choose a limited palette so inexpensive materials still look coordinated.
- Make decorations in batches to save time and maintain consistency.
- Use oversized shapes to create impact with fewer individual pieces.
- Combine flat decorations with folded or dimensional pieces for texture.
Make It a Family-Friendly Craft Project
One of the nicest things about DIY under the sea decorations is how easy it is to involve other people in the preparation. Cutting basic fish shapes, choosing colors, decorating paper pieces, and arranging coral can all become part of the creative process.
For younger children, prepare the shapes in advance and let them decorate the fish with patterns and colors. Older children can help design garlands or create larger reef elements. The finished decorations then become part of the celebration itself.
How to Build a Cohesive Underwater Display
A cohesive display does not mean every decoration needs to match. Instead, repeat a few visual ideas throughout the room. If your fish use turquoise, pink, yellow, and blue, repeat those colors in the flowers, coral, streamers, and table details.
Shapes can also be repeated. Rounded tissue flowers can echo the round forms of honeycomb decorations, while wavy streamers can reinforce the idea of moving water. These small connections make a handmade setup feel intentional.
Keep one main area as the focal point. This could be a backdrop behind the party table, a photo wall, or a large fish display. Let the surrounding decorations support that focal point rather than competing with it.
Ideas for Different Celebrations
These DIY under the sea decorations can be adapted for many occasions. For a birthday party, use a large fish garland and colorful reef backdrop. For a summer gathering, lean into bright turquoise, coral, and yellow. For a classroom display, focus on handmade fish, paper seaweed, and simple ocean crafts.
The concept can also work as a general seasonal decorating project. You can make a smaller arrangement for a playroom, craft corner, event table, or themed photo backdrop.
Keep the Theme Playful
The visual inspiration works because it feels joyful rather than overly realistic. You can embrace that approach by using exaggerated colors, oversized paper flowers, cheerful fish shapes, and plenty of movement.
There is no need to make every detail look like a real underwater environment. A creative interpretation often feels more inviting and gives you greater freedom when choosing materials.
Why This Matters
- Simple handmade shapes become more effective when repeated.
- Color contrast helps important decorations stand out in photos.
- Layering creates depth without requiring complicated craft techniques.
Finishing Touches That Make the Display Pop
Once the main decorations are in place, step back and look at the entire room. Check whether the colors are balanced and whether the focal area is easy to identify. If one section feels empty, add a small group of fish, coral, or paper flowers rather than filling the entire space.
Small details can also make photographs more interesting. Place a few shells around the base of the display, add a small cluster of coral shapes, or hang a handful of fish at different heights. These details give the eye more places to explore.
Most importantly, leave some breathing room. A colorful theme can quickly become crowded if every surface is covered. Strategic empty space helps your brightest decorations stand out.
At a Glance
- Build the background with blue and turquoise streamers.
- Add colorful paper fish for movement.
- Layer coral, seaweed, shells, and tissue flowers.
- Repeat your accent colors across the entire display.
- Use one main backdrop as the visual focal point.
Conclusion
DIY under the sea decorations are a fun way to transform a simple party space into a bright, imaginative underwater world. Paper fish, flowing streamers, colorful coral, tissue flowers, honeycomb decorations, and shells can work together to create a display that feels festive without requiring complicated crafting skills.
The key is to focus on color, repetition, texture, and layering. Start with a blue ocean-inspired background, add colorful fish and flowing elements, then build up the reef with handmade coral and dimensional decorations. A few well-placed details can make the entire setup feel more complete.
Most of all, have fun with the colors and shapes. The cheerful style of an under the sea theme gives you plenty of freedom to experiment, reuse craft materials, and create decorations that feel personal. Whether you are preparing for a birthday, classroom celebration, summer gathering, or simply a creative decorating project, these ideas can help you create an underwater scene that guests will remember.
Tags
DIY Under the Sea Decorations Under the Sea Party Ocean Party Decor DIY Party Decorations Ocean Theme Decorations Underwater Party Ideas Ocean Crafts Sea Themed Party