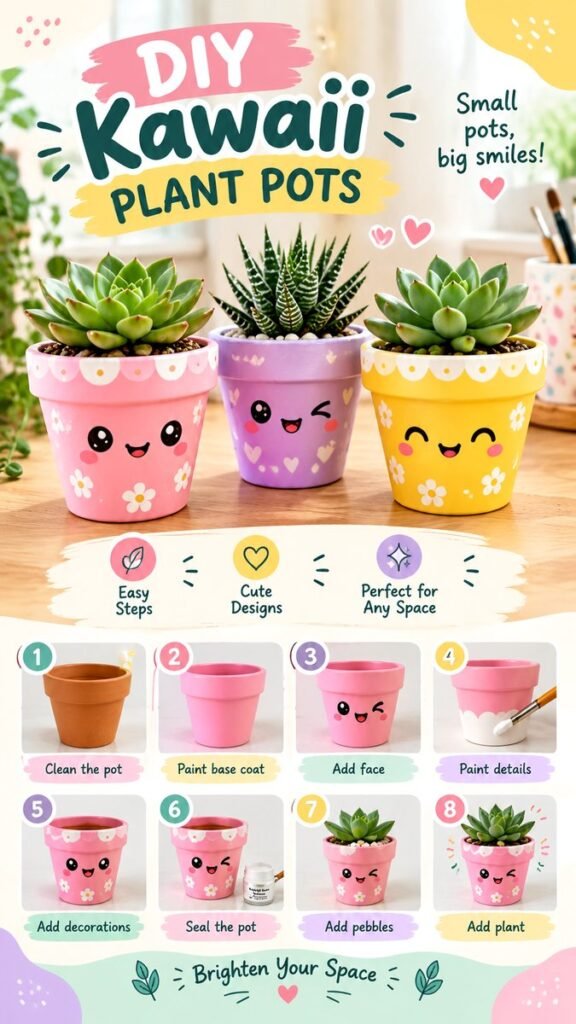
DIY flower pots are a simple and creative way to give ordinary planters a cheerful personality. With a little paint, a few decorative details, and a favorite plant, a plain terracotta pot can become a colorful piece of handmade decor. The inspiration here centers on playful pastel colors, cute expressions, floral accents, scalloped edges, and charming patterns that make small plants feel even more inviting.
Whether you are refreshing a collection of old pots or starting with inexpensive terracotta planters, this project is easy to adapt to your own style. You can create soft pink, lavender, yellow, mint, or any other combination that complements your room. The goal is not perfection. It is to create flower pots that feel cheerful, personal, and fun to display.
Key Takeaways
- Transform simple terracotta pots with colorful paint and playful details.
- Pastel shades create a soft, cheerful look that works well with greenery.
- Simple faces, flowers, hearts, dots, and scalloped borders add personality.
- Use several coordinated pots to create a charming plant display.
- Seal finished designs before adding pebbles and plants.
- This project can be adapted for beginners, gifts, desks, shelves, and patios.
Why DIY Flower Pots Are So Much Fun
A plant pot does more than hold a plant. It can become part of the decoration around it. A colorful handmade planter can bring personality to a windowsill, brighten a work desk, or add a playful touch to a shelf. DIY flower pots also give you an opportunity to coordinate your planters with the colors already used in your home.
The designs shown in this style are especially appealing because they combine several easy decorating techniques without making the project feel complicated. A simple painted base creates the foundation, while a cute face, tiny flowers, dots, hearts, or a contrasting border adds character.
Important: The most successful painted flower pots do not need dozens of complicated details. Choose a simple color palette, repeat a few decorative shapes, and let the plant provide the natural texture and contrast.
Materials for Cute Painted Flower Pots
One of the best things about this craft is that you can keep the supply list relatively simple. Start with a clean terracotta flower pot and gather the paints and tools you need for your chosen design.
- Terracotta or plain ceramic flower pots
- Acrylic craft paint in your preferred colors
- Small and medium paintbrushes
- A fine detail brush for faces and small decorations
- Water and a container for cleaning brushes
- A palette or disposable surface for mixing paint
- Small decorative pebbles or stones
- A suitable plant or succulent
- Clear protective sealer suitable for your pot and paint
- Pencil or washable marker for lightly planning details
You do not need every color shown in a particular design. Two or three coordinated shades can be enough to create a polished result. For example, combine pink with white and a soft green, or pair lavender with cream and a sunny yellow accent.
Choose a Color Palette Before You Paint
Color is one of the easiest ways to make DIY flower pots look intentional rather than random. Pastel shades are particularly effective for cute planters because they create a light and friendly appearance without overwhelming the greenery.
Consider choosing one main color for each pot and then repeating a small accent color across the collection. Pink, lavender, yellow, mint, cream, and soft blue can work beautifully together. If you prefer a more understated look, use neutral pots with only a few colorful details.
Think about the plants you plan to use, too. Green leaves stand out beautifully against pink, purple, yellow, and white backgrounds. If your plant has distinctive stripes or strong leaf patterns, a simpler pot design can help the foliage remain the star.
How to Make DIY Flower Pots Step by Step
1. Clean the Pot
Begin with a clean, dry flower pot. Remove dust, loose soil, labels, or other residue from the surface. A smooth and clean starting point helps paint adhere more evenly.
If you are reusing an older pot, give it extra attention around the rim and drainage area. Let the pot dry completely before painting. Moisture or leftover debris can make the first coat uneven.
2. Paint the Base Coat
Apply your chosen base color with a suitable brush. A light coat is usually easier to control than applying a very thick layer at once. Allow the first coat to dry before deciding whether another coat is needed.
For a pastel look, several thin layers can create a smoother finish while keeping the color soft. Pay attention to the rim and outer surface, but keep the drainage opening clear.
3. Add a Cute Face
A simple face can instantly transform a plain planter into a character. Start with the eyes and then add a small mouth. A wink, closed eyes, rosy cheeks, or a tiny smile can create completely different personalities.
Use a fine brush or another appropriate detail tool for small features. If you want symmetrical eyes, lightly sketch their placement before painting. Do not worry about making every detail identical. Slight differences can make handmade pots feel more charming.
4. Paint Decorative Borders
Scalloped borders are an easy way to make a planter look finished. Paint a row of rounded shapes around the upper or lower section of the pot. You can make the border white for contrast or use another pastel shade for a softer effect.
Other simple border ideas include dots, tiny flowers, leaves, hearts, waves, or short lines. Choose one main decorative pattern instead of covering every available space.
5. Add Small Details
Once the major shapes are dry, add the small details that make the pot unique. Tiny flowers can be painted around the front, while dots and hearts can fill small areas without making the design feel crowded.
Try repeating the same small motif in different areas. For example, three tiny flowers around the lower half of a pot can create a balanced look. You can also use small dots to add texture to a painted border.
6. Let the Design Dry and Seal It
Give the paint enough time to dry before handling the pot extensively. Once the design is completely dry, apply an appropriate clear sealer if the product and intended use call for one. Follow the instructions on the specific sealer you choose.
Sealing can help protect decorative artwork from everyday handling and moisture, but painted pots should still be treated thoughtfully. Keep the drainage area functional and avoid trapping unnecessary water around the base of the plant.
7. Add Pebbles or Decorative Stones
A layer of small pebbles can provide a finished appearance around the top of the soil. Light-colored stones work especially well with pastel planters because they create a clean contrast between the pot, soil, and foliage.
Use decorative stones as a visual accent rather than relying on them as a substitute for appropriate drainage or plant care. The plant’s growing requirements should always guide how the pot is prepared.
8. Add Your Plant
The final step is adding a plant that suits the pot and its growing environment. Compact succulents and other small plants can create the same cheerful tabletop effect shown in this style of DIY project.
Choose a plant based on its light, watering, and space requirements rather than appearance alone. Once the plant is in place, adjust the soil and decorative stones as needed so the finished planter looks neat and balanced.
Expert Insight
A coordinated group of small flower pots often looks more visually interesting than a single highly decorated planter. Repeat colors or motifs across the collection while giving each pot its own expression.
- Repeat one accent color across several pots.
- Vary the faces or patterns to keep each planter unique.
- Use greenery as part of the overall color composition.
Cute DIY Flower Pot Design Ideas
Once you understand the basic process, there are countless ways to personalize your planters. You can keep the designs very simple or build a collection around a particular theme.
Pastel Character Pots
Give every planter a different facial expression. One can wink, another can smile with closed eyes, and another can have a surprised expression. Keep the pot colors coordinated so the collection feels connected.
Floral Painted Pots
Paint simple flowers around the body of the pot. Small five-petal blooms are easy to recognize and can be repeated in different sizes. Add a contrasting center to each flower for a playful handmade finish.
Scalloped Rim Designs
A scalloped border around the rim creates a soft decorative edge. White scallops on a pink or yellow pot create a bright, playful contrast, while tone-on-tone colors create a more subtle appearance.
Minimal Dot and Heart Pots
If detailed painting is not your favorite craft, use dots and small hearts instead. A few repeated shapes can make a pot look decorated without requiring advanced painting skills.
Tips for Cleaner Painted Pot Designs
Small improvements in preparation can make a noticeable difference. Before starting the decorative stage, make sure your base coat is completely dry. Working over soft or tacky paint can cause colors to mix unintentionally.
Use different brush sizes for different jobs. A broader brush is useful for the base coat, while a small brush gives you more control over faces, flowers, dots, and borders.
Pro Tip: Plan the largest decorative elements first and add tiny details afterward. This helps prevent the design from becoming crowded and makes it easier to maintain a clear visual focal point.
- Let each layer dry before adding another color.
- Use a light pencil guide for complicated shapes.
- Keep the drainage hole unobstructed.
- Repeat colors to make multiple pots look like a collection.
- Step back occasionally to check the overall balance of the design.
Where to Display Your Finished Flower Pots
Once your DIY flower pots are complete, look for areas where a small burst of color would make a difference. A sunny windowsill can provide a natural setting for a collection of cheerful planters, while a desk or shelf can benefit from one compact pot.
Grouping pots together is another easy decorating strategy. Place three different colors side by side, or arrange several planters at slightly different heights. The variation in foliage, color, and painted expressions can create a lively display.
For a cohesive look, coordinate the pots with nearby textiles, artwork, storage containers, or other decorative accessories. Pastel planters can work particularly well in bright, relaxed spaces where handmade accents feel at home.
DIY Flower Pots Make Thoughtful Handmade Gifts
A painted flower pot can also become a simple handmade gift. Choose a pot color based on the recipient’s style, add a personalized expression or pattern, and pair it with a suitable small plant.
You can make a matching set for friends, family members, teachers, coworkers, or anyone who enjoys plants and handmade crafts. Another option is to decorate several empty pots and let the recipient choose the plants they want to grow.
The handmade nature of the project is part of its appeal. Small variations in brushstrokes and details make each planter feel personal rather than mass-produced.
Simple Ways to Customize the Project
Do not feel limited to the exact colors or expressions of one design. The same painting method can create many different aesthetics. Try earthy neutrals for a natural look, brighter primary shades for a playful display, or muted pastels for a softer room.
You can also replace painted faces with simple botanical illustrations, geometric shapes, initials, tiny rainbows, abstract lines, or repeating patterns. If you prefer a more grown-up style, leave the face off and focus on an elegant border or minimal floral artwork.
The key is to choose details that are manageable with the tools you have. A successful DIY flower pot should be enjoyable to make, not stressful to perfect.
At a Glance
- Start with a clean, dry pot.
- Build the design with thin, even paint layers.
- Add simple faces, flowers, dots, or scalloped borders.
- Let everything dry fully before finishing the planter.
- Pair the finished pot with a plant that suits its growing conditions.
Conclusion: Create Flower Pots With Personality
DIY flower pots are an easy way to combine creativity, color, and greenery in one small project. A plain terracotta planter can become a cheerful character, a floral accent, or a colorful piece of handmade home decor with only a few basic supplies.
The most important part is to enjoy the process. Experiment with pastel colors, try different expressions, repeat favorite motifs, and create a collection that feels like your own. Even simple painted details can completely change the personality of a planter.
Final takeaway: Start simple, choose a small color palette, and let the greenery complement your artwork. With a little paint and imagination, everyday planters can become bright decorative pieces that make your space feel more personal.