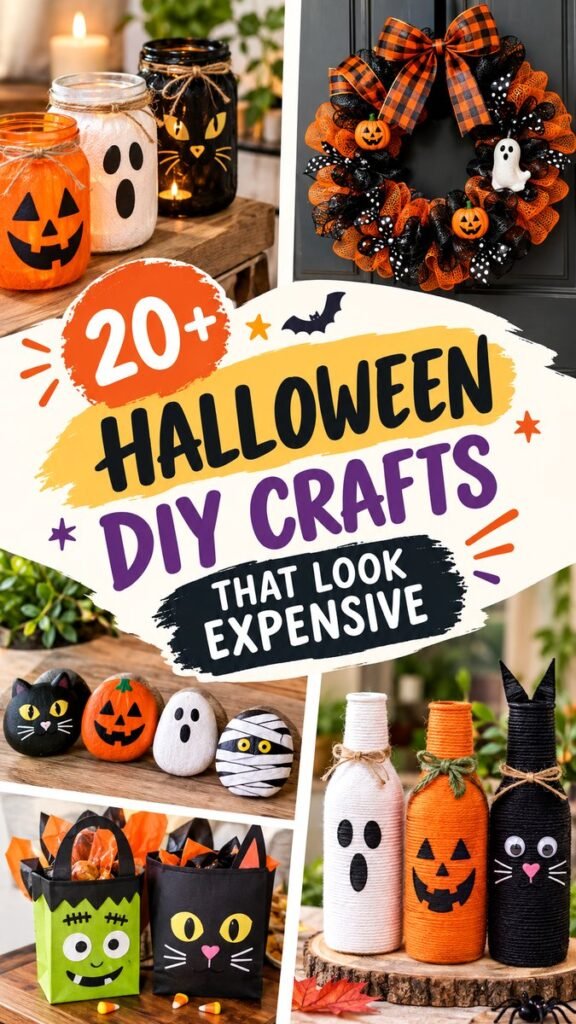
Halloween is the perfect time to get creative without spending a fortune, and DIY Halloween crafts make it easy to transform everyday materials into eye-catching seasonal decorations. From glowing character jars and playful painted stones to spooky wreaths, yarn-wrapped bottles, and festive treat bags, there are countless ways to bring a handmade Halloween atmosphere into your home.
The ideas featured here focus on simple visual projects that combine familiar Halloween colors, fun characters, and inexpensive craft materials. Orange, black, white, purple, green, yarn, paint, ribbon, jars, bottles, and recycled containers can all become part of a memorable display. Whether you are decorating a mantel, entryway, shelf, party table, or front door, these DIY Halloween crafts offer plenty of inspiration for creating a festive look with personality.
Key Takeaways
- Use simple household and craft supplies to create memorable Halloween decorations.
- Combine orange, black, white, green, and purple for an instantly recognizable Halloween palette.
- Repurpose jars and bottles as lanterns, characters, or decorative centerpieces.
- Painted rocks are an easy way to create pumpkins, ghosts, cats, and other spooky characters.
- Layer several small crafts together to make shelves, tables, and entryways feel more festive.
Easy DIY Halloween Crafts With Big Visual Impact
One of the best things about DIY Halloween crafts is that a project does not have to be complicated to look impressive. The strongest decorations often rely on a few recognizable shapes, contrasting colors, and carefully placed details. A plain glass jar can become a glowing ghost, a black cat, or a jack-o’-lantern with only a handful of decorative touches.
The same principle works with bottles, rocks, paper bags, wreath materials, and yarn. Instead of purchasing an entirely new collection of decorations, look around your craft supplies and home for objects that can be transformed. This approach keeps projects approachable while giving the finished display a coordinated handmade appearance.
Important: Choose a small color palette before starting several projects. Repeating the same orange, black, white, and green accents across different crafts helps separate decorations look like part of one intentional Halloween collection.
1. Create Halloween Character Jars
Glass jars are among the most versatile materials for Halloween decorating. Their simple shape provides a blank canvas for spooky faces, colorful finishes, and soft lighting. Orange jars can become pumpkins, white jars can resemble ghosts, and dark jars can be transformed into black cats.
For a simple character design, start with a clean jar and choose a face that can be created from paint, paper shapes, or adhesive craft materials. Keep the eyes and mouth bold enough to be visible from a distance. A little twine around the rim can add a rustic touch, while a small light inside can make the decoration glow.
For indoor displays, group three jars with different characters together. Vary their heights and colors rather than lining them up at exactly the same level. This creates a more natural arrangement and makes the display feel like a small Halloween scene.
Simple Jar Character Ideas
- Ghost jar: Use a light-colored finish with large oval eyes and a surprised mouth.
- Pumpkin jar: Choose orange and add a classic jack-o’-lantern face.
- Black cat jar: Add pointed ears, bright eyes, whiskers, and a small nose.
- Spooky lantern: Keep the design minimal and let the light provide most of the atmosphere.
2. Turn Bottles Into Spooky Decorations
Empty bottles can become surprisingly stylish Halloween decorations when wrapped in yarn or another textured material. The cylindrical shape is ideal for creating ghosts, pumpkins, cats, mummies, and other simple characters.
Begin with bottles that have relatively smooth surfaces. Wrap yarn tightly around the outside, keeping the rows as even as practical. Different colors can immediately suggest different characters. White works beautifully for ghost-inspired designs, orange creates a pumpkin effect, and black makes a dramatic cat or nighttime-themed decoration.
After covering the bottle, add a simple face. Small paper shapes, painted details, craft eyes, or other lightweight decorations can provide the finishing touch. A natural twine bow around the neck can make the finished piece feel more rustic and handmade.
Pro Tip: Texture can make inexpensive materials look much more decorative. Combining yarn, twine, ribbon, wood surfaces, and smooth glass creates contrast that helps simple Halloween crafts stand out.
Painted Halloween Rocks for Quick Seasonal Decor
Painted rocks are another approachable craft idea for Halloween. Their natural shapes make them easy to arrange as a small collection, and simple character faces can be surprisingly effective. You do not need complicated artwork to make them recognizable.
Look for smooth, reasonably flat stones and clean them before decorating. Once dry, apply a base color and allow it to dry before adding facial features. Orange stones can become pumpkins, white stones can become ghosts, black stones can become cats, and striped designs can create mummy-inspired characters.
The beauty of painted rocks is their flexibility. They can sit on a shelf, fill a decorative bowl, surround a centerpiece, or add small Halloween accents to a table. If you are making several, vary the expressions slightly so they feel like a playful group rather than identical pieces.
Easy Painted Rock Characters
- Choose the shape: Select stones that naturally suggest the character you want to make.
- Add the base: Paint the entire surface with a suitable Halloween color.
- Create the face: Use simple eyes, mouths, ears, whiskers, or stripes.
- Add small details: Tiny highlights can give the characters more personality.
- Arrange as a group: Display several different designs together for a stronger visual effect.
DIY Halloween Wreath Ideas
A Halloween wreath can instantly change the look of a front door or interior wall. The reference style of colorful mesh, ribbon, and character accents shows how a wreath can become the focal point of a seasonal display.
You can build a wreath around a simple base and layer different textures to create fullness. Black and orange materials provide a classic Halloween combination, while white accents can brighten the design. Ribbon with dots, stripes, checks, or other playful patterns can add visual interest without requiring complicated crafting techniques.
For a more cohesive look, repeat one or two character elements throughout the wreath. Small pumpkins, ghosts, bats, or cat-inspired details can be distributed around the design rather than concentrated in a single area. A large bow at the top can provide a clear finishing point.
Why This Matters
A coordinated craft collection looks more polished when repeated colors and textures appear across multiple decorations.
- Repeat two or three dominant colors.
- Mix smooth and textured materials.
- Use different sizes to create visual depth.
Halloween Treat Bags With Personality
Decorative treat bags are both practical and fun. Simple paper bags can be transformed into Halloween characters with colored paper, handles, craft eyes, and bold facial details. This makes them useful for Halloween parties, classroom treats, family gatherings, or a festive candy station.
A black bag can become a cat by adding pointed ears and bright eyes. A green bag can take inspiration from a classic monster character, while orange and black combinations create a traditional Halloween appearance.
Keep the design bold rather than overcrowded. A few large features are usually easier to recognize than many tiny decorations. If you are making multiple bags, creating several character styles can turn them into part of the overall party decor.
Make a Coordinated Halloween Craft Display
Once you have several finished projects, the way you arrange them can make just as much difference as the crafts themselves. Instead of spreading decorations randomly throughout a room, choose a small area and create a concentrated seasonal display.
A wooden shelf works particularly well because it provides different levels for jars, painted rocks, bottles, and other decorations. Place taller pieces toward the back and shorter pieces toward the front. Use a few natural elements, such as a wood surface or greenery, to keep the arrangement from feeling visually flat.
For a table, begin with one larger centerpiece and build outward with smaller decorations. A group of three character jars can work as a central feature, while painted rocks or miniature craft pieces fill the surrounding spaces.
How to Make DIY Halloween Crafts Look More Expensive
You do not need expensive supplies to achieve a polished Halloween look. The key is consistency. When colors, textures, and shapes work together, even very simple projects can appear thoughtfully designed.
Use a Limited Color Palette
Choose a few colors and repeat them throughout the collection. Orange and black provide the classic Halloween foundation, while white, green, or purple can be used as secondary accents. Repeating these colors across jars, wreaths, bottles, bags, and painted rocks creates visual unity.
Mix Textures
Texture adds depth without requiring expensive decoration. Smooth glass looks interesting beside rough wood. Soft yarn contrasts with shiny ribbon, while twine gives painted surfaces a rustic handmade character. Combining materials is one of the easiest ways to make a simple display feel layered.
Repeat Character Motifs
Choose a few recognizable Halloween motifs and repeat them. For example, pumpkins can appear on jars, rocks, bottles, and treat bags. Cats, ghosts, and bats can be used in the same way. Repetition makes separate DIY projects feel like one coordinated collection.
Pro Tip: Do not worry about making every craft identical. A collection often looks more interesting when each piece has its own personality while still sharing the same colors, materials, or character theme.
Budget-Friendly Materials to Keep on Hand
Many Halloween crafts can be made with materials that are easy to find or repurpose. Keeping a small craft box available makes spontaneous seasonal projects much easier.
- Glass jars and empty bottles
- Acrylic or craft paint
- Yarn and twine
- Ribbon and decorative mesh
- Colored paper and cardstock
- Craft glue and adhesive materials
- Smooth rocks and small natural wood pieces
- Paper bags for treat containers
Having these basics on hand gives you plenty of options when inspiration strikes. You can change the colors and character details to create completely different decorations from the same collection of supplies.
Tips for a Fun Halloween Craft Session
Crafting is more enjoyable when the workspace is organized before you begin. Gather your materials, protect the work surface, and decide which projects you want to complete first. If you are making multiple decorations, prepare the base materials together before moving on to detailed decorating.
For example, paint several rocks at once, wrap several bottles in yarn, or prepare multiple jar bases before adding faces. This assembly-line approach can make a larger collection feel much easier to manage.
Allow each layer to dry properly before adding another. Rushing paint, glue, or other finishes can make small details harder to control. Taking a little extra time during each stage can produce cleaner results.
At a Glance
- Start with simple reusable materials.
- Choose a consistent Halloween color palette.
- Create recognizable faces with bold, simple details.
- Combine different textures for a layered display.
- Group finished crafts together for maximum visual impact.
Bring Your Halloween Craft Ideas Together
The most appealing DIY Halloween crafts are not necessarily the most complicated ones. A jar, bottle, rock, paper bag, or wreath can become a memorable seasonal decoration when you combine a clear idea with a few well-chosen details.
Start with one project that catches your attention, then build a small collection around it. If you begin with painted pumpkin rocks, add a matching jar or yarn-wrapped bottle. If a Halloween wreath is your main decoration, repeat its colors and textures on nearby table or shelf pieces. This approach creates a cohesive look without requiring every decoration to match perfectly.
DIY Halloween decorating is also an opportunity to experiment. Try different facial expressions, combine unexpected textures, or adapt the same basic craft into several characters. The goal is not perfection. It is creating a festive atmosphere that feels personal, playful, and fun.
Conclusion
DIY Halloween crafts are a simple way to make seasonal decorating more creative, personal, and budget-friendly. With jars, bottles, rocks, yarn, ribbon, paper, paint, and a little imagination, ordinary materials can become pumpkins, ghosts, cats, colorful wreaths, treat bags, and other festive decorations.
Whether you are preparing for a Halloween party or simply want to add a few spooky touches around the house, focus on a consistent color palette, recognizable characters, varied textures, and thoughtful placement. A collection of small handmade projects can create just as much visual impact as a large store-bought display.
Choose your favorite idea, gather a few simple supplies, and start crafting. The best Halloween decorations are often the ones that reflect your own creativity and make your space feel ready for the season.