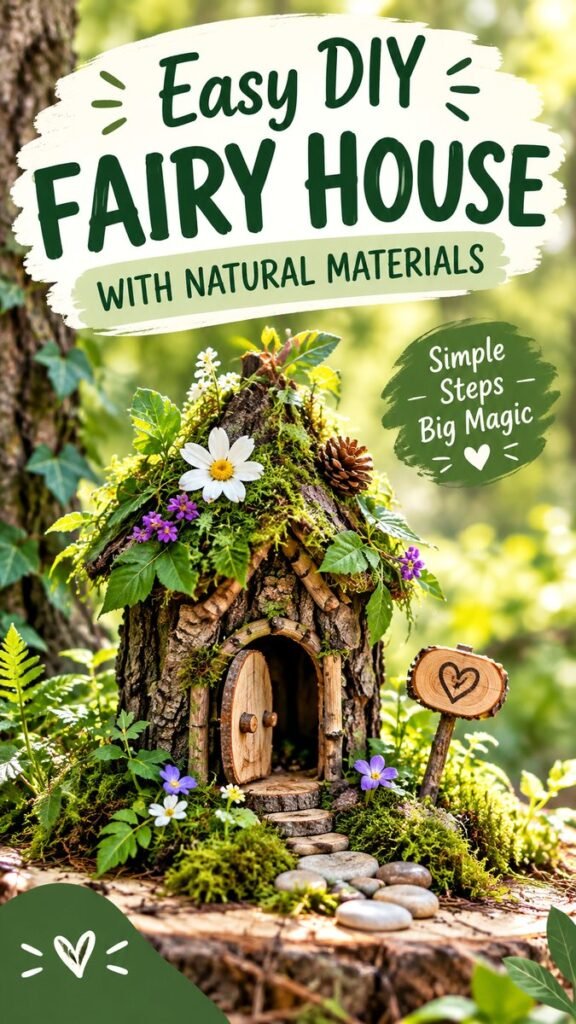
Creating a fairy house DIY with natural materials is a wonderful way to turn a small corner of the garden into a charming woodland hideaway. With bark, twigs, moss, stones, leaves, pinecones, and a few tiny flowers, you can build a miniature home that feels as though it belongs naturally among the trees. The beauty of this project is that it does not need expensive craft supplies or complicated tools. The most appealing details often come from simple materials gathered from nature.
A natural fairy house can become a creative weekend project for families, a whimsical addition to a fairy garden, or a peaceful decorative feature tucked beneath a tree. The design shown here highlights the appeal of a rustic bark structure, a tiny arched doorway, a stone pathway, greenery, and colorful flowers. The result feels handmade, cozy, and wonderfully connected to its woodland setting.
Key Takeaways
- Use bark, twigs, moss, stones, and other natural materials to create an earthy fairy house.
- Choose a sheltered outdoor location beneath a tree or among established plants.
- Build the structure around a simple doorway and add texture with layered bark and greenery.
- Create a tiny pathway with smooth pebbles to make the miniature scene feel complete.
- Use small flowers and leaves to soften the design and blend the house into its surroundings.
- Keep the finished display simple so the natural materials remain the main attraction.
Why Make a Fairy House With Natural Materials?
A fairy house made from natural materials has a special character that manufactured decorations often cannot reproduce. Every piece of bark has its own texture, every twig has a slightly different shape, and stones bring natural variation to the pathway and surrounding landscape. Instead of trying to make everything perfectly uniform, you can embrace those differences.
Natural materials also help a miniature house feel like part of the garden rather than an object simply placed on top of it. Moss can soften hard edges, leaves can frame a doorway, and small flowers can provide color without overwhelming the rustic structure. The finished project can look wonderfully organic even when the construction itself is quite simple.
The key to a convincing natural fairy house is not perfection. It is creating layers of texture, color, and small details that make the miniature space feel connected to its surroundings.
What Natural Materials Can You Use?
You do not need a long shopping list for this project. Start by looking at what is already available in your garden or in suitable natural surroundings. Fallen and responsibly collected materials can provide almost everything needed for the basic structure and decoration.
- Bark: Useful for walls, roofing, trim, and rustic textures.
- Small twigs: Ideal for framing doors, creating supports, or adding decorative details.
- Moss: Excellent for softening edges and giving the house a woodland appearance.
- Stones and pebbles: Perfect for paths, steps, borders, and miniature landscaping.
- Pinecones: Great for adding texture and natural visual interest around the house.
- Leaves: Useful as simple decorative accents or garden framing.
- Small flowers: Add gentle pops of color around the doorway and pathway.
- Small pieces of wood: Helpful for doors, steps, signs, and structural details.
When collecting materials, choose items that are clean, dry, and appropriate for your setting. Avoid damaging living trees or plants. Fallen branches, loose bark, and naturally dropped pinecones are often better choices than removing materials from healthy plants.
Choose the Perfect Location
The location can make as much difference as the house itself. The reference design works beautifully because the miniature structure sits directly against a tree trunk, surrounded by low greenery and flowers. This creates an instant woodland backdrop and gives the house a natural sense of place.
Look for a small sheltered area where the fairy house will be visible but still feel tucked away. The base of a mature tree can work well, as can a quiet corner beside shrubs, under a garden canopy, or among groundcover plants.
Consider the ground before you begin. A relatively stable surface makes it easier to position the house and create a pebble pathway. If the area becomes extremely wet, muddy, or exposed to strong weather, delicate materials may deteriorate more quickly.
Think About the Background
A good background helps a tiny structure stand out. Green foliage provides a beautiful contrast against dark bark, while flowers can add small points of color around the entrance. You do not need a completely empty area. In fact, surrounding plants can make the miniature scene look more believable.
Build the Basic Fairy House
Start with the main structure. The example features a compact bark-covered house with a rounded, rustic doorway. You can create a similar concept without reproducing the exact design. The goal is to form a stable miniature shelter with enough surface area to attach or arrange decorative natural elements.
- Choose a sturdy base. A small piece of wood, a naturally stable area of ground, or another suitable foundation can support the structure.
- Arrange the wall materials. Position pieces of bark or wood so they create a compact wall-like form.
- Create the doorway. Use curved twigs or small pieces of wood to outline a simple entrance.
- Add a roof. Layer bark, twigs, leaves, or other suitable natural materials to create a textured roofline.
- Fill visual gaps. Moss and small pieces of greenery can soften joins and make the structure look more cohesive.
- Secure unstable pieces. Where necessary, use an appropriate hidden craft adhesive or another safe method suitable for outdoor use.
Do not worry about making the walls perfectly straight. Slightly irregular edges are part of the charm. A rustic fairy house should look as though it grew out of the woodland environment rather than being manufactured to exact dimensions.
Make the Door the Focal Point
The doorway is one of the most important details because it gives the miniature house a sense of scale. A small wooden door can be made from thin pieces of wood arranged vertically or from one carefully shaped piece. Add a tiny twig handle if desired.
Frame the entrance with curved twigs, moss, leaves, or small stones. Even a simple doorway becomes much more interesting when surrounded by contrasting textures.
Create a Tiny Pebble Path
One of the most charming details in a natural fairy garden is a miniature pathway. The image features a winding arrangement of smooth stones leading toward the entrance, which gives the scene depth and creates a visual connection between the house and the surrounding garden.
Collect small stones in several shapes and sizes. Begin with larger pieces near the entrance and gradually use smaller stones as the path extends outward. You can make the path straight, gently curved, or irregular depending on the space available.
For a softer appearance, allow moss, soil, or low plants to remain visible between some of the stones. A perfectly uniform path can look less natural than one with slight gaps and variations.
Expert Insight
- Vary the size and texture of natural materials instead of making every element identical.
- Keep the largest visual detail near the house and use smaller accents as the scene moves outward.
- Repeat a few natural colors, such as green, brown, gray, and soft floral shades, for a cohesive look.
Add Moss, Leaves, and Flowers
Once the basic structure is complete, bring the miniature garden to life with natural greenery. Moss is particularly useful because it can cover rough transitions and make the house appear established within the landscape. Place it around the roof, doorway, foundation, or nearby stones.
Leaves can be arranged around the base to create a layered appearance. Try combining different leaf shapes rather than using only one type. The contrast between broad leaves, delicate stems, moss, and bark can make a small area feel surprisingly detailed.
Small flowers provide another easy way to add personality. White, yellow, pink, purple, and other gentle shades can work beautifully against earthy browns and greens. Instead of covering the entire scene with flowers, place a few around the pathway and doorway so they act as visual accents.
Use flowers as accents rather than the main feature. A few carefully positioned blooms can draw attention toward the doorway while keeping the rustic bark and natural textures visually dominant.
Simple Details That Make It Feel Special
Small details can transform a basic miniature house into a memorable garden feature. You do not need elaborate accessories. In fact, simple handmade additions often fit the natural aesthetic better.
- Create tiny steps from flat stones.
- Use a small piece of wood as a miniature sign.
- Arrange pinecones near the house as woodland accents.
- Make a simple twig fence around part of the garden.
- Add a tiny bench from short pieces of wood.
- Use leaves to create a natural border around the pathway.
- Place a few small stones beside the entrance as decorative stepping stones.
Keep the details proportional to the house. Too many large decorations can make the scene feel crowded. The most attractive fairy garden displays usually have a clear focal point surrounded by smaller supporting elements.
Ideas for Kids and Family Crafting
A fairy house DIY can also become a creative nature project for children. Kids can help collect appropriate fallen materials, sort stones by size, arrange flowers, and design the pathway. Adults can handle any cutting, drilling, hot glue, or other tools that may be unsuitable for children.
Rather than giving everyone a fixed design to follow, let children choose their own materials and decide how the miniature garden should look. One child might prefer a flower-filled cottage, while another may create a simple woodland shelter covered in moss and twigs.
The activity can encourage observation of natural textures, shapes, and colors while turning an ordinary outdoor space into something imaginative. It can also be repeated seasonally, with small changes to the surrounding plants and decorations.
How to Keep the Natural Look
The biggest design challenge is knowing when to stop. Because natural materials already provide so much texture, you rarely need a large number of decorative additions.
Choose a limited color palette inspired by the surroundings. Browns from bark and wood, greens from moss and foliage, gray or beige stones, and a few soft flower colors create a calm woodland appearance.
It is also helpful to vary texture rather than adding more objects. Rough bark beside smooth pebbles creates contrast. Soft moss beside woody twigs adds another layer. Delicate flowers against larger leaves create a natural sense of scale.
Outdoor Care and Seasonal Refreshes
Natural fairy houses are designed to weather, and that is part of their appeal. Bark may darken, leaves may change, moss may shift, and flowers will naturally come and go. Instead of expecting the display to remain exactly the same, treat it as a living seasonal craft.
Check the structure occasionally after heavy rain or strong winds. Reposition loose stones, replace fallen twigs, and remove materials that have become damaged or unsuitable. If a decorative element becomes unstable, it is usually easy to rebuild or rearrange it.
Seasonal changes can also inspire new designs. Fresh greenery and flowers can create a spring-inspired scene, while fallen leaves and pinecones can give the same house a cozy autumn appearance. Small changes can make the project feel new without rebuilding everything.
Common Mistakes to Avoid
A natural fairy house does not need to be complicated, but a few simple choices can make the finished display more durable and visually appealing.
- Overcrowding the scene: Leave enough open space around the house so the main structure remains easy to see.
- Using too many colors: A restrained natural palette usually creates a more cohesive woodland effect.
- Making everything perfectly symmetrical: Organic shapes and uneven arrangements often look more natural.
- Ignoring scale: Keep pathways, flowers, doors, and decorative objects appropriately sized for the miniature structure.
- Choosing an exposed location: A sheltered spot can help delicate natural details last longer.
A Simple Step-by-Step Weekend Project
If you want to turn the idea into a manageable weekend activity, divide the project into stages. On the first day, gather and sort the materials. Separate bark, twigs, stones, moss, pinecones, and decorative greenery into small groups.
Next, decide where the house will sit and sketch a rough arrangement using stones or twigs before attaching anything. Build the main structure first, then add the doorway and roof. Once the foundation looks right, move on to the pathway and landscaping.
Finish by adding the smallest details. A few flowers near the entrance, a tiny sign, or a handful of carefully positioned stones can provide the final touch without making the scene overly busy.
Pro Tip: Take a step back several times while decorating. Looking at the fairy house from a short distance makes it easier to see whether the doorway, pathway, greenery, and decorative accents feel balanced.
At a Glance
- Gather natural materials such as bark, twigs, moss, stones, and flowers.
- Choose a sheltered woodland-style location.
- Build around a simple, welcoming doorway.
- Add a winding pebble path and layered greenery.
- Finish with a few small handmade details.
Conclusion: Create Your Own Woodland Fairy House
A fairy house DIY made with natural materials is a simple project with plenty of room for creativity. Bark, twigs, moss, stones, pinecones, leaves, and flowers can become the foundation for a miniature woodland scene that feels personal and wonderfully handmade.
The most important part is not following a perfect blueprint. Start with a small structure, create a welcoming doorway, build a simple pathway, and then let the surrounding natural materials guide the rest of the design. Irregular bark, uneven stones, and changing plants can give the finished fairy house more character than perfectly matched craft supplies ever could.
Whether you build one beneath a tree, in a dedicated fairy garden, or in a quiet corner of your outdoor space, this project is an inviting way to combine crafting with nature. Keep the design simple, work with the textures you find, and allow the miniature landscape to evolve over time.
Once your first fairy house is finished, you may find yourself imagining tiny pathways, garden borders, woodland doors, and other miniature features to add around it. That is the real charm of this kind of project: a few natural materials can turn an ordinary garden corner into a small world filled with creativity and character.
Tags
Fairy House DIY Natural Materials DIY Fairy Garden Woodland Crafts Nature Crafts Rustic Garden Decor Miniature Garden Outdoor DIY