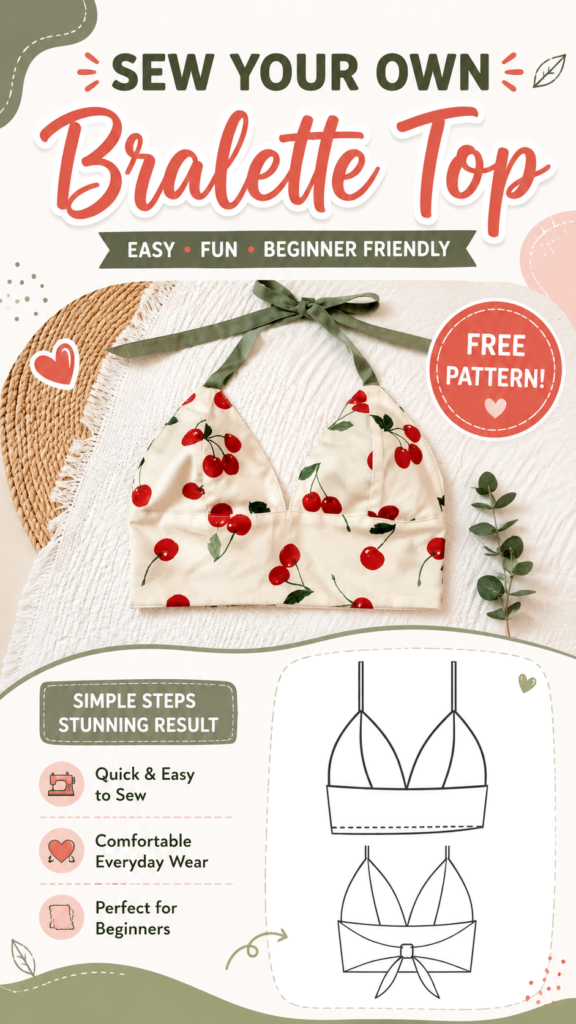
Making your own clothes can be much easier than it looks, especially when you start with a simple project designed around a few basic shapes. A DIY bralette top is a great example of how a small amount of fabric and straightforward sewing techniques can become a stylish handmade wardrobe piece. With a beginner-friendly pattern, you can practice sewing curved seams, attaching straps, creating a neat band, and working with printed fabric while making something you can actually wear.
Key Takeaways
- A simple bralette is an approachable project for beginner sewists.
- Basic pattern pieces can create a polished and wearable result.
- Printed cotton or similar lightweight fabrics can add personality to handmade clothing.
- Careful measuring and pressing can make a major difference in the final fit.
- Simple design changes can turn one pattern into several different styles.
Why a DIY Bralette Top Is a Great Sewing Project
A bralette top combines several useful sewing skills without requiring an overly complicated construction. The design shown features triangular cups, a horizontal lower band, and narrow shoulder straps. These elements make the finished garment look refined while keeping the overall shape relatively simple.
For someone exploring easy DIY clothes, this type of project offers a satisfying balance between creativity and practicality. You can experiment with fabric prints, strap details, proportions, and finishing touches while learning techniques that can later be applied to dresses, camisoles, tops, and other handmade garments.
Important: The biggest advantage of starting with a simple garment is that you can concentrate on accurate construction rather than becoming overwhelmed by too many complicated pattern pieces. Good measuring, careful cutting, and neat pressing often matter more than having advanced sewing experience.
Understanding the Bralette Top Design
The visual design centers on a soft, feminine bralette silhouette with two shaped cups and a structured lower section. The triangular cup shapes create the recognizable bralette appearance, while the straight band underneath provides definition and helps the garment maintain its form.
The narrow straps extend upward from the cups and can be tied or adjusted depending on the construction. A simple fabric tie also creates an opportunity to add a decorative detail without making the sewing process significantly more complicated.
The Triangle Cups
The cups are one of the most visually important parts of the project. Their curved outer edges and central meeting point create the shape of the top. Because the cup seams are visible, accurate cutting and stitching are particularly important here.
When working around curves, sew slowly and avoid pulling the fabric as it passes beneath the presser foot. A steady seam allowance helps the two sides remain balanced and makes later pressing much easier.
The Lower Band
The lower band gives the top a clean finished appearance and creates a visual break between the cups and the rest of the garment. In the example, the band is relatively wide and rectangular, which contrasts nicely with the softer triangular cup shapes.
A well-pressed lower band can make a handmade garment look considerably more professional. Take the time to press seams as you work instead of waiting until the entire garment is finished.
The Straps
Straps can be both functional and decorative. A narrow fabric strap gives the design a delicate appearance, while a longer tie can create an attractive bow at the back or shoulder area.
If you are making your first version, focus on creating straps with consistent width and neatly finished edges. Even small details such as evenly pressed straps can have a noticeable effect on the final result.
Choosing Fabric for an Easy DIY Clothes Project
Fabric choice can completely change the personality of a handmade bralette. The pictured version uses a light background with a cheerful cherry print, giving the garment a playful vintage-inspired feel. A similar silhouette could look completely different in a solid neutral, tiny floral print, stripes, gingham, or another small-scale pattern.
For a beginner sewing project, consider a fabric that is manageable under a sewing machine and comfortable against the skin. Lightweight woven fabrics can be a useful starting point for a structured bralette design, although the exact fabric requirements depend on the particular pattern and desired result.
- Small prints: Great for a playful handmade look and generally easy to position.
- Solid colors: Ideal when you want the shape and construction to be the main focus.
- Floral patterns: Add a soft, romantic appearance.
- Gingham or checks: Create a classic casual aesthetic.
- Lightweight fabrics: Can make the finished garment feel comfortable and easy to wear.
Before cutting your final fabric, always consider how the pattern will interact with the print. If the fabric has a directional design, you may need to pay closer attention to how each pattern piece is positioned.
How to Prepare for Sewing a Bralette Top
Preparation is one of the easiest ways to make a sewing project feel less stressful. Before turning on your machine, gather your fabric, pattern pieces, measuring tools, scissors or a rotary cutter, sewing thread, pins or clips, and an iron.
Start With Accurate Measurements
Do not choose a pattern size based only on your usual ready-to-wear clothing size. Sewing patterns can use different sizing systems, so compare your measurements with the pattern’s measurement guide whenever one is provided.
For a fitted top, measurements around the relevant areas are especially important. If you are between sizes, consider the intended ease and construction of the specific pattern rather than automatically choosing a smaller size.
Prepare the Pattern Pieces
The simple line drawings shown with this type of project demonstrate how the same basic bralette structure can be adapted into different looks. One version can remain minimal and clean, while another can include a wider decorative bow or additional shaping.
Keep your pattern pieces organized and clearly labeled. If you are making modifications, write them directly on a copy of the pattern so you can remember what you changed when making another version.
Pre-Treat Your Fabric
If the fabric is washable, pre-treating it before cutting can help reduce the chance of unexpected shrinkage later. Follow the care recommendations appropriate for the fabric you selected.
Once the fabric is ready, place it on a flat surface and smooth out wrinkles. Accurate cutting starts with fabric that is properly prepared and positioned.
A Simple Sewing Workflow for Beginners
The exact construction order should always follow the instructions supplied with your chosen pattern. However, the overall process for a simple bralette can be approached as a series of manageable stages.
- Measure yourself and select the appropriate pattern size.
- Prepare and press the fabric before cutting.
- Transfer or cut the required pattern pieces carefully.
- Mark important center points and matching areas.
- Assemble the cup sections according to the pattern instructions.
- Press the seams carefully as you work.
- Attach the cups to the lower band.
- Prepare and attach the shoulder or tie straps.
- Finish the remaining raw edges according to the pattern instructions.
- Check the completed garment and make any appropriate fit adjustments.
Pro Tip: Pressing is not just a final finishing step. Press each completed seam before moving to the next construction stage. This small habit helps seams sit flatter and makes later assembly more accurate.
Getting Cleaner, More Professional Results
Beginner sewing projects often look much better when you slow down during the small details. You do not need an expensive machine or a large collection of specialty tools to improve your results. Consistency is often the real secret.
Keep Your Seam Allowances Consistent
A consistent seam allowance helps pattern pieces fit together as intended. Use the markings on your sewing machine or an appropriate guide to maintain an even distance from the fabric edge.
Clip or Ease Curved Areas Carefully
Curved seams can be more challenging than straight seams because the fabric has to turn naturally. Depending on the pattern and seam construction, small clips or careful easing can help the curve lie smoothly.
Test Before Making Your Final Version
If you are uncertain about sizing or construction, consider making a test version using inexpensive fabric first. This gives you an opportunity to understand the construction sequence and identify potential fit changes before using your favorite material.
Expert Insight
- Accurate measuring is more valuable than rushing into cutting.
- Pressing between construction steps creates cleaner-looking seams.
- A test version can reveal fit or construction issues before you use your preferred fabric.
Make the Pattern Your Own
One of the most enjoyable aspects of easy DIY clothes is the ability to personalize a basic design. Once you understand the structure of the bralette, you can begin thinking about how fabric and finishing details can change the overall appearance.
Experiment With Prints
A cherry print gives the example a fun and recognizable personality, but you can create an entirely different mood with your fabric selection. Soft florals can feel romantic, geometric prints can look modern, and neutral fabrics can produce a minimalist wardrobe staple.
Try Different Strap Details
Straps can be made visually prominent or kept subtle. A tie detail can become part of the design rather than simply serving a practical purpose. You can also explore different widths or fabric combinations if the pattern construction allows for them.
Add Your Own Finishing Touches
Small details can transform a basic handmade top. Neat topstitching, carefully matched prints, contrasting fabric, or a decorative bow can give the finished piece a more personalized appearance.
When experimenting, change one feature at a time. This makes it easier to understand how each design decision affects the finished garment and helps you develop your own sewing style.
Common Beginner Sewing Mistakes to Avoid
Even simple projects can become frustrating when a few basic preparation steps are skipped. The good news is that most beginner mistakes are easy to prevent.
- Skipping measurements: Always compare your measurements with the pattern information.
- Cutting without checking the fabric: Make sure the fabric is flat and properly aligned.
- Ignoring the seam allowance: Small differences can affect how pieces fit together.
- Rushing curves: Sew slowly around shaped seams for better control.
- Skipping pressing: Pressing helps the garment look more polished.
- Making too many changes at once: Test modifications gradually so you know what works.
Ways to Build Your DIY Wardrobe
Once you finish a simple bralette top, you can use the experience as a foundation for future handmade clothes. The skills learned from one project can carry over into many other garments.
Learning to work with pattern pieces, curved seams, straps, bands, fabric grain, and finishing techniques gives you a stronger foundation for future sewing projects. You may eventually feel comfortable experimenting with camisoles, skirts, simple dresses, crop tops, and other beginner-friendly garments.
The key is to choose projects that challenge you slightly without making the construction unnecessarily complicated. A series of manageable projects can help you build confidence much faster than jumping straight into an advanced garment.
At a Glance
- Choose a fabric that suits your sewing experience.
- Measure carefully before selecting your size.
- Press seams throughout the sewing process.
- Use a test version when you are unsure about fit.
- Personalize the finished top with fabric and strap details.
Conclusion: Start With One Simple Handmade Top
A DIY bralette top is a wonderful way to make easy DIY clothes feel achievable. Its combination of shaped cups, a simple lower band, and delicate straps creates a stylish result while giving beginners the opportunity to practice several useful sewing techniques.
The most important part is not achieving perfection on the first attempt. Sewing is a skill that improves through repetition. Take your measurements, prepare your fabric, follow the pattern carefully, press as you go, and give yourself permission to learn from every seam.
Whether you choose a playful cherry print like the inspiration shown here or select a completely different fabric, a handmade bralette can become a rewarding project and a stepping stone toward a more creative DIY wardrobe. Start with a manageable design, focus on accuracy, and enjoy the process of turning fabric into something uniquely yours.