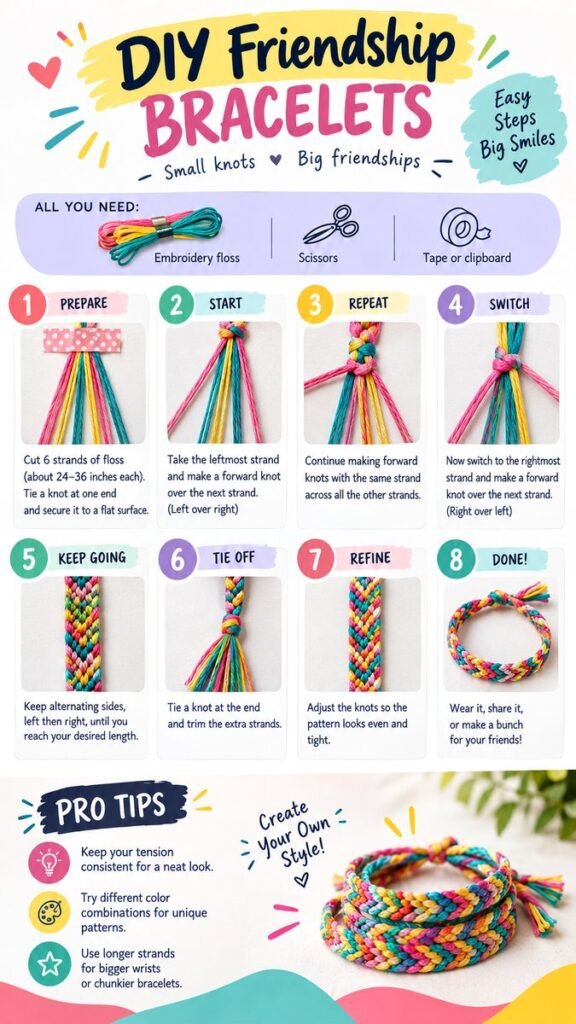
Making your own friendship bracelets is a simple, colorful craft that turns a few strands of embroidery floss into something personal and fun. The bright patterns, repeating knots, and mix of cheerful colors make these bracelets especially appealing for beginners, creative kids, teens, and anyone who enjoys handmade projects. With a few basic supplies and a little patience, you can learn the foundation behind many diy friendship bracelets patterns and start creating designs of your own.
Key Takeaways
- Start with embroidery floss, scissors, and tape or a clipboard.
- Use several strands in contrasting colors to make the pattern easy to see.
- Consistent knot tension helps create neat, even rows.
- Keep the strand order organized throughout the bracelet.
- Leave enough extra floss for finishing and tying the bracelet.
- Experiment with color combinations once you understand the basic technique.
The visual guide focuses on a straightforward forward-knot technique and breaks the process into manageable stages. That makes it a useful starting point if traditional friendship bracelets seem complicated. Instead of trying to memorize an entire pattern at once, you can concentrate on one small action at a time, repeat it, and watch the design gradually appear.
What You Need to Make Friendship Bracelets
One of the best things about this craft is how few supplies are required. You do not need a large collection of specialist tools to get started. A small workspace, some colorful embroidery floss, and a way to hold the strands steady are enough for a basic bracelet.
- Embroidery floss: Choose several colors that work well together. Bright combinations can create playful patterns, while softer shades give the bracelet a more subtle appearance.
- Scissors: A sharp pair makes it easier to cut clean lengths and trim the finished ends.
- Tape or a clipboard: This keeps the top of the bracelet secure while you work through each row.
- A flat work surface: A clear table or desk gives you enough room to separate the strands and maintain their order.
For a beginner project, longer strands are easier to handle than strands that are barely long enough. The visual instructions suggest cutting several strands at a generous length so there is enough material for the knots, bracelet body, and finishing ends.
Pro Tip: Cut your strands longer than you think you need. Extra floss is much easier to trim at the end than a bracelet that cannot be completed because the strands are too short.
How to Start a DIY Friendship Bracelet
The beginning of a bracelet determines how comfortable the rest of the process will feel. Before making your first knot, prepare the strands carefully and secure them in a position where they will not slide around.
1. Prepare the Strands
Begin by cutting your embroidery floss into equal lengths. The illustrated example uses multiple strands in different colors, giving the finished bracelet a bright, woven appearance. Tie the strands together at one end, leaving enough loose length below the knot to create the bracelet.
Try to keep the strands approximately the same length. Uneven starting lengths can make the project more difficult to manage later, particularly when you reach the finishing stage.
2. Secure the Bracelet
Place the tied end on a flat surface and hold it in place with tape. A clipboard can also work well because it allows you to move the project without losing your strand arrangement.
The important goal is stability. Your strands should be able to hang downward while the tied section remains fixed. When the top moves around during knotting, maintaining even tension becomes much harder.
3. Arrange the Colors
Separate the strands so each one is easy to identify. The order you choose affects the final pattern, so take a moment to arrange the colors before beginning the first row.
This is also where you can start thinking creatively. Pair contrasting colors for a bold design, group similar shades for a softer effect, or use a rainbow-inspired arrangement for a cheerful bracelet.
Why This Matters
The strand order is part of the pattern. Keeping the colors organized from the beginning makes each row easier to follow and helps prevent accidental changes that can alter the finished design.
Learning the Basic Forward Knot
The central technique shown in the guide is a forward knot. Once you understand the motion, you can repeat it across a row and gradually build the bracelet.
Start with the strand on the left. Cross it over the neighboring strand to form the beginning of the knot. Pull the working strand through the opening and gently tighten it. The goal is to create a secure knot without pulling so hard that the bracelet becomes distorted.
Continue using the same working strand across the remaining strands in the row. As it moves from left to right, the strand gradually changes position. This repeated movement creates the foundation for the diagonal and chevron-style textures commonly seen in friendship bracelets.
Keep Your Tension Consistent
Tension is one of the most important details for a neat bracelet. If some knots are extremely tight while others are loose, the rows may look uneven. You do not need to pull forcefully. Instead, aim for a steady, comfortable motion every time you make a knot.
Important: Consistent tension is more useful than tight tension. A neat friendship bracelet comes from repeating the same controlled movement, not from pulling each knot as hard as possible.
Building the Pattern Row by Row
Once the first row is complete, the process becomes a rhythm. Rather than worrying about the entire bracelet, focus on completing one row at a time.
Repeat the Knotting Sequence
After the first working strand has moved across the other strands, begin the next row with the new leftmost strand. Repeat the forward-knot motion across the row. Keeping the same basic sequence helps create a consistent pattern.
As more rows are completed, the colorful knots begin to form recognizable shapes. This is often the most satisfying part of the project because the bracelet changes from loose strands into a structured woven design.
Switch Sides When Needed
Many beginner friendship bracelet patterns become more interesting when the direction or working strand changes. The illustrated process demonstrates moving through the strands and alternating the working position. Paying attention to which strand is active prevents the pattern from becoming confused.
If you lose your place, stop before making another knot. Look at the strand order and identify which strand should be working next. Taking a few seconds to check is usually easier than trying to correct several misplaced knots later.
How to Create Clean and Colorful Patterns
The beauty of DIY friendship bracelets is that the same basic technique can produce many different visual results. Color selection has a major effect on how clearly the pattern appears.
Try Contrasting Colors
Colors that look different from one another make individual knots and rows easier to see. Combinations such as pink and teal, yellow and purple, or several bright rainbow shades can create a lively appearance.
Use Similar Shades for a Softer Look
You can also work with colors that sit close together visually. Different shades of blue, green, pink, or purple can create a more coordinated bracelet. This approach is especially useful when you want a handmade accessory that feels subtle rather than highly contrasted.
Experiment After Learning the Basics
Once you are comfortable with the basic knot, start changing the strand order and color combinations. Small adjustments can create noticeably different patterns without requiring an entirely new set of skills.
Keep notes or take photos of combinations you particularly like. This gives you a personal reference collection of diy friendship bracelets patterns to revisit whenever you want a new project.
Common Friendship Bracelet Mistakes to Avoid
Beginners often encounter the same few problems. Fortunately, most are easy to prevent with a little preparation.
Uneven Tension
Knots that vary greatly in tightness can make the bracelet look bumpy or inconsistent. Practice making each knot with a similar amount of pressure. If a row looks uneven, slow down rather than trying to compensate by pulling harder.
Wrong Knot Direction
Changing the knot direction accidentally can affect the appearance of the pattern. Pay attention to the movement demonstrated in your chosen pattern and repeat it consistently.
Mixed-Up Strands
Colorful strands can become tangled quickly. Separate them with your fingers before beginning each row, and keep them in their intended order whenever possible.
Strands That Are Too Short
Running out of floss before the bracelet reaches the desired length is frustrating. Starting with generous strand lengths gives you more flexibility and makes the finishing process easier.
Loose Finishing Knots
The bracelet is not finished when the woven section reaches the right length. Secure the ends carefully and trim excess floss only after the final knots are stable. A little extra attention at this stage helps the bracelet hold together during regular use.
Finishing Your Handmade Bracelet
When the woven portion reaches the desired length, tie a secure knot at the end. Leave enough loose floss to make the bracelet comfortable to fasten. You can then trim the excess strands or braid them into simple ties.
Take a moment to inspect the finished bracelet. Look for loose knots, uneven areas, or strands that need trimming. Small adjustments can make a handmade bracelet look much more polished.
The final result can be worn as a colorful accessory, exchanged with a friend, or used as inspiration for another bracelet. Making several bracelets with different palettes is also a fun way to practice while building a collection of personalized designs.
Creative Ways to Personalize Friendship Bracelets
Once the basic technique feels comfortable, personalization becomes the most enjoyable part. The bracelet does not have to follow one fixed color scheme or pattern.
- Choose colors inspired by a favorite season.
- Create a bright rainbow combination.
- Use two or three colors for a coordinated look.
- Make matching bracelets for friends.
- Try different strand orders to explore new visual effects.
- Make bracelets in different lengths for different wrist sizes.
- Combine simple patterns with more detailed designs as your skills improve.
These small choices turn a basic craft into something that feels personal. The process also encourages experimentation because there is no single color combination that everyone has to follow.
At a Glance
- Supplies: Embroidery floss, scissors, and tape or a clipboard.
- Foundation: Secure the strands and arrange the colors before knotting.
- Technique: Practice controlled forward knots across each row.
- Best result: Keep strand order organized and tension consistent.
- Finish: Secure the ends, trim excess floss, and check the bracelet before wearing it.
Conclusion: Keep Practicing Your Friendship Bracelet Patterns
DIY friendship bracelets are a great example of how a simple technique can lead to endless creative possibilities. With embroidery floss, a few basic tools, and a little patience, you can create colorful handmade accessories while learning how knots, color order, and repetition work together.
The key is not to rush. Start with a simple pattern, keep your strands organized, and focus on making each knot with consistent tension. As your confidence grows, experiment with new color combinations and strand arrangements. Every bracelet you make gives you another opportunity to improve your technique.
Whether you are making one bracelet for yourself, creating matching pieces for friends, or building a collection of colorful handmade designs, the process is just as rewarding as the finished result. Pick your favorite colors, secure your strands, and start knotting one row at a time. Your next favorite bracelet pattern could be one you create yourself.