Creating your own furniture doesn’t have to be complicated or expensive. With a few pieces of lumber, basic tools, and a little patience, you can build a practical piece that adds character to your home. This DIY bench project offers an approachable way to explore woodworking while creating a versatile wooden bench suitable for entryways, bedrooms, patios, and other spaces.
Featuring a simple 2×4 construction, a warm natural wood appearance, and a compact design, this bench is an excellent inspiration for beginners and experienced DIY enthusiasts alike. The straightforward structure makes it easier to understand how the seat, legs, and support pieces work together, while the natural finish allows the wood grain to become part of the decoration.
Whether you’re searching for easy woodworking projects, affordable DIY furniture, or a weekend building idea, these DIY bench plans can help you plan a project that combines function and style. Let’s explore the materials, construction approach, design details, and customization ideas that can help you create your own wooden bench.
Key Takeaways
- A simple DIY bench can be an approachable woodworking project for beginners.
- 2×4 lumber offers a practical starting point for building affordable furniture.
- The featured design uses a compact seat, sturdy legs, and lower support.
- Accurate measuring, sanding, and secure assembly are important for a quality result.
- Wood stain, paint, and decorative choices can personalize the finished bench.
- A small wooden bench can work in several areas around your home.
DIY Bench Design: Simple, Practical, and Stylish
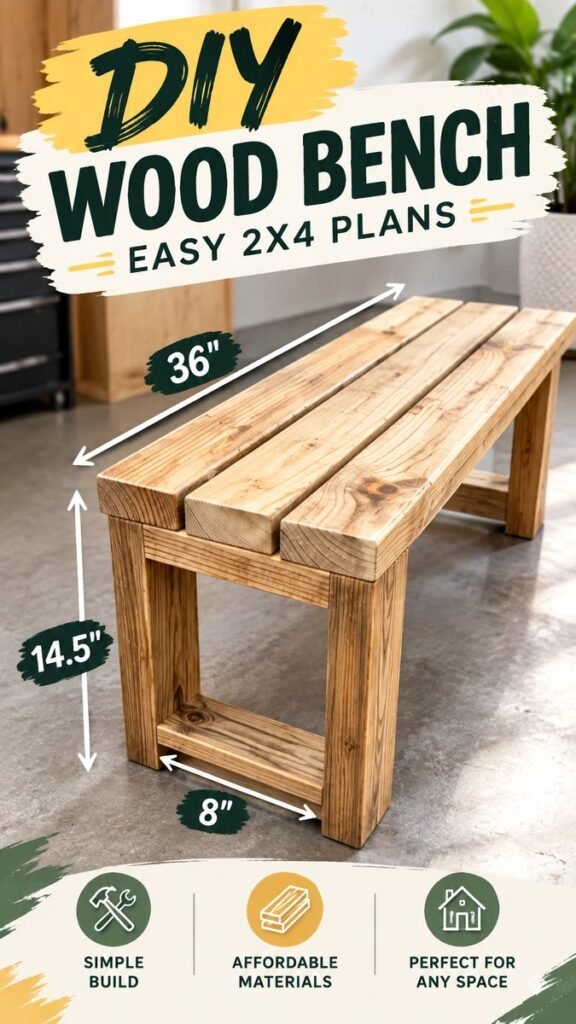
The featured wooden bench has a clean, functional shape built around three main elements: a plank-style seat, four supporting legs, and horizontal braces that help connect the structure. Its uncomplicated appearance is part of its appeal. Instead of relying on decorative details or complicated curves, the design allows the natural character of the wood to take center stage.
The seat consists of several wooden boards positioned side by side. Small gaps between the boards add visual definition while giving the top a classic plank-style appearance. The legs extend vertically beneath the seat, creating an elevated sitting surface, and the lower support structure adds another practical design element.
The bench shown in the reference uses measurements of approximately 36 inches for the seat length, 14.5 inches for the overall height, and 8 inches for the lower opening or support span indicated in the graphic. These measurements should be treated as design references rather than a complete, verified cutting plan. Actual dimensions depend on the lumber, joinery, and intended use.
Important: Before cutting wood, confirm every dimension and account for the actual thickness and width of your lumber. A visual reference can help guide your design, but a reliable build requires a complete measurement plan.
Why Choose a 2×4 Wood Bench?
2×4 lumber is a popular choice for DIY furniture because it is widely used in woodworking and construction projects. It provides a convenient starting point for simple builds and can be adapted to different sizes, finishes, and styles. Although the name suggests dimensions of two inches by four inches, actual finished lumber measurements are smaller, so accurate measuring is essential.
A 2×4 bench can be particularly appealing when you want to practice basic woodworking skills without committing to an elaborate project. The design can help you learn how to measure, cut, sand, position boards, and assemble a simple structure.
- Accessible materials: Standard construction lumber can be suitable for many DIY projects.
- Simple design: Straight boards make the overall concept easy to understand.
- Flexible appearance: The finished piece can be stained, painted, or left with a natural look.
- Customizable dimensions: The length and height can be adapted for different spaces and purposes.
Remember that the best lumber choice depends on the intended location, expected load, moisture exposure, and overall construction quality. Select straight boards with suitable condition and avoid damaged material when building furniture.
Materials and Tools for Your DIY Bench
Before starting your woodworking project, organize your materials and tools. Having everything ready can make the building process more efficient and reduce interruptions once you begin measuring and assembling the bench.
Materials Checklist
The exact amount of lumber depends on your final dimensions and cutting layout. For a compact 2×4 bench inspired by this design, consider the following materials:
- Suitable 2×4 lumber for the seat, legs, and support pieces.
- Wood screws or another appropriate fastening system.
- Wood glue, if compatible with your joinery and intended use.
- Sandpaper in several grits for smoothing the surfaces.
- Wood stain, paint, or a suitable protective finish.
- Optional wood filler for small imperfections and screw holes.
Choose a finish based on whether the bench will remain indoors or be placed in a covered outdoor area. Indoor furniture and outdoor furniture can have different finishing requirements, particularly when exposed to moisture or changing temperatures.
Essential Tools
A basic woodworking setup may include a measuring tape, pencil, square, saw, drill, drill bits, clamps, and sanding equipment. The exact tools required depend on your chosen cutting method and assembly technique.
- Use a measuring tape to establish the required dimensions.
- Mark cutting lines with a pencil and square.
- Use a suitable saw to cut the boards accurately.
- Drill pilot holes where appropriate to help reduce splitting.
- Use clamps to hold pieces in position during assembly.
- Sand the surfaces and edges before applying the finish.
Always follow the safety instructions for your tools. Wear suitable eye protection, keep your work area organized, and use proper support when cutting or drilling lumber.
How to Build a Simple DIY Wooden Bench
Building a DIY bench becomes easier when you divide the project into manageable stages. Rather than attempting to assemble everything at once, focus on preparing the wood, constructing the seat, assembling the base, and checking the final stability.
Step 1: Plan Your Dimensions
Start by deciding how long, tall, and deep you want your bench to be. The featured design provides a compact visual example, but your own measurements should reflect the space where the bench will be used.
Consider whether the bench is intended for occasional sitting, decorative use, an entryway, or another purpose. The expected use influences the required strength, seat height, leg placement, and fastening choices.
Draw a simple sketch showing the seat boards, legs, braces, and approximate dimensions. Include the thickness of each board so you can calculate the final height accurately.
Pro Tip: Create a cutting list before purchasing lumber. This helps you estimate the material requirements and organize the project more efficiently.
Step 2: Measure and Cut the Lumber
Once you have your design, measure each piece carefully. Use a square to mark straight cutting lines and double-check measurements before making cuts. Even a small error can affect the alignment of the seat and legs.
The seat boards should be cut to the planned length, while the legs and support pieces should be prepared according to your selected bench height and construction method.
Inspect the cut ends and remove rough splinters before moving to assembly. If your lumber has noticeable defects, decide whether those areas can be safely incorporated into the design or whether a replacement piece is needed.
Step 3: Prepare the Seat Boards
The seat is the most visible part of this DIY wood bench. The reference design uses multiple boards arranged side by side, creating a rustic plank appearance. Lay the boards on a flat surface and check how they fit together before attaching them.
Look for major gaps, uneven edges, or boards that rock when placed together. Minor variations can contribute to a rustic look, but excessive unevenness may affect comfort and appearance.
Sand the top surfaces and edges to remove rough areas. Pay special attention to corners and exposed edges, especially if the bench will be used frequently.
Expert Insight
A beautiful wooden bench depends on more than its overall shape. Consistent board alignment, smooth edges, and careful finishing can make a simple design look considerably more polished. Spend time preparing the visible surfaces before final assembly.
Step 4: Assemble the Legs and Support Structure
The base of the bench provides the foundation for the seat. Position the legs according to your design and check that they are aligned before attaching the support pieces.
The reference image shows a straightforward leg structure with horizontal supports beneath the seat and a lower brace between the legs. This arrangement creates the visual appearance of a compact, open base.
Use a square to check the angles and measure the spacing between corresponding legs. Clamps can help hold the pieces in place while you drill and fasten them.
Choose fasteners that are appropriate for the lumber thickness and the intended use of the bench. Avoid relying on appearance alone when deciding whether a joint is sufficiently strong. Each connection should be assembled according to sound woodworking practices.
Step 5: Attach the Seat
After assembling the base, position the prepared seat boards on top. Check that the boards are centered and that the overhang, if any, is consistent with your plan.
Before fastening the seat, inspect the structure from several angles. Confirm that the legs are positioned correctly and that the base sits evenly on a flat surface.
Attach the seat using your selected fastening method. Drill pilot holes when appropriate and avoid over-tightening screws, which can damage the wood or affect the connection.
Once the seat is secured, gently inspect the entire bench for movement, sharp edges, or loose connections. Make any necessary adjustments before applying the final finish.
Sanding and Finishing Your DIY Bench
The natural wood appearance shown in the design gives the bench a warm, rustic character. A suitable finish can enhance the grain while helping protect the surface from everyday wear.
Choose the Right Sanding Approach
Begin with sandpaper suitable for the condition of your lumber. Rough construction boards may require more preparation than already smooth furniture-grade wood. Work through progressively finer grits as needed, removing scratches from the previous sanding stage.
Focus on the seat, exposed edges, and areas that people may touch. Remove dust before applying any stain or finish so the surface remains clean.
For a rustic appearance, you may want to preserve some natural character in the grain. However, rustic style should not mean leaving dangerous splinters, sharp corners, or unstable wood untreated.
Stain, Paint, or Natural Wood?
There are several ways to personalize a DIY wooden bench. The best choice depends on your home decor, the type of lumber, and where you plan to use the piece.
- Natural finish: Highlights the original grain and creates a warm, understated look.
- Wood stain: Adds color while allowing the grain to remain visible.
- Paint: Provides an opportunity to match the bench with a specific room or decor style.
- Two-tone design: Combines a painted base with a contrasting wood seat.
Test your chosen product on a scrap piece of the same wood before applying it to the bench. Different boards can absorb stain unevenly, and testing helps you understand the final appearance.
Follow the manufacturer’s instructions for drying times, ventilation, application, and protective coats. If the bench will be used outdoors, select products suitable for the environmental conditions.
Where to Use a DIY Wood Bench
One of the most appealing features of a simple wooden bench is its versatility. A compact design can fit into areas where a larger piece of furniture would be impractical.
Entryway Seating
A wooden bench can provide a convenient place to sit while putting on or removing shoes. Position it near an entryway wall or beneath hooks, provided the available space allows comfortable movement around it.
You can add a cushion, small basket, or decorative pillow to create a welcoming arrangement. Keep accessories practical and avoid overcrowding the seating area.
Bedroom and Living Spaces
In a bedroom, a small bench can be placed at the foot of the bed or near a window. In a living room, it may serve as an occasional seating option or decorative accent.
The natural wood finish pairs well with neutral interiors, farmhouse-inspired spaces, rustic decor, and modern rooms that benefit from warm textures.
Patio and Covered Outdoor Areas
A wooden bench can also be used in a covered patio or sheltered outdoor area. However, untreated indoor lumber may not be suitable for prolonged exposure to rain, humidity, or direct sunlight.
If you intend to use the bench outdoors, choose appropriate materials, fasteners, and protective finishes. Inspect the bench regularly for moisture damage, splitting, or weakened connections.
DIY Bench Customization Ideas
Once you understand the basic structure, you can adapt the project to suit your personal style. Small changes to the finish, dimensions, or details can give the same general concept a completely different appearance.
Adjust the Size
Consider making a longer bench for a spacious entryway or a shorter version for a compact corner. Changing the dimensions requires careful attention to proportions and structural support.
If you change the seat length or height, review the leg spacing and fastening arrangements rather than simply extending individual boards.
Experiment With Color
A dark wood stain can create a traditional appearance, while a light finish can complement modern or Scandinavian-inspired interiors. Soft neutral paint colors may work well in a relaxed home setting.
Try a few sample finishes on scrap wood before choosing your final color. This is especially useful when working with lumber that has different grain patterns or varying levels of absorption.
Add Functional Details
You can explore additional design elements while keeping the basic bench concept intact. Depending on your skill level and intended use, possible additions include a lower shelf, a cushion, or storage baskets positioned beneath the seat.
Any added feature should be planned carefully so it does not interfere with stability, comfort, or safe use.
Common DIY Bench Mistakes to Avoid
Simple furniture projects can still present challenges. Taking time to plan and inspect your work can help you avoid common problems that affect appearance and performance.
- Skipping measurements: Always verify dimensions before cutting.
- Ignoring board condition: Inspect lumber for damage, significant warping, or unsuitable defects.
- Uneven leg placement: Use a square and consistent measurements to improve alignment.
- Insufficient sanding: Smooth exposed edges and remove splinters before use.
- Rushing assembly: Allow time to check joints and alignment at every stage.
- Choosing the wrong finish: Match the finish to the intended environment and material.
Important: A bench should be inspected for stability before being used as seating. A visually attractive project is not automatically safe or structurally adequate. Confirm that the construction method, materials, and fasteners are suitable for the expected load.
Quick Points: DIY Bench at a Glance
At a Glance
- Project: Simple DIY wooden bench.
- Material inspiration: 2×4 lumber.
- Design style: Rustic, compact, and functional.
- Customization: Adjust dimensions, color, and finish.
- Key skill: Accurate measuring and secure assembly.
Conclusion: Create Your Own DIY Wood Bench
A DIY bench is a practical woodworking project that can help you develop useful building skills while creating a piece of furniture for your home. The simple 2×4-inspired design shown here demonstrates how straightforward materials and a thoughtful layout can produce a stylish, versatile result.
From the plank-style seat to the sturdy-looking base, every part of the design offers an opportunity to practice measuring, cutting, sanding, and assembly. You can keep the appearance natural for a rustic feel or customize the finish to complement your existing decor.
The key to a successful DIY bench is careful preparation. Start with a clear plan, select suitable materials, verify your dimensions, and take your time during assembly. Pay attention to stability and finish quality so the completed piece is both attractive and appropriate for its intended use.
Whether you’re preparing your first woodworking project or looking for an affordable furniture idea, this DIY wood bench can provide plenty of inspiration. Save the design, gather your materials, and begin planning a handmade piece that reflects your personal style. Happy building!