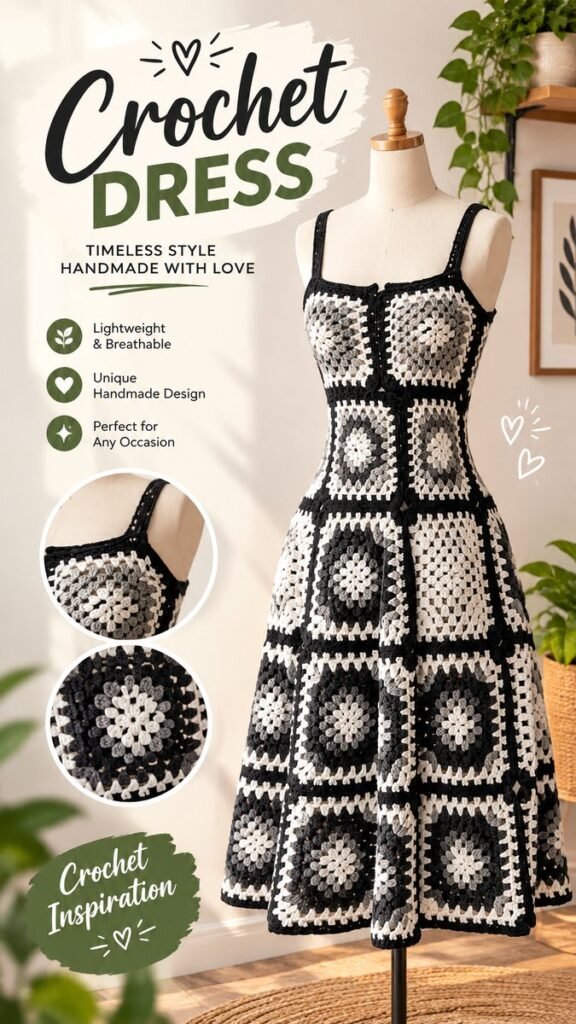
DIY fashion clothing becomes especially exciting when traditional handmade techniques are transformed into wearable pieces with a modern personality. A crochet granny square dress is a beautiful example of this idea, combining individual crocheted motifs into a feminine, textured silhouette that feels both nostalgic and fresh. The black, white, and soft gray palette gives this handmade style a timeless appearance, while the repeating square pattern creates plenty of visual interest.
Key Takeaways
- A crochet dress can become a standout DIY fashion clothing project.
- Granny squares offer a flexible way to build patterns and combine colors.
- Neutral shades create a versatile handmade wardrobe piece.
- Careful joining and shaping can turn separate motifs into a polished silhouette.
- Simple color changes can make the same basic crochet technique look completely different.
Why Crochet Dresses Are Perfect for DIY Fashion Clothing
Crochet fashion has a special quality that is difficult to reproduce with mass-produced clothing. Every stitch contributes to the final texture, and every color choice can change the personality of the garment. A handmade crochet dress therefore feels less like an ordinary outfit and more like a creative project that can be adapted to individual preferences.
The dress shown in this style uses granny-square-inspired motifs arranged across the bodice and skirt. The repeated geometric shapes create a strong visual rhythm, while the fitted waist and fuller lower section give the garment a graceful shape. It demonstrates how a familiar crochet technique can be used beyond blankets, scarves, and accessories.
Important: The most appealing part of DIY fashion is the ability to make design decisions at every stage. Color, square size, motif arrangement, neckline, straps, and skirt shape can all be adjusted to create a garment that feels personal rather than generic.
Understanding the Granny Square Look
Granny squares are among the most recognizable crochet motifs. They are typically constructed in rounds, allowing the design to grow outward from a central point. The classic appearance often features a small center surrounded by progressively larger rounds of stitches. When multiple squares are joined together, they can form larger textiles and garments.
For fashion projects, the appeal of granny squares comes from their modular nature. Instead of constructing an entire garment from one continuous piece, a maker can create individual motifs and arrange them strategically. This approach makes it easier to experiment with colors and patterns before committing to the final layout.
Why the Pattern Works So Well
The visual structure of square motifs naturally creates sections across a garment. On a dress, these sections can emphasize the bodice, waist, hips, and skirt. Contrasting borders also help define each motif, making the overall pattern appear organized even when many individual squares are used.
A monochromatic palette is particularly effective because it allows the texture and geometry of the crochet stitches to become the main design feature. Black, white, and gray provide contrast without overwhelming the intricate construction of the garment.
Choosing Colors for a DIY Crochet Dress
Color selection can completely transform a crochet dress. A neutral palette creates a sophisticated and versatile result, while brighter combinations can give the same motif a playful or youthful character. Before crocheting a large number of squares, it is useful to make a few sample motifs and place them next to one another.
Neutral and Minimalist Combinations
Black and white provide one of the easiest ways to create strong contrast. Gray can soften the transition between the two extremes and add additional depth. Cream, beige, charcoal, and soft taupe can also work beautifully for a more understated handmade aesthetic.
Adding More Color
If you prefer colorful DIY fashion clothing, consider introducing one accent shade while keeping the remaining colors neutral. Sage green, dusty blue, terracotta, mustard, or muted pink can create a distinctive look without making the pattern feel too busy.
- Use two or three colors for a clean, coordinated appearance.
- Use a contrasting border to make individual squares stand out.
- Repeat accent colors throughout the garment for visual balance.
- Make a small color sample before producing the complete set of motifs.
Planning the Shape Before You Crochet
A successful handmade garment begins with planning. Crochet motifs can be beautiful individually, but the final clothing item needs to fit comfortably and maintain its intended silhouette. A dress with a fitted bodice and flared skirt requires different dimensions across the body, so the placement and number of motifs matter.
Start by considering the major sections of the garment. Think about the neckline, shoulder straps, bust area, waist, hips, and skirt. The square motifs can then be arranged to follow these areas instead of simply being attached in a uniform grid.
Create a Simple Layout
- Measure the intended garment dimensions.
- Decide approximately how many motifs are needed for each section.
- Create several sample squares using the selected yarn and hook.
- Arrange the motifs on a flat surface before joining them.
- Check proportions around the waist and skirt before completing the final assembly.
This planning stage can save significant time. It also allows you to change the arrangement without having to undo a large portion of the finished dress.
Expert Insight
Think of each granny square as a small design tile. When the tiles are arranged thoughtfully, the joins become part of the overall visual structure instead of simply connecting separate pieces. Planning the direction, border colors, and motif placement can make a handmade dress look much more intentional.
Building a Crochet Dress From Individual Motifs
Once the color palette and layout are established, the next stage is producing the crochet motifs. Consistency is important. Try to maintain similar stitch tension throughout the project so the finished squares have comparable dimensions.
The exact construction method can vary depending on the crochet pattern, yarn weight, hook size, and desired fit. Some designs use traditional granny squares, while others use variations with floral centers, textured stitches, or modified borders. The visual principle remains similar: small motifs are combined to create a larger wearable surface.
Joining the Squares
Joining is one of the most important stages because it influences both appearance and flexibility. A neat join creates clean lines between motifs and helps maintain the overall geometry. Depending on the desired look, squares can be joined with a visible contrasting stitch or a less noticeable connection.
If you are new to crochet clothing, practice the joining technique on a few sample squares first. This makes it easier to see how the fabric behaves and whether the finished seams feel comfortable.
Creating a Flattering Silhouette
One of the most distinctive elements of this crochet dress style is the transition from a fitted upper section to a wider skirt. This creates movement while allowing the geometric motifs to remain the central visual feature.
When designing your own version, consider how the motifs will sit around curves. Squares may need to be arranged differently near the waist and hips than they are across a flatter section of the garment. The goal is not simply to cover the body with identical blocks, but to arrange those blocks so the garment follows the intended shape.
Pay Attention to the Waist
The waist is an especially useful place to introduce shaping. A narrower arrangement can create definition before the skirt expands. Borders, joining bands, or changes in motif orientation can also visually emphasize this area.
Pro Tip: Try the garment on or check it against your measurements at several stages rather than waiting until the final join. Crochet fabric can behave differently as more motifs are added, so frequent fitting helps prevent unwanted surprises.
Making DIY Fashion Clothing More Versatile
A handmade crochet dress does not have to be limited to one styling approach. Layering can make an open or textured crochet garment easier to incorporate into different wardrobes. A simple slip, fitted base dress, camisole, or lightweight top can create different levels of coverage depending on the design.
Casual Styling
For a relaxed look, pair a crochet dress with simple flats, casual sandals, or clean sneakers. Keep accessories understated so the handmade texture remains the focus.
Layered Styling
Layering adds flexibility to crochet clothing. A neutral underlayer can complement a black-and-white design while allowing the open texture and square pattern to remain visible. A lightweight cardigan or jacket can also change the overall mood of the outfit.
Practical Tips for Handmade Crochet Clothing
Crochet garments require patience, especially when many individual motifs are involved. Keeping your materials organized can make the project much more enjoyable. Store completed squares together and separate them by color or intended position if your design includes several variations.
- Keep your yarn tension as consistent as possible.
- Measure motifs periodically instead of assuming every square is identical.
- Arrange completed motifs before joining to test the overall pattern.
- Leave enough time for blocking or shaping if the chosen yarn and pattern require it.
- Check seams and joining points for comfort before wearing the finished garment.
- Follow the yarn manufacturer’s care recommendations to help preserve the finished piece.
Turning Inspiration Into Your Own Design
The most rewarding part of DIY fashion clothing is making a familiar concept your own. You can start with the visual idea of a granny-square dress and then change almost every design detail. Try larger or smaller motifs, different center patterns, wider straps, a different neckline, or a skirt with a completely different shape.
You can also experiment with the balance between solid and open crochet areas. A dress with more open stitches may have a lighter visual appearance, while denser motifs can create a more substantial fabric. The right choice depends on the desired style, yarn, season, and intended layering.
Start With a Small Sample
If making an entire dress feels ambitious, begin with a few granny squares. Use them to test color combinations, stitch definition, and joining methods. This small experiment can become the foundation for a larger crochet fashion project later.
At a Glance
- Style: Handmade crochet fashion with geometric granny-square motifs
- Palette: Black, white, and gray for timeless contrast
- Design focus: Textured motifs, fitted shaping, and a flowing skirt
- DIY potential: Highly customizable through color, motif, and layout choices
- Styling: Easy to adapt with layering and simple accessories
Conclusion: Make Crochet Fashion Your Own
A granny-square crochet dress shows just how creative DIY fashion clothing can be. Individual motifs that might seem simple on their own can become an expressive, wearable design when they are carefully arranged and joined. The contrast of black, white, and gray highlights the stitch texture, while the fitted shape and fuller skirt create a distinctive handmade silhouette.
Whether you are an experienced crocheter or simply collecting ideas for a future project, this style offers plenty of opportunities to experiment. Begin with a small motif, choose a palette that reflects your personality, plan the garment carefully, and let the individual details build into something completely your own.
Save this idea for your next creative project: a handmade crochet dress can combine classic craft techniques with modern personal style, creating a wardrobe piece that feels thoughtful, distinctive, and genuinely yours.