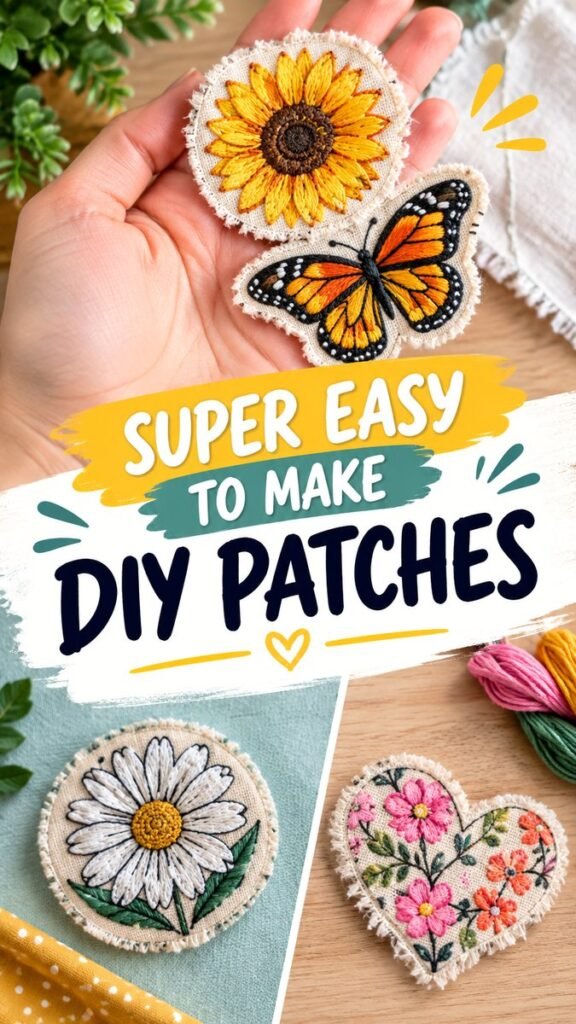
DIY patches are a creative way to give everyday clothing and accessories a fresh personality. From colorful embroidered flowers to cheerful butterflies and playful heart designs, handmade patches can turn simple fabric pieces into something special. They are especially appealing if you enjoy embroidery, sewing, upcycling, or easy craft projects that produce a practical result. With a few basic materials, you can create custom patches that add character to jackets, jeans, tote bags, hats, backpacks, and other fabric items.
Key Takeaways
- DIY patches are a simple way to personalize everyday fabric items.
- Embroidery creates colorful, textured designs with a handmade appearance.
- Floral, butterfly, and heart motifs work beautifully for custom patches.
- Fabric scraps can become the foundation for creative patch projects.
- Careful stitching and neat edges help handmade patches look polished.
- Custom patches are useful for refreshing older clothes and accessories.
Why DIY Patches Are Such a Fun Craft
There is something satisfying about making a small piece of art that can also become part of something you wear or use. DIY patches combine creativity with practical sewing skills, making them a rewarding project for beginners and experienced crafters alike. Instead of leaving an old denim jacket or plain tote bag untouched, you can add a few handmade details and completely change its look.
Embroidered patches are particularly attractive because the stitches create dimension and texture. A simple flower can become a detailed focal point when different thread colors are layered together. Butterflies, leaves, hearts, and other nature-inspired motifs also translate beautifully into stitched designs.
Important: The beauty of handmade DIY patches comes from their personality. Small variations in stitching, thread direction, and fabric edges can make each patch feel genuinely unique rather than mass-produced.
Materials You Can Use for DIY Patches
You do not need a complicated craft setup to begin making your own patches. A small collection of basic sewing supplies can give you plenty of room to experiment with different shapes, colors, and techniques.
- Fabric: Choose sturdy cotton, canvas, denim, or another fabric that can support embroidery.
- Embroidery thread: Keep several colors available so you can create flowers, butterflies, leaves, and decorative details.
- Needle: A sharp embroidery needle makes it easier to work cleanly through the fabric.
- Embroidery hoop: A hoop can help keep fabric smooth and make stitching more comfortable.
- Scissors: Small sharp scissors are useful for trimming thread and shaping the finished patch.
- Fabric marking tool: A removable fabric pencil or marker can help you sketch a design before stitching.
- Backing material: Depending on how you want to attach the patch, you can explore fusible, sew-on, or other fabric-safe backing options.
Using scraps is one of the most enjoyable parts of this craft. Small pieces of leftover fabric that might otherwise be forgotten can become colorful handmade decorations. Natural linen-style fabrics, light canvas, and other woven materials can provide a pleasant background for embroidery.
Choosing a Design for Your Handmade Patch
The design you choose will influence everything from the size of the patch to the colors and stitching techniques you use. If you are new to embroidery, start with a recognizable shape that does not require too many complicated details.
Floral DIY Patches
Flowers are an excellent starting point because they can be simplified into petals, centers, stems, and leaves. A daisy-style flower can be created with repeated stitches around a central circle, while a more decorative floral patch can combine several colors and leaf shapes.
Try experimenting with contrasting petals and centers. A bright flower against neutral fabric can create a strong visual effect without requiring an overly complicated pattern.
Butterfly Patches
Butterflies are another appealing option for embroidered patches. Their symmetrical wings make it easy to create a recognizable outline, while different thread colors can add personality. You can use bold shades for a playful design or softer colors for a more understated look.
Focus on the outer shape first, then add wing sections and small decorative details. Keeping the central body visually distinct can help the butterfly remain easy to recognize even when the patch is small.
Heart and Decorative Shapes
Heart-shaped patches are simple, versatile, and easy to adapt. Instead of filling the entire shape with one color, consider decorating it with flowers, leaves, small stitched motifs, or simple lines. A patterned heart can work beautifully on clothing, bags, and handmade accessories.
You can also create circles, stars, clouds, leaves, fruits, initials, or other simple shapes. The best design is often one that reflects your personal style while remaining clear enough to recognize at a glance.
Expert Insight
For a polished-looking patch, think about the design as a small composition. Use one main shape, a limited color palette, and a few supporting details instead of trying to fill every available space.
How to Make DIY Patches Step by Step
Once you have chosen a design and gathered your materials, the process becomes a relaxing combination of drawing, stitching, trimming, and finishing. The following approach works well for many simple embroidered patch ideas.
- Choose your fabric. Select a piece that is large enough for your design with some extra space around the edges.
- Sketch the design. Lightly draw the outline so you have a guide for your embroidery.
- Secure the fabric. Place the fabric in an embroidery hoop if you are using one, keeping the surface reasonably taut.
- Begin with the main shapes. Stitch the largest elements first, such as petals, wings, leaves, or the main outline.
- Add color and texture. Introduce additional thread colors to create contrast and visual interest.
- Finish the small details. Add centers, outlines, veins, dots, decorative lines, or other features that complete the design.
- Inspect the stitching. Check the front and back of your work and secure loose threads neatly.
- Trim the patch. Carefully cut around the embroidered design while leaving enough fabric for a clean edge.
- Prepare the backing. Choose an attachment method that suits the fabric item where you plan to use the patch.
- Attach your patch. Sew or apply it according to the backing method and the needs of the finished project.
Pro Tip: If you want the finished patch to look neat, take your time when trimming around the embroidered edge. Small, controlled cuts are easier to manage than trying to remove too much fabric at once.
Ideas for Using Custom Fabric Patches
Once your patch is finished, you have plenty of ways to use it. A handmade patch can be a small accent or the centerpiece of a larger upcycling project.
- Denim jackets: Add several patches to the front, back, or sleeves for a customized look.
- Jeans: Use patches to decorate pockets or add interest to plain denim.
- Tote bags: A colorful embroidered patch can instantly brighten a simple canvas bag.
- Backpacks: Small designs can make an everyday bag feel more personal.
- Hats: A compact floral or decorative patch can work well on a fabric cap.
- Craft accessories: Add patches to fabric pouches, organizers, or other handmade items.
Combining several patches can create an especially interesting result. For example, a flower, butterfly, and heart can form a small collection of related motifs. Keeping a few colors consistent across the designs helps the finished arrangement feel coordinated.
How to Make Your Patches Look More Professional
Handmade does not have to mean unfinished. A few simple choices can make DIY patches look more refined while still preserving their handmade charm.
Keep Your Color Palette Focused
Too many unrelated colors can make a small design feel crowded. Choose a main color, one or two supporting shades, and a contrasting accent when needed. Repeating colors across multiple patches can also make a collection look intentional.
Pay Attention to Stitch Direction
Stitch direction can make embroidered designs appear more dimensional. For flower petals, for example, stitches that follow the length of the petal can emphasize its shape. Similar attention to direction can help leaves and butterfly wings look more defined.
Create Clean Edges
The outside edge frames the entire patch, so it deserves attention. Whether you leave a small fabric border or create a stitched edge, aim for an even finish. The edge should support the design rather than distract from it.
Easy DIY Patch Ideas for Beginners
If you are just starting with embroidery, there is no need to begin with an elaborate illustration. Simple motifs can teach you useful techniques while still producing attractive results.
- Make a simple five-petal flower with a contrasting center.
- Create a small leaf using two or three shades of green.
- Try a basic butterfly with symmetrical wings.
- Decorate a heart with small flowers or dots.
- Combine several simple flowers into a small bouquet.
- Experiment with a circular patch featuring one bold central motif.
These projects are also useful for learning how different stitches behave. Once you become comfortable with simple outlines and filled areas, you can gradually introduce more intricate patterns.
Creative Ways to Personalize Your Patches
The biggest advantage of making your own patches is the freedom to customize every detail. You can choose colors that match a favorite garment, create designs around a particular theme, or make patches that represent your hobbies and interests.
Try mixing embroidered motifs with different fabric textures. A neutral woven base can make bright embroidery stand out, while colorful fabric can create a softer background for simpler stitching. You can also experiment with patch sizes. Several tiny patches can create a playful arrangement, while one larger patch can act as a statement detail.
Another fun approach is to create a small set of related patches. For example, a floral collection could include a daisy, a flower-filled heart, and a leafy motif. A consistent palette can tie everything together while allowing each patch to remain different.
Making DIY Patches Part of an Upcycling Project
DIY patches pair naturally with clothing upcycling. Instead of replacing a plain or older garment, you can use handmade embroidery to give it a new visual direction. A few carefully placed patches can refresh denim, canvas, or other sturdy fabric pieces.
This approach also encourages you to look differently at leftover materials. Fabric scraps, unused embroidery thread, and small pieces of canvas can become useful craft supplies. Keeping a small collection of these materials makes it easier to start a patch whenever inspiration strikes.
Think about placement before attaching anything permanently. Lay your finished patches on the garment or bag and try several arrangements. Moving them around can help you find a balanced composition without committing to the first idea.
Tips for a More Enjoyable Embroidery Project
DIY embroidery is meant to be creative and enjoyable, so give yourself room to experiment. Your first patch may not have perfectly uniform stitches, and that is part of the charm of handmade work. Concentrate on learning how the materials respond and improving with each project.
- Start with a small design rather than an oversized project.
- Test thread colors on a scrap before committing to the final patch.
- Keep your workspace organized so needles and thread are easy to find.
- Take breaks during longer stitching sessions.
- Save successful designs as inspiration for future patches.
Most importantly, enjoy the process. Handmade patches are not only about the finished decoration. They are also an opportunity to practice a traditional craft while creating something that reflects your own taste.
At a Glance
- Choose a sturdy fabric and a simple design.
- Use colorful embroidery to build texture and personality.
- Trim the finished patch carefully for a clean silhouette.
- Attach patches to clothing, bags, hats, or other fabric items.
- Mix related motifs and colors for a coordinated collection.
Conclusion
DIY patches are a wonderful way to combine embroidery, creativity, and practical upcycling. Whether you make a bright sunflower, a detailed butterfly, a floral heart, or a simple geometric design, even a small handmade patch can transform an ordinary fabric item into something much more personal.
Start with a design that feels manageable, choose a few colors you love, and focus on clean, thoughtful stitching. As your confidence grows, you can experiment with more detailed motifs, different fabrics, and larger collections of custom patches. The result is not just a decoration, but a handmade piece that carries your own creative touch.
With simple materials and a little patience, DIY patches can become an easy craft to return to whenever you want a fresh project. Gather your fabric scraps, choose your favorite colors, and start stitching a design that makes your next jacket, bag, or accessory uniquely yours.
Tags
DIY Patches Embroidered Patches DIY Embroidery Custom Patches Sewing Projects Handmade Crafts Fabric Crafts Clothing Upcycling