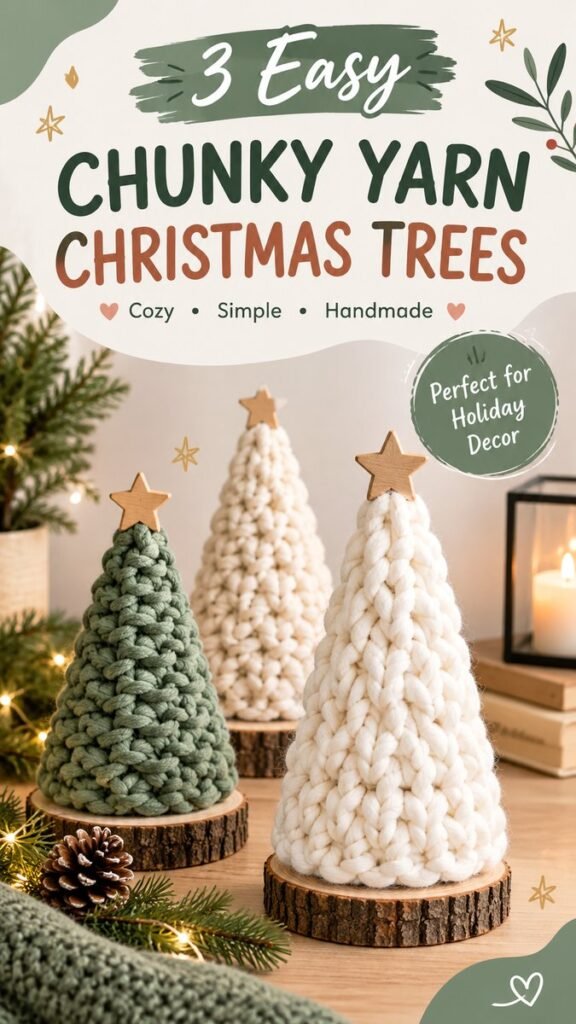
DIY tree decor is a simple way to bring warmth, texture, and handmade personality into a home during the holiday season. Chunky yarn Christmas trees are especially appealing because they combine cozy materials with an easy decorative shape. A few cone-shaped forms, soft yarn, natural wood accents, and neutral colors can create a beautiful display for a mantel, shelf, entryway, dining table, or festive centerpiece.
The charm of these handmade trees comes from their texture. Thick yarn creates an inviting, tactile finish that looks especially cozy when paired with pinecones, evergreen branches, warm lighting, wood slices, and other natural details. Whether you prefer a minimalist neutral palette or want to experiment with seasonal colors, a DIY tree project can be adapted to suit almost any decorating style.
Key Takeaways
- Chunky yarn creates a soft, cozy texture that stands out in holiday displays.
- Simple cone shapes make an excellent foundation for beginner-friendly DIY tree decor.
- Mixing different tree heights adds depth and visual interest to a display.
- Neutral yarn colors work beautifully with wood, greenery, pinecones, and warm lighting.
- Different wrapping and looping techniques can create completely different textures.
Why DIY Tree Decor Is So Appealing
There is something special about handmade holiday decorations. Instead of relying entirely on store-bought ornaments, a DIY tree lets you choose the materials, colors, size, and texture that work best in your space. The finished piece feels more personal because every detail reflects your own creative choices.
Chunky yarn is particularly effective for this type of project. Its oversized fibers create visible loops and layers, giving a basic cone an interesting finished surface without requiring complicated decoration. Depending on the technique, the yarn can look smooth and wrapped, loosely looped, heavily textured, or braided.
Another advantage is versatility. A collection of handmade trees can be arranged as a centerpiece, grouped on a shelf, placed beside a fireplace, or used to decorate a small corner that needs a seasonal touch. Smaller versions can also be incorporated into tablescapes and gift displays.
Important: The most effective DIY tree displays usually rely on a simple combination of texture, height, and color rather than lots of extra decoration. Let the yarn remain the visual focus and use natural accents to support it.
Choosing Materials for a Chunky Yarn Tree
You do not need a large collection of supplies to create attractive DIY tree decor. The basic concept can be adapted to materials you already have, especially if you enjoy yarn crafts or seasonal decorating.
Chunky Yarn
Start with a thick yarn that gives the tree plenty of visual texture. Cream, ivory, beige, soft green, taupe, and other muted shades create a calm, rustic look. If your home has more colorful holiday decorations, red, forest green, burgundy, or warm mustard can add contrast.
Different yarn thicknesses can also be combined. A very thick yarn produces bold loops and a plush appearance, while a slightly finer chunky yarn creates more visible layers. Testing a small section first can help you decide which texture you prefer.
Cone-Shaped Bases
A cone provides the basic tree silhouette. You can work with a suitable craft cone or another stable cone-shaped foundation that can be covered with yarn. The most important consideration is stability. A lightweight tree may be easy to move, but a wider base helps prevent taller versions from tipping over.
Natural Decorative Elements
Wood slices are a beautiful choice for displaying handmade trees. They introduce a natural texture that contrasts with soft yarn. Pinecones and evergreen sprigs can add seasonal character without making the arrangement feel crowded.
Warm lights, a neutral blanket, wooden accessories, and softly glowing lanterns can further reinforce the cozy atmosphere. The goal is not to cover every surface with decorations. A few carefully selected details are enough.
Three Easy Ways to Create a DIY Tree
One of the most enjoyable things about this project is that the same cone can be transformed in several ways. The visual result depends heavily on how the yarn is applied.
1. Wrapped Yarn Tree
The wrapped approach creates a clean, continuous appearance. Yarn is placed around the cone in overlapping rows until the base is covered. This technique is a great option when you want a simple, modern tree with a relatively smooth finish.
Keep the tension consistent as you work. If some rows are extremely loose while others are pulled tightly, gaps may appear or the surface may look uneven. Slight overlap between rows can help create a fuller appearance.
For a minimalist holiday display, pair several wrapped trees in cream, oatmeal, and soft beige. The subtle color differences add dimension while maintaining a coordinated look.
2. Finger-Knit Tree
Finger knitting can produce a thicker, more structured strand before it is attached to the cone. The resulting texture can look especially substantial when made with chunky yarn.
This method is useful when you want the yarn to have a pronounced rope-like appearance. The finished strand can be arranged around the cone in controlled rows, creating a bold pattern that catches the eye.
Because the texture is already built into the knitted strand, this style can make a relatively simple tree look much more elaborate.
3. Loopy Textured Tree
For a softer and more playful result, experiment with looped yarn. Larger loops create a highly textured surface that looks plush and handmade. This approach works particularly well with oversized yarn because the individual loops become part of the decoration.
Try keeping the loops similar in size for a polished finish, or vary them slightly for a relaxed handcrafted appearance. A textured tree can become the focal point of a small holiday arrangement even without additional ornaments.
Why This Matters
Texture does much of the decorative work in a handmade yarn tree. Instead of adding lots of ornaments, experiment with yarn thickness, wrapping direction, loops, and color. These small changes can make several trees look coordinated without making them identical.
How to Style a DIY Tree Display
Once your handmade trees are finished, styling them is just as important as making them. A beautiful DIY project can lose some of its impact if every piece is the same height and positioned in a straight line.
Mix Different Heights
Grouping three trees with noticeably different heights creates an easy visual hierarchy. Place the tallest tree slightly behind the others and allow the shorter trees to sit toward the front or sides. This arrangement naturally draws the eye across the display.
You can also create a wider composition by placing a tall tree on one side and balancing it with two smaller trees on the other. There is no need for perfect symmetry.
Use a Limited Color Palette
A restrained palette makes handmade textures more noticeable. Cream and ivory yarn look elegant with natural wood, while muted greens introduce a subtle seasonal connection. Beige and oatmeal tones can soften the arrangement even further.
If you prefer traditional Christmas colors, use the same principle. Choose two or three main shades and repeat them throughout the display rather than introducing too many competing colors.
Add Natural Texture
Wood slices, pinecones, evergreen branches, and woven textiles complement chunky yarn beautifully. These materials create contrast because they bring different shapes and surfaces into the arrangement.
For a rustic look, leave some natural wood visible. For a softer modern look, combine the trees with neutral fabric and warm lighting.
Create a Cozy Corner
A DIY tree display does not need to occupy an entire room. A small group can transform a console table, bookshelf, coffee table, bedroom dresser, or kitchen shelf.
Place the trees beside a small lantern or warm light source to create a gentle evening atmosphere. Keep enough empty space around the arrangement so the individual silhouettes remain easy to see.
Beginner Tips for Better Results
Handmade decorations do not need to be perfect to look beautiful. In fact, slight variations can make a DIY tree feel more authentic. Still, a few simple techniques can make the finished result cleaner and easier to style.
- Test your yarn first. Wrap a small section around the base to see how the texture and color look together.
- Work gradually. Build the covering in sections instead of rushing to complete the entire cone.
- Watch your tension. Consistent tension helps prevent obvious gaps and uneven areas.
- Check stability. Make sure the completed tree can stand securely on its chosen surface.
- Experiment with placement. Step back occasionally to see how the shape looks from a distance.
- Keep decoration intentional. Let the chunky yarn remain the star of the project.
Pro Tip: If you are making several DIY trees, change one feature at a time. Keep the same yarn color while changing the texture, or keep the technique consistent while varying the height. This creates a collection that feels connected without looking repetitive.
DIY Tree Ideas for Different Decorating Styles
Minimalist Holiday Decor
Choose ivory or off-white yarn, simple wooden bases, and very few additional accents. The result is calm and understated. This style works particularly well when your room already contains plenty of visual detail.
Rustic Christmas Decor
Pair chunky yarn with wood slices, pinecones, greenery, and natural textiles. Slightly irregular textures can enhance the handmade character. Warm neutrals help create the relaxed feeling associated with rustic seasonal decorating.
Modern Cozy Decor
For a contemporary arrangement, focus on clean shapes and a restrained color scheme. Cream, soft sage, warm beige, and muted brown work well together. Grouping trees at different heights gives the display a modern sculptural quality.
Colorful Handmade Decor
If neutral shades are not your style, use brighter yarn colors to personalize the project. A collection of red, green, gold, or other seasonal shades can become a cheerful focal point. Keep the surrounding decorations relatively simple so the colorful trees remain easy to appreciate.
Where to Display Handmade Yarn Trees
The compact shape of a DIY tree makes it useful throughout the home. Arrange a few on a living room shelf, place them on a dining table, or create a small seasonal vignette on an entryway console.
They can also work well in bedrooms and home offices where you want a subtle festive touch without filling the room with traditional decorations. A single handmade tree can be enough to make a small surface feel seasonal.
For a dining table, consider arranging several trees along the center with greenery and pinecones between them. Keep the arrangement low enough that it does not interfere with conversation or block the view across the table.
Making Your DIY Tree Collection Feel Personal
The best DIY tree ideas are not necessarily the most complicated ones. Personal touches can come from choosing yarn that matches your home, changing the proportions, experimenting with texture, or creating a small collection in different sizes.
You might make one especially tall tree as a focal point and surround it with two smaller versions. Alternatively, create several similar trees and use different bases to give each one its own character.
Think about the atmosphere you want before selecting your materials. Soft cream yarn creates a warm and peaceful effect, while deeper greens can make the arrangement feel more connected to traditional seasonal greenery. Natural wood adds warmth regardless of the color palette.
Quick Points
- Use chunky yarn for instant visual texture.
- Combine tall, medium, and small trees for dimension.
- Pair soft yarn with wood and greenery for contrast.
- Keep the surrounding decor simple and intentional.
- Experiment with wrapped, knitted, or looped textures.
Conclusion
A DIY tree is a simple project with plenty of room for creativity. Chunky yarn turns an uncomplicated cone shape into a soft, textured decoration that can instantly make a space feel warmer and more inviting. By experimenting with wrapping, finger knitting, or looping techniques, you can create several different looks from the same basic idea.
The most successful displays focus on balance rather than excess. Mix different heights, repeat a small selection of colors, and introduce natural elements such as wood, pinecones, greenery, and warm lighting. Whether your style is rustic, minimalist, modern, or colorful, handmade yarn trees can be adapted to fit your holiday decor.
Most importantly, enjoy the process. A handmade Christmas tree does not have to look factory-perfect. Its texture, small variations, and personal character are exactly what make DIY holiday decor special. Choose your favorite yarn, create a few different shapes and sizes, and build a cozy seasonal display that feels uniquely yours.
Tags
DIY Tree DIY Christmas Decor Chunky Yarn Crafts Yarn Christmas Trees Christmas Crafts Handmade Decor Cozy Holiday Decor span style=”display:inline-block;background:#eef2ed;border:1px solid #d5ddd3;border-radius:20px;padding:7px 13px;margin:4px;color:#405344;font-size:14px;”>Christmas DIY Ideas