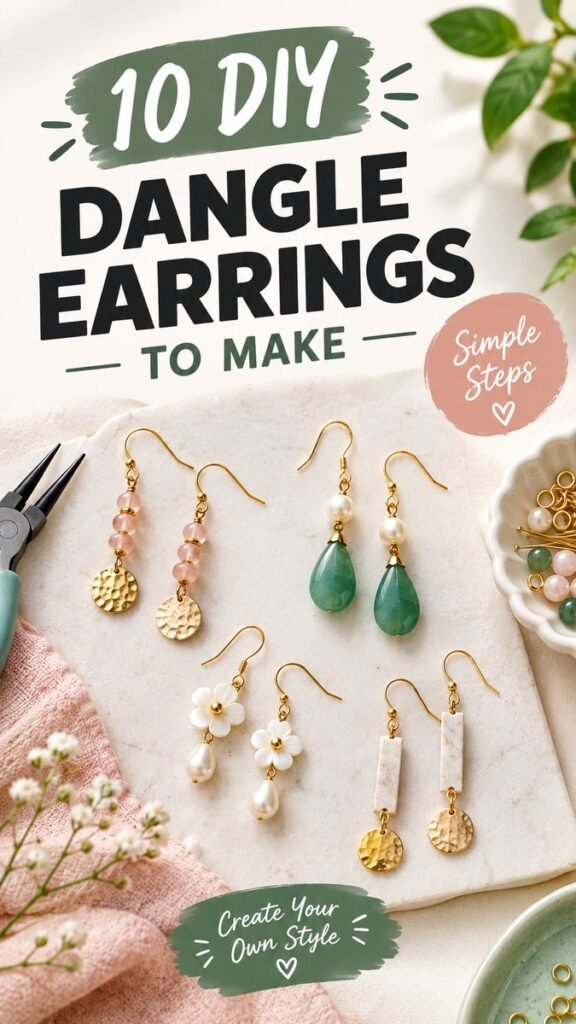
Creating your own jewelry can be much easier than it looks, especially when you start with simple DIY earrings. A few basic findings, colorful beads, pearls, charms, and earring hooks can be transformed into beautiful handmade pieces with a polished finish. The designs shown here combine delicate gold-tone elements with soft beads, green stones, pearls, and floral details, making them a great source of inspiration for anyone searching for DIY earrings easy enough to try at home.
Key Takeaways
- Simple earring designs can create a polished handmade look.
- Beads, pearls, stones, charms, and gold-tone findings offer endless combinations.
- Lightweight components are ideal for comfortable everyday earrings.
- A few basic jewelry-making tools can handle many beginner projects.
- Changing colors and shapes makes each pair feel personal and unique.
- Handmade earrings can also become thoughtful gifts for friends and family.
Why Easy DIY Earrings Are So Fun to Make
DIY earrings are one of the most approachable jewelry projects because they do not require a large workspace or an extensive collection of supplies. Small components can be arranged into countless combinations, allowing beginners to experiment without committing to a complicated pattern.
The visual inspiration features several different approaches to the same basic concept. One pair uses soft pink beads with a textured round gold-tone element, while another combines green teardrop-shaped stones with pearl-like beads. Other designs introduce flower-shaped components, elongated rectangular pieces, and delicate metallic accents.
Important: The easiest way to make DIY earrings look intentional is to repeat a small number of elements. Pair one statement bead with a simple metal finding, or repeat the same bead in a balanced sequence for a coordinated finish.
That flexibility makes easy DIY earrings especially appealing when you want jewelry that matches a particular outfit, season, color palette, or personal style. You can keep the design minimal or add layers of beads and charms for a more decorative look.
Basic Supplies for DIY Earrings
You do not need a large collection of jewelry-making materials to get started. A small selection of versatile components is enough to create many different designs.
Earring Hooks
Earring hooks form the top of a traditional dangling earring. Gold-tone hooks work particularly well with warm-colored beads and pearls, while silver-tone hooks can create a cooler, more contemporary appearance. Choose a style that complements the overall design rather than competing with the decorative elements.
Beads and Stones
Beads provide most of the visual personality in handmade earrings. Round beads are useful for stacked designs, while teardrop or oval pieces can become attractive focal points. Green stones, blush beads, white pearls, and neutral components can all produce very different moods.
Jump Rings and Jewelry Findings
Small rings and connectors make it possible to attach beads, charms, and decorative components together. Keeping several sizes nearby gives you more freedom when building different earring shapes.
Jewelry-Making Pliers
A pair of small jewelry pliers is one of the most useful tools for beginner projects. They can help open and close jump rings, shape wire, and secure small components. Round-nose or chain-nose pliers can also be useful as your projects become more advanced.
Wire and Head Pins
Head pins and jewelry wire allow beads to become connected decorative sections. They are particularly helpful when making dangle earrings because individual beads can be arranged vertically before being attached to the earring hook.
How to Make Easy Dangle Earrings
The beauty of simple earring projects is that the construction can remain straightforward even when the finished result looks sophisticated. Start by deciding which component will be the main focal point, then build the rest of the design around it.
- Choose your color palette. Pick two or three complementary colors instead of using too many unrelated shades.
- Select the main decorative piece. A teardrop stone, flower bead, pearl, or textured metal charm can serve as the focal point.
- Arrange the components. Lay the beads and findings on your work surface before attaching anything so you can see how the finished pair will look.
- Build the dangling section. Thread the selected beads onto a head pin or suitable jewelry wire.
- Create a secure connection. Use your pliers to form or close the connection at the top of the beaded section.
- Attach the earring hook. Connect the finished decorative section to the hook using an appropriate jump ring or loop.
- Repeat carefully. Create the second earring while checking the first one regularly for matching proportions.
- Inspect the finished pair. Make sure all connections are closed securely and that no sharp wire ends remain exposed.
Before making the second earring, place the completed first earring beside your loose components. This simple habit makes it much easier to reproduce the same bead order, spacing, and proportions.
Expert Insight
- Lay out both earrings before assembling them to check symmetry.
- Use one standout component and keep supporting details simple.
- Test the weight of the finished design before wearing it for a long period.
10 DIY Earring Ideas to Try
1. Blush Bead and Gold Dangle Earrings
Soft pink or blush beads look beautiful with warm metallic findings. Stack several small beads vertically and finish the bottom with a textured round charm. The result is feminine, delicate, and easy to customize.
2. Green Teardrop Stone Earrings
A large green teardrop-shaped stone can act as the star of the design. Add one or two small pearl-like beads above it for contrast, keeping the rest of the structure minimal so the focal stone remains noticeable.
3. Floral Pearl Dangles
Flower-shaped beads paired with pearl-like drops create a soft decorative style. This combination works particularly well when you want a handmade pair that feels playful without becoming overly complicated.
4. Geometric Bar Earrings
Long rectangular beads or bars can give simple DIY earrings a modern appearance. Add a small round metallic charm underneath for movement and contrast. This design is especially useful for creating a clean, contemporary jewelry collection.
5. Pearl Stack Earrings
Use several pearl-like beads in different sizes to create a cascading effect. A simple metallic connector between each bead keeps the design organized while allowing the earrings to move naturally.
6. Minimal Single-Bead Earrings
For an extremely easy project, use one attractive bead on each earring hook. A single polished stone or colorful bead can be enough to create a stylish everyday accessory.
7. Mixed Bead Dangle Earrings
Combine different shapes while keeping the colors within the same palette. For example, a rounded bead, small pearl, and metallic charm can create visual variety without making the finished earrings look crowded.
8. Gold-Tone Charm Earrings
Metal charms are an easy way to add interest to a simple earring base. Pair a decorative charm with one bead for a lightweight design that can be adapted to different styles.
9. Color-Blocked Earrings
Choose two contrasting bead colors and repeat them in a simple sequence. This approach is ideal when you want a colorful pair without needing complicated shapes or advanced techniques.
10. Personalized Statement Dangles
Once you are comfortable with the basics, combine your favorite beads, stones, flowers, and charms into a longer statement design. Keep the hook and connectors simple so the decorative elements remain the focus.
Tips for Making DIY Earrings Look Professional
A handmade project does not need complicated techniques to look polished. Consistency is often more important than complexity. Matching lengths, repeating colors, and carefully closed connections can make a simple design appear much more refined.
Pro Tip: Make the first earring slowly and use it as your visual template. Instead of guessing the second earring from memory, match every bead and connection against the finished piece.
Keep the Weight Comfortable
Long dangle earrings can become uncomfortable if too many heavy components are added. When experimenting with statement designs, consider using fewer large pieces or combining one substantial focal element with lighter beads.
Create Balance Through Repetition
Repeating a bead shape or color helps a handmade pair feel cohesive. If one earring contains three blush beads and a gold charm, the matching earring should follow the same sequence unless an intentionally asymmetrical style is your goal.
Mix Textures Carefully
Combining smooth pearls with faceted stones, hammered metal, matte beads, or glossy components can add depth. The trick is to give each texture enough space to be noticed rather than placing too many competing elements together.
Choosing Colors for Handmade Earrings
Color is one of the easiest ways to personalize DIY jewelry. Soft blush, cream, white, and gold can create a delicate look, while green stones introduce a natural accent. Neutral shades are particularly versatile because they can complement many outfits.
For a more playful result, choose one dominant color and one accent shade. For example, green beads can be paired with pearl-like white beads and gold-tone findings. Pink beads can be balanced with cream or metallic details. Keeping the palette controlled helps the final earrings feel coordinated.
You can also create seasonal collections. Warm neutrals and earthy tones can work well for autumn-inspired jewelry, while pastel beads can create a fresh spring or summer feeling. Metallic accents can then tie the entire collection together.
Easy DIY Earrings for Gifts
Handmade earrings can be a thoughtful gift because the design can be selected around the recipient’s favorite colors and style. A simple pair of pearl-inspired earrings can feel classic, while colorful bead earrings can be more playful and expressive.
When making earrings as gifts, simple designs are often especially useful. They are easier to reproduce, easier to package, and more likely to work with different outfits. Creating several pairs from the same color palette can also make a lovely coordinated handmade gift set.
Small jewelry boxes, fabric pouches, or simple presentation cards can complete the handmade experience. Even when the jewelry itself uses inexpensive materials, careful presentation can make the finished gift feel considered and personal.
A Simple Way to Plan Your Next Jewelry Project
Before reaching for your tools, take a few minutes to sketch out the idea or arrange the components on your work surface. Think about the focal point, overall length, colors, and number of decorative pieces.
- Choose one main focal element.
- Select two or three supporting colors.
- Decide whether the earrings should be short, medium, or long.
- Arrange the pieces before making permanent connections.
- Keep a finished earring nearby while assembling its pair.
This planning stage can prevent unnecessary adjustments and helps you discover interesting combinations before committing to the final design.
At a Glance
- Best starting point: simple bead-and-hook designs.
- Most versatile materials: beads, pearls, stones, jump rings, and charms.
- Helpful tool: small jewelry pliers.
- Design secret: repeat colors and shapes for a coordinated look.
- Easy upgrade: add one statement stone or textured charm.
Final Thoughts on DIY Earrings Easy Enough for Beginners
Making DIY earrings is a creative project that gives you plenty of room to experiment without requiring an overwhelming list of materials or techniques. Simple hooks, beads, pearls, stones, charms, and metallic findings can be combined in countless ways to create jewelry that feels completely your own.
The designs inspired by this style show how a few carefully selected components can create very different results. Soft pink beads can produce a delicate romantic effect, green stones can bring a natural statement, pearl-like details can add elegance, and geometric pieces can create a modern finish.
Remember: You do not need advanced jewelry-making skills to begin. Start with one simple pair, focus on neat connections and balanced proportions, then experiment with new colors, textures, and shapes as your confidence grows.
Whether you are making jewelry for yourself, preparing handmade gifts, or simply looking for a relaxing craft project, easy DIY earrings are a rewarding place to start. Gather a few favorite components, arrange them into a design you love, and let your personal style guide the finished pair.