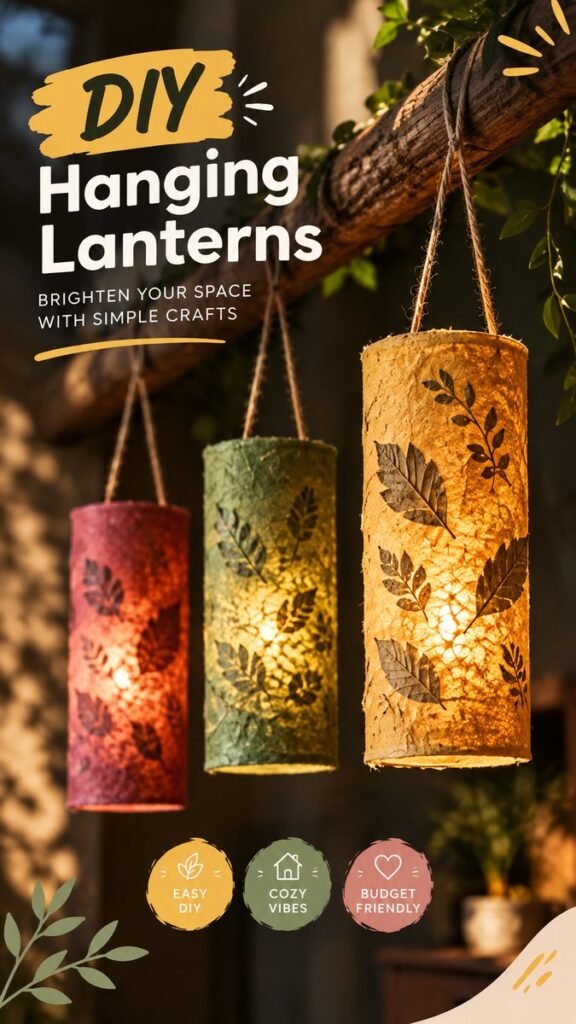
Paper lanterns DIY projects are a beautiful way to add warmth, texture, and personality to a room without requiring complicated supplies or advanced crafting skills. These handmade hanging lanterns combine soft light with colorful paper, delicate patterns, and natural-inspired details, creating the kind of cozy atmosphere that instantly makes a space feel more inviting. Whether you want to decorate a bedroom, patio, craft corner, party area, or quiet reading nook, a handmade paper lantern can become an eye-catching feature.
The appeal of DIY paper lanterns is their flexibility. You can experiment with different colors, shapes, textures, cutout patterns, and decorative details to create something that fits your personal style. A simple cylindrical design can look completely different when made in deep berry, muted green, warm gold, or another favorite shade. Add botanical motifs or layered paper details, and the result feels especially charming.
Key Takeaways
- Paper lanterns are an easy way to create cozy handmade lighting and decorative accents.
- Color, texture, and cutout patterns can completely change the look of a lantern.
- Cylindrical hanging designs work especially well for grouping several lanterns together.
- LED tea lights or small LED bulbs are a practical choice for paper-based decorations.
- Natural details such as leaf patterns can give handmade lanterns an organic, relaxed character.
Why Paper Lanterns DIY Projects Are So Appealing
There is something special about handmade lighting. Unlike mass-produced decorations, DIY paper lanterns can be customized to match the colors and mood of your home. They can be soft and understated, bright and playful, rustic and natural, or colorful enough to become the main decorative feature.
Paper is also an approachable craft material. It is lightweight, easy to shape, and available in countless colors and finishes. You can use plain craft paper for a minimalist appearance or choose textured sheets when you want the lantern to have more visual depth.
Important: The most successful paper lanterns balance decoration with light. Patterns should enhance the glow rather than completely block it, allowing the lantern to remain both a beautiful craft and an effective decorative light source.
The warm glow created when light passes through colored paper is one of the biggest reasons these crafts work so well. Darker shades create a richer, moodier appearance, while lighter paper produces a softer and brighter effect. When several colors are displayed together, the result can feel especially welcoming.
Choosing a Design for Your DIY Paper Lantern
Before cutting or assembling anything, think about the atmosphere you want to create. The shape of the lantern matters, but the surface treatment can be just as important. A simple cylindrical form provides plenty of room for experimenting with patterns and embellishments.
Cylindrical Hanging Lanterns
Cylindrical paper lanterns are a particularly versatile option. Their tall shape gives you a generous surface for decorative details while allowing light to spread vertically. They also look attractive when several are hung at different heights.
For a coordinated display, choose three complementary colors instead of making every lantern identical. A warm neutral paired with muted green and a berry-inspired shade can create a cozy, nature-inspired palette. Alternatively, use different tones from the same color family for a calmer arrangement.
Patterned and Cutout Lanterns
Patterns are where a simple paper lantern can become truly distinctive. Small geometric cutouts, dots, stars, leaves, flowers, or abstract shapes can allow light to escape in interesting ways. The resulting shadows can become part of the decoration.
For a softer handmade appearance, avoid making every pattern perfectly uniform. A mixture of small and larger shapes can create a more organic surface. If you prefer a modern look, keep the pattern consistent and use plenty of negative space.
Botanical-Inspired Paper Lanterns
Leaf and botanical details work beautifully with warm paper lighting. You can create the appearance of pressed leaves, attach paper foliage, or cut simple plant-inspired silhouettes into the surface. These details bring an earthy quality to the finished decoration.
Natural motifs are especially effective when combined with colors such as olive, sage, mustard, cream, terracotta, or muted berry. The combination creates a relaxed handmade aesthetic that works well with rustic, bohemian, cottage-inspired, and nature-themed interiors.
Materials for a Simple Paper Lantern Craft
You do not need a huge collection of craft supplies to make attractive paper lanterns. Start with a few basic materials and add decorative elements depending on the style you want.
- Colored or textured craft paper
- Scissors or a craft knife
- Ruler and pencil
- Craft glue or double-sided adhesive
- String, twine, or sturdy decorative cord
- A small LED tea light or LED light source
- Optional paper leaves, cutout templates, stamps, or decorative accents
Choose paper that is sturdy enough to hold its shape but still flexible enough to fold or curve. Extremely thin paper can tear easily, while very heavy cardstock may be harder to form into a smooth cylinder.
A Note About Lighting
Because paper is combustible, an LED light is a sensible choice for decorative lantern crafts. Small battery-powered LED tea lights can provide a warm glow without placing a flame directly inside the paper structure. Always follow the instructions supplied with your light source and keep the finished craft away from heat.
How to Make Paper Lanterns DIY Style
A basic hanging lantern can be made with a straightforward construction method. Once you understand the structure, you can modify the surface and decoration to create countless variations.
1. Plan the Lantern Shape
Decide how tall and wide you want your lantern to be. A taller cylinder creates an elegant hanging effect, while a shorter design can work well as part of a table or shelf display.
Measure your paper carefully and mark the cutting lines with a pencil. Leave enough material along one edge to create a joining flap. Before adding decoration, gently curve the paper to make sure the proportions look right.
2. Add Your Decorative Pattern
This is the stage where you can personalize the project. Add cutouts, layered shapes, paper leaves, simple line drawings, or textured elements. Keep the design balanced so the lantern does not become visually crowded.
If you are using a cutout pattern, place a protective surface underneath the paper and work slowly. Small details can make a big difference, particularly once the lantern is illuminated.
3. Form the Paper Cylinder
Carefully curve the decorated sheet until the two vertical edges meet. Secure the seam with craft glue or double-sided adhesive. Hold the join in place while the adhesive sets so the cylinder keeps its shape.
A clean seam helps the lantern look polished. If you want a more rustic craft appearance, a slightly visible handmade join can also become part of the character.
4. Create the Hanging Support
Use sturdy string or twine to create a hanging loop. For a balanced lantern, attach the cord at two or more points around the upper edge rather than relying on a single attachment point.
Natural twine complements botanical designs particularly well, while a simple neutral cord can create a cleaner modern appearance. Make sure the hanging material is securely attached before placing the lantern overhead.
5. Add the LED Light
Place a small LED light inside the lantern and test the glow. Move the light slightly if necessary to find the most attractive illumination. Some patterns look better when the light is centered, while layered decorations may create more interesting shadows when the light is positioned differently.
Pro Tip: Test your lantern in the evening before deciding where to hang it. The same paper color can look completely different under daylight and warm artificial light, so checking the finished glow helps you choose the best placement.
Creative Color Ideas for Hanging Paper Lanterns
Color can completely transform a paper lantern DIY project. Instead of choosing colors randomly, think about the mood you want your finished display to create.
Warm and Earthy
Mustard, cream, terracotta, olive, and muted brown create a relaxed palette that works beautifully with natural materials. Pair these colors with twine and leaf-inspired decorations for a rustic or botanical effect.
Soft and Calm
For a peaceful decorative display, try pale green, warm white, dusty pink, soft beige, or light gray. These colors allow the lanterns to blend into a room without overwhelming the rest of the decor.
Rich and Colorful
Deep berry, golden yellow, forest green, and warm orange can create a more dramatic arrangement. When grouped together, these shades make handmade lanterns feel festive and full of personality.
Why This Matters
A successful lantern display is not only about the individual crafts. The relationship between color, light, spacing, and height determines how the entire arrangement feels. Use related colors and vary the hanging heights to create a display that feels intentional rather than cluttered.
Where to Display DIY Paper Lanterns
One of the best things about handmade paper lanterns is that they can be adapted to many decorative settings. Their lightweight construction makes them especially suitable for hanging arrangements.
- Bedroom: Hang a small group near a reading corner or decorative wall.
- Living room: Use a few lanterns as a warm accent near a window or cozy seating area.
- Covered patio: Create a relaxed outdoor-inspired display where the lanterns are protected from weather.
- Party decor: Coordinate paper lantern colors with the theme of a celebration or gathering.
- Craft room: Display colorful lanterns as both useful lighting accents and creative decor.
- Entryway: A small hanging arrangement can introduce color and warmth near an entrance.
When hanging multiple lanterns, vary their heights slightly. A staggered arrangement creates movement and makes each piece easier to see. You can also group three lanterns together and use different sizes or colors to create a focal point.
Easy Ways to Personalize Your Lanterns
Once you have mastered the basic structure, there are plenty of ways to make your paper lantern craft unique. Try combining different techniques rather than relying on a single decorative element.
- Layer translucent paper behind cutout sections to soften the glow.
- Add simple paper leaves for a botanical-inspired surface.
- Use different paper textures to create depth.
- Experiment with vertical strips for a modern geometric appearance.
- Combine two complementary colors in one lantern.
- Use decorative twine to emphasize the handmade character.
- Change the shape from a simple cylinder to another lightweight geometric form.
You can also create a seasonal collection. Warm gold and orange shades can suit autumn-inspired decorating, while soft pastels can create a spring or summer atmosphere. Deep green and berry tones can bring a cozy feeling to colder months without requiring complicated seasonal decorations.
Common Mistakes to Avoid
DIY paper lanterns are relatively simple, but a few small details can affect the finished result. Taking your time during construction can make the lantern look considerably more polished.
Using Paper That Is Too Fragile
Very thin paper can wrinkle or tear during assembly. Choose a material with enough structure to hold its shape while still allowing light to pass through.
Adding Too Many Decorations
It can be tempting to keep adding patterns and embellishments, but a crowded design may hide the beautiful glow. Leave some open space so the light has room to shine through.
Ignoring Balance
A hanging lantern should remain stable and visually balanced. Check that the support cords are securely attached and that the lantern hangs naturally before displaying it.
Using an Open Flame
A paper craft and an open flame are an unsafe combination. Choose an LED light designed for decorative use instead. This also makes it easier to enjoy your lantern for longer periods without worrying about heat near the paper.
Make a Coordinated Lantern Display
Rather than making one lantern and stopping there, consider creating a small collection. Three or five lanterns can create a much stronger visual effect than a single piece, especially when the designs share a common color palette.
They do not need to be identical. In fact, slight variations can make the display more interesting. Keep one feature consistent, such as the shape, paper texture, or decorative motif, and change another element such as color or pattern.
For example, three cylindrical lanterns could use berry, green, and golden paper while sharing the same leaf-inspired decoration. Hang the tallest lantern slightly higher and position the others at different levels. The result feels coordinated while still showing off the individual handmade pieces.
Design Insight: Think of a group of DIY paper lanterns as one composition rather than several separate crafts. Repeating colors, textures, or motifs creates visual connection, while small differences keep the arrangement interesting.
A Simple Weekend Craft Project
Paper lanterns DIY projects are ideal for a relaxed crafting session because the basic construction is straightforward and the creative possibilities are wide open. You can prepare several lanterns using the same template, then personalize each one with different patterns and colors.
They are also a great project when you want handmade home decor without investing in expensive materials. A few sheets of decorative paper, some cord, adhesive, and LED lights can become an attractive display with a distinctly personal feel.
Invite friends or family to create their own designs and make the project even more enjoyable. Everyone can choose a different color or pattern, then combine the finished lanterns into one eclectic display.
At a Glance
- Use sturdy, light-friendly paper for the main lantern body.
- Choose colors that complement the room or event theme.
- Add botanical patterns, cutouts, or layered paper for extra character.
- Use LED lighting instead of an open flame.
- Hang several lanterns at varied heights for a more dynamic display.
Conclusion: Create Your Own Cozy Paper Lanterns
Making paper lanterns at home is a simple way to combine creativity, color, and cozy decor in one project. The basic cylindrical shape provides an easy starting point, while decorative patterns, botanical details, textured paper, and creative color combinations give you endless opportunities to make each lantern your own.
Whether you create one statement piece or a colorful group of hanging lanterns, the finished result can bring a gentle handmade atmosphere to your space. Experiment with proportions, try different surface designs, and let the paper itself become part of the visual story.
The most appealing DIY lanterns do not have to be perfect. Small variations in texture, pattern, and handmade details are often what give them their charm. Start with a simple design, choose a palette you love, and build from there. With a little imagination, ordinary craft paper can become beautiful glowing decor that adds warmth wherever it hangs.
Ready to craft? Gather your favorite paper colors, decorative details, twine, and LED lights, then create a lantern display that reflects your own style. Save your favorite paper lantern ideas for your next relaxing DIY session!