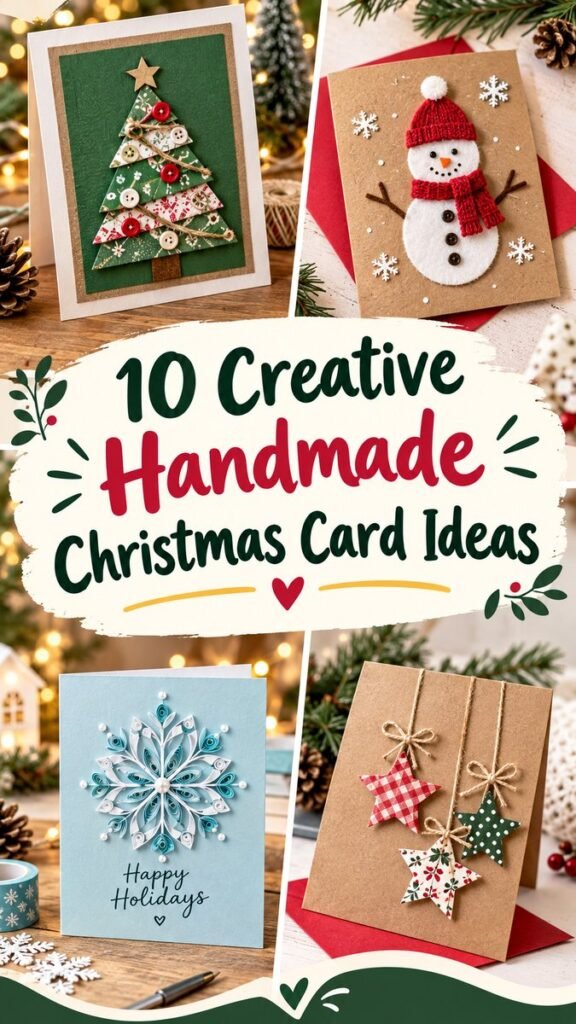
Making a DIY Christmas card is a simple way to turn the holiday season into something more personal and creative. Handmade cards can be decorated with patterned paper, buttons, twine, felt, snowflakes, stars, greenery, and other festive details that make every design feel unique. Whether you enjoy paper crafts, holiday decorating, or easy weekend projects, these Christmas card ideas offer plenty of inspiration for creating cheerful greetings at home.
The designs featured in this collection combine traditional Christmas colors with playful handmade textures. Rich greens, warm reds, natural kraft paper, crisp white details, and soft blue accents create a cozy holiday look. Some ideas use layered paper to form Christmas trees, while others feature snowflakes, ornaments, stars, or a charming snowman. The best part is that many of these concepts can be adapted to suit the supplies you already have.
Key Takeaways
- Use layers, texture, and simple embellishments to make handmade cards stand out.
- Traditional red, green, white, and kraft tones create an instantly festive appearance.
- Buttons, twine, fabric, paper scraps, and felt can become beautiful Christmas decorations.
- Simple shapes such as trees, stars, snowflakes, and snowmen are beginner-friendly.
- Mix handmade details with clean layouts for cards that look polished without being complicated.
Why Make a DIY Christmas Card?
A handmade Christmas card feels different from a mass-produced greeting because it gives you room to add your own personality. Even a basic folded card becomes special when you choose the colors, arrange the decorations, and write a thoughtful message inside. Handmade cards are also a fun way to enjoy creative time during the holiday season.
You do not need advanced crafting skills to create an attractive design. Start with a sturdy card base, choose one main Christmas motif, and add a few supporting details. A paper tree decorated with buttons can look just as charming as a more elaborate design. The goal is not perfection. It is creating something that feels warm, cheerful, and personal.
Important: A successful handmade Christmas card usually needs only one strong focal point. Choose a tree, snowflake, snowman, star, or ornament as the main feature, then keep the surrounding decorations simple enough to let that focal point shine.
10 Creative DIY Christmas Card Ideas
1. Layered Christmas Tree Card
Create a festive Christmas tree by layering several pieces of patterned paper into triangular shapes. Vary the prints and sizes to give the tree dimension. Add small buttons, a star at the top, and a little twine for extra texture. A green paper background surrounded by kraft and white layers gives this design a classic handmade appearance.
This idea is especially useful if you have leftover scrapbook paper. Mix floral Christmas patterns, tiny dots, stripes, or traditional holiday motifs. Keep the tree centered and use a simple border so the layered design remains the main attraction.
2. Cozy Snowman Christmas Card
A snowman is one of the easiest Christmas shapes to recreate with craft materials. Use white felt, paper circles, or another soft-looking material to build the body. Add a red hat and scarf, tiny buttons, simple eyes, and a small orange nose. Finish the design with miniature snowflakes or dots scattered around the snowman.
A kraft paper card base works beautifully with a colorful snowman because the natural background provides contrast. You can also place the finished card on a red or green folded base for a brighter holiday palette.
3. Quilled Snowflake Card
For a more delicate look, try creating a snowflake from rolled paper strips. Paper quilling allows you to build intricate shapes from small coils and loops. Arrange the pieces symmetrically to form a decorative snowflake, then add a small bead or pearl-like embellishment in the center.
A pale blue card base creates a wintry effect, while white and icy blue details keep the design light and elegant. Add a short greeting such as “Happy Holidays” underneath the snowflake for a finished look.
4. Hanging Star Ornament Card
Turn simple paper stars into miniature ornaments by attaching them to pieces of twine. Use kraft paper as the card background and create stars from different Christmas patterns. A red gingham star, a green patterned star, and a floral star can create an appealing mix without requiring complicated techniques.
Tie small bows at the top of each ornament to make them look as though they are hanging from an invisible Christmas tree. Leave plenty of open space around the decorations for a clean, modern composition.
5. Button Christmas Tree Card
Buttons are excellent embellishments for homemade Christmas cards. Arrange different sizes and colors to decorate a simple paper Christmas tree. Red, white, green, and neutral buttons can imitate ornaments while adding dimension to the finished card.
For an especially textured result, combine buttons with twine, patterned paper, and a wooden or paper star. This is also a practical way to use buttons from an old craft collection instead of leaving them unused in a supply box.
6. Embellished Snowflake Greeting Card
Snowflakes can be made from paper, felt, cardstock, glitter-free textured materials, or delicate cutout shapes. Place one large snowflake in the center of a red, green, blue, or white card and surround it with a few smaller details.
For a polished appearance, repeat the same color in several parts of the design. For example, a silver-style snowflake can be paired with small matching accents and a neutral background. Keeping the palette limited makes the card feel coordinated.
7. Layered Paper Ornament Card
Create a collection of Christmas ornaments from paper circles, teardrops, stars, or other simple shapes. Layer patterned paper over a solid card base and attach each ornament with twine. This approach is easy to customize because every ornament can use a different pattern.
Try combining three or four coordinated patterns rather than using too many unrelated prints. A limited palette of red, green, cream, and kraft tones gives the finished card a warm handmade appearance.
8. Fold-Out Christmas Tree Card
Add an element of surprise with a dimensional fold-out Christmas tree. A layered paper tree can stand slightly away from the card base when the card is opened, creating a playful three-dimensional effect.
Decorate the tree with tiny paper ornaments, stars, buttons, or other lightweight embellishments. Keep the folds crisp and test the card several times before adding decorations so it opens and closes comfortably.
9. Rustic Kraft Paper Christmas Card
Kraft paper is a wonderful foundation for rustic Christmas crafts. Its warm neutral color pairs naturally with red, green, white, and natural twine. Create a simple central decoration, then frame it with a few small accents to achieve a cozy farmhouse-inspired look.
This style is ideal when you want your handmade card to feel understated rather than heavily decorated. A small star, a tied piece of twine, or a few paper ornaments can be enough to complete the design.
10. Mixed-Material Christmas Card
Combine several craft materials to create a card with plenty of visual interest. Paper, buttons, felt, twine, fabric scraps, and small decorative pieces can work together beautifully when they share a consistent color palette.
Choose one material as the main feature and use the others as supporting accents. This prevents the design from feeling crowded. A paper Christmas tree might be the focal point, while buttons become ornaments and twine creates a decorative border or hanging detail.
Expert Insight
The easiest way to make handmade cards look intentional is to repeat colors and shapes. If your main decoration uses red and green, echo those colors in small accents. Repeating a visual detail two or three times creates balance without adding unnecessary clutter.
Essential Supplies for Handmade Christmas Cards
You can build a useful Christmas card craft collection without buying a large number of specialized supplies. Start with basic cardstock or blank card bases, then add decorative materials as needed.
- Cardstock or blank folded cards
- Patterned scrapbook paper
- Kraft paper
- Colored paper in Christmas shades
- Buttons in different sizes
- Twine or decorative string
- Felt or fabric scraps
- Paper snowflake and star shapes
- Scissors and a craft knife for suitable projects
- Paper-safe adhesive
- Pens or markers for handwritten greetings
Before starting a project, arrange your supplies on the table and group them by color. This small step can make designing easier because you can quickly see which materials complement one another.
How to Design a Christmas Card That Looks Polished
Start With a Simple Layout
Before gluing anything down, place all your elements on the card and experiment with different arrangements. A centered focal point creates a traditional appearance, while an off-center design can feel more contemporary.
Use Contrast Carefully
Contrast helps handmade decorations stand out. A white snowflake looks crisp against a deep green background, while colorful buttons pop against kraft paper. If your main decoration is busy, choose a quieter background to keep the overall composition readable.
Add Texture in Small Doses
Texture is one of the easiest ways to make a DIY Christmas card feel special. Buttons, felt, twine, layered paper, and fabric can all create depth. However, too many different textures may compete for attention, so select two or three materials that work naturally together.
Pro Tip: Photograph or preview your card from a short distance before finishing it. If the main shape and greeting are still easy to recognize, the design has a strong visual hierarchy. If everything blends together, remove one or two small embellishments.
Easy Ways to Personalize Your DIY Christmas Cards
Personalization does not have to mean creating a completely different design for every recipient. Keep a basic layout and change one or two details. You might use a favorite color combination, add a different initial, choose a unique patterned paper, or write a short personal message inside.
For family and friends, handwritten notes can make the card feel even more meaningful. A simple greeting followed by a sentence about a favorite shared memory can turn a decorative craft project into a keepsake.
Tips for Making Cards in Batches
If you need several Christmas cards, choose one or two designs and prepare the materials in stages. Cut all the paper shapes first, then prepare the buttons, stars, snowflakes, or other embellishments. Once everything is ready, assemble the cards one after another.
- Choose a limited color palette.
- Prepare the card bases.
- Cut or fold the major decorative shapes.
- Arrange the pieces before attaching them.
- Add dimensional embellishments last.
- Write or add the greeting after the design is secure.
Working in batches saves time and also helps keep a collection of handmade cards visually coordinated. You can still vary small details so each card has its own character.
At a Glance
- Best beginner motifs: trees, stars, snowflakes, ornaments, and snowmen.
- Easy textures: buttons, twine, felt, layered paper, and fabric.
- Classic palette: red, green, white, kraft, and warm neutral tones.
- Design secret: repeat colors and shapes for a balanced handmade look.
- Personal touch: finish each card with a thoughtful handwritten greeting.
Conclusion: Make the Holidays More Personal
A DIY Christmas card can be as simple or detailed as you want. Layered paper trees, cheerful snowmen, delicate snowflakes, hanging stars, colorful buttons, and rustic kraft paper all provide easy starting points for a handmade holiday project. The most appealing designs often come from combining a few familiar materials in a thoughtful way rather than trying to add every decoration at once.
Whether you are crafting one special greeting or preparing a whole stack for the holiday season, these ideas can help you create cards that feel warm, creative, and personal. Gather your favorite paper scraps, buttons, twine, felt, and festive embellishments, then experiment with colors and layouts until you find a style that feels like you.
Most importantly, have fun with the process. Handmade holiday cards do not need to be perfect to be memorable. A thoughtful design and a personal message can make even the simplest Christmas card feel wonderfully special.