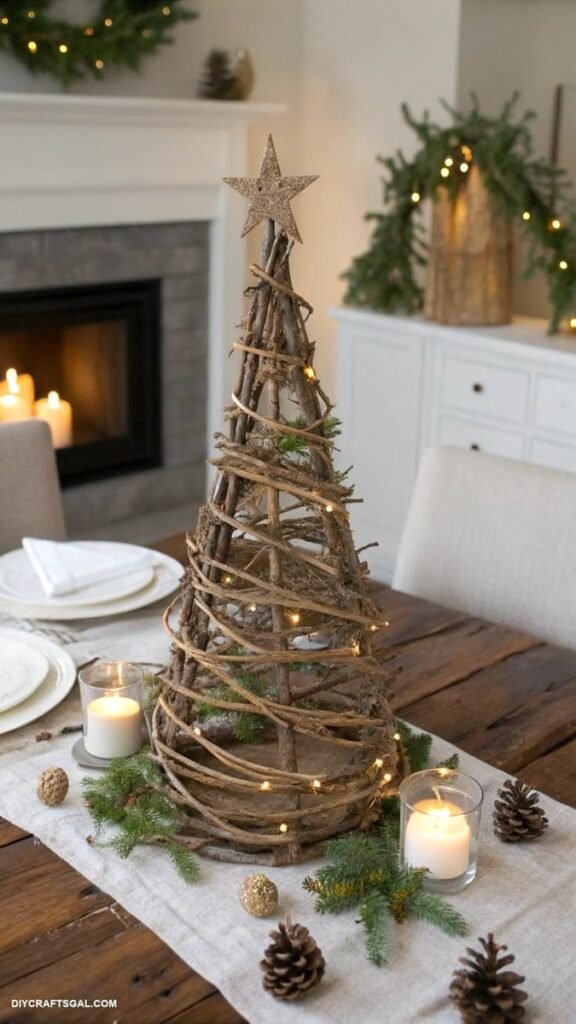
Bring a warm, handmade feeling to your holiday decorating with a charming DIY tree inspired by natural woodland textures. This rustic tree combines simple branches, twine, greenery, warm fairy lights, and a classic star topper to create a cozy centerpiece that feels festive without looking overly polished. It is a beautiful choice for a dining table, mantel, entryway, sideboard, or any small corner that could use a touch of Christmas charm. Best of all, the design can be adapted to suit your space, materials, and decorating style.
Key Takeaways
- A rustic DIY tree can create a cozy holiday focal point using simple natural materials.
- Branches and twine give the design an organic woodland character.
- Warm fairy lights add softness and make the tree especially inviting in the evening.
- Small touches such as greenery, pinecones, and a star topper complete the festive look.
- The idea works especially well as a tabletop Christmas decoration for smaller spaces.
- You can easily customize the size, texture, and decorations to match your home.
Why a DIY Tree Makes a Beautiful Holiday Decoration
Traditional Christmas trees are wonderful, but they are not always practical for every room. A DIY tree offers a smaller and more flexible alternative while still bringing the unmistakable feeling of the holiday season into your home. The tree shown here has a slender, open shape that makes it ideal for a dining table or another surface where a full-size tree would be too large.
The natural construction also gives the decoration a relaxed character. Instead of relying on perfectly shaped branches and heavily coordinated ornaments, the design celebrates irregular textures and earthy details. That makes it particularly appealing for rustic, farmhouse, Scandinavian-inspired, cottage, and woodland Christmas interiors.
Important: The beauty of a rustic DIY tree comes from its imperfections. Branches do not need to be identical, and the finished piece does not have to look perfectly symmetrical. Natural variation is part of the charm.
What Makes This Rustic DIY Tree So Appealing?
The design combines several simple visual elements that work especially well together. The branches create the basic tree silhouette, while natural twine wraps around the structure in loose, winding lines. Small pieces of greenery add freshness, and warm lights provide a gentle glow. At the top, a simple star creates a clear finishing point.
Rather than covering every surface with decorations, the open construction allows the materials themselves to remain visible. You can see the branch framework through the spaces between the twine, which gives the tree an airy and handmade appearance.
This approach is also useful when decorating on a budget. You do not need a large collection of ornaments to make the finished piece look complete. A handful of carefully chosen accents can have more impact than dozens of decorations competing for attention.
Materials to Consider for a DIY Tree
A project like this can be adapted to whatever craft supplies and natural materials you already have available. The goal is to create a stable tapered structure and then decorate it with layers of texture and light.
- Small branches: Choose dry, reasonably straight branches for the main structure.
- Natural twine: Jute or another rustic-looking cord works well for wrapping and securing the branches.
- Greenery: Small evergreen sprigs can add a fresh seasonal appearance.
- Warm fairy lights: Tiny lights help emphasize the shape of the tree without overwhelming it.
- A star or simple topper: This creates a finished focal point at the top.
- Pinecones: These are useful for adding natural texture around the base or nearby table setting.
- A sturdy base: A suitable base helps keep the tree upright and secure.
- Optional decorative accents: Small neutral ornaments can be added if you want a more decorated appearance.
You do not necessarily need every item on this list. One of the advantages of a DIY Christmas tree is that the design can evolve around the materials you already own. If you have an abundance of branches but very little decoration, let the natural structure take center stage. If you prefer a more festive look, add additional greenery, lights, or small ornaments.
How to Create a Rustic DIY Tree
The basic idea is simple: build a tapered framework, secure it, wrap it with twine, and finish it with seasonal details. Take your time during the structural stage because a stable foundation will make decorating much easier.
1. Gather and Prepare the Branches
Start by collecting branches that are dry, clean, and suitable for indoor decorating. Look for a mixture of lengths so that the structure can gradually become narrower toward the top. Remove loose pieces or anything that could easily fall away during construction.
There is no need to make every branch perfectly straight. Slight bends and natural variations can make the finished tree more interesting. However, avoid branches that are excessively fragile or unstable.
2. Build the Tapered Shape
Arrange the longest branches around the outside to establish the lower portion of the tree. Gradually use shorter branches as you move upward. The objective is a triangular or conical silhouette rather than a perfectly symmetrical Christmas tree.
Secure the branches at key points so they do not shift while you work. A sturdy internal support can also help maintain the shape, especially if you plan to add several layers of twine and decorations.
3. Wrap the Structure With Twine
Once the basic frame is stable, begin wrapping natural twine around the branches. Follow the shape of the tree, moving gradually from the lower section toward the top. Keep some sections loose and open rather than wrapping every inch.
The irregular spacing is one of the details that gives this style its personality. A slightly uneven spiral can look more natural and handmade than a perfectly measured pattern.
4. Add Greenery
Small evergreen sprigs can be tucked into selected areas of the structure. Concentrate on a few strategic spots rather than filling the entire tree. This creates contrast between the muted branches and the fresh green foliage.
Greenery also helps soften the harder lines of the wood. If you are using fresh material, keep the tree in an appropriate environment and replace pieces when they begin to dry excessively.
5. Add Warm Lights
Wrap a strand of small warm fairy lights around the tree, following the general path of the twine. Place the lights so that some sit toward the front while others glow deeper inside the open framework.
This creates a layered effect. During daylight, the branches and twine remain the main visual feature. In the evening, the warm lights become much more noticeable and give the tree a cozy glow.
6. Finish With a Simple Topper
A star at the top provides a strong visual endpoint and immediately reinforces the Christmas theme. A natural wood star, textured ornament, neutral decoration, or another simple topper can work beautifully.
Keep the topper proportional to the tree. A small handmade-looking accent usually complements this rustic design better than something extremely large or visually heavy.
Expert Insight
For a more polished rustic look, repeat the same few materials throughout the arrangement. Branches, greenery, natural twine, warm lighting, and neutral accents create a cohesive palette without requiring lots of decorations.
How to Style Your DIY Tree at Home
Where you place the finished tree can have just as much impact as how you decorate it. The tabletop design shown here works particularly well as part of a larger holiday tablescape. A simple linen runner, wooden table, candles, greenery, and pinecones create a natural setting that supports the tree without distracting from it.
Create a Rustic Dining Table
Place the DIY tree in the center of a dining table and surround it with small pieces of evergreen, pinecones, neutral ornaments, or candles. Keep the surrounding decorations low enough that guests can still see across the table comfortably.
Natural textures are especially effective here. Linen, unfinished wood, woven materials, greenery, and warm lighting can create a relaxed holiday atmosphere that feels inviting rather than overly formal.
Decorate a Mantel or Sideboard
A smaller version of the tree can also work beautifully on a mantel or sideboard. Pair it with greenery and a few warm lights to create a coordinated display. If the surface already contains several decorations, let the tree remain relatively simple.
Use It in a Small Space
One of the biggest advantages of a tabletop tree is its compact footprint. It can bring seasonal character to an apartment, bedroom, office, entryway, or small dining area without requiring the floor space of a traditional Christmas tree.
Pro Tip: If your room already has strong holiday colors, keep the DIY tree neutral. Natural wood, muted greenery, soft lights, and simple textures can make the decoration feel intentional while blending easily with existing decor.
Easy Ways to Customize the Design
The same basic tree can take on completely different personalities depending on the materials and colors you choose. That makes this project especially useful for anyone who enjoys refreshing their holiday decor from year to year.
- For a farmhouse look: Add linen ribbon, neutral ornaments, and simple wooden accents.
- For a woodland theme: Emphasize pinecones, evergreen sprigs, bark textures, and natural twine.
- For a minimalist style: Use fewer branches, limited greenery, and a single strand of warm lights.
- For a cozy cottage look: Add soft fabric ribbon and a few small handmade ornaments.
- For a more festive finish: Introduce subtle metallic accents or additional warm lights.
Tips for a Beautiful and Balanced Finish
Good styling is often about knowing when to stop. Because the tree already has a strong shape and interesting texture, too many decorations can hide the qualities that make the project special.
- Step back regularly while decorating so you can see the overall silhouette.
- Keep the base visually grounded with greenery or a few natural accents.
- Distribute lights throughout the structure instead of placing them in one area.
- Repeat colors and textures around the surrounding table or display.
- Leave some open space so the branch framework remains visible.
- Make sure the finished tree is stable before adding heavier decorations.
It is also helpful to think about the tree from every angle. A tabletop decoration can be viewed from several sides, especially when placed in the center of a dining table. Rotate the tree as you work and adjust any areas that look noticeably heavier than others.
Why Natural Materials Work So Well for Christmas Decor
Natural materials bring warmth and visual depth to holiday decorating. Branches have irregular lines, twine introduces a soft woven texture, pinecones provide structure, and greenery adds a fresh seasonal note. Together, these materials create a look that feels connected to the outdoors.
They also pair beautifully with warm lighting. The gentle glow of tiny lights against wood and greenery creates a comfortable atmosphere, particularly during winter evenings. This is one reason rustic Christmas decorating remains so appealing for people who want a cozy home rather than an overly elaborate display.
The neutral color palette is another advantage. Browns, greens, cream tones, and warm golden light can work with many existing interiors. You can keep the design understated or add a few brighter accents without rebuilding the entire arrangement.
Make the DIY Tree Part of a Larger Holiday Display
For a cohesive room, repeat a few of the tree’s materials elsewhere. Place additional pinecones along a runner, tuck evergreen sprigs around candles, or use natural twine on gift wrapping. These small connections help the decoration feel like part of a complete holiday theme.
Lighting can also be repeated throughout the space. Warm fairy lights around a mantel, sideboard, or nearby greenery can echo the glow of the tree and make the room feel more unified.
Remember that a successful holiday display does not have to fill every available surface. Leaving some areas quiet allows the most meaningful decorations to stand out. A simple DIY tree can become the focal point precisely because the surrounding styling remains restrained.
At a Glance
- Use natural branches to create a tapered tabletop tree.
- Wrap the frame with twine for rustic texture.
- Add small greenery pieces for seasonal color.
- Use warm fairy lights for a soft evening glow.
- Finish with a simple star or neutral topper.
Conclusion
A DIY tree is a simple way to make holiday decorating feel more personal, creative, and connected to nature. With branches, twine, greenery, warm lights, and a few thoughtful accents, you can create a beautiful centerpiece without relying on a large collection of decorations.
The rustic design is especially versatile because it can fit into many decorating styles. Keep it simple for a minimalist room, add pinecones and greenery for a woodland feel, or introduce soft festive accents for a more traditional holiday atmosphere. The most important part is choosing materials and details that make the finished piece feel at home in your space.
Whether you are looking for a compact Christmas decoration, an easy handmade centerpiece, or a creative weekend craft, this DIY tree offers plenty of room to experiment. Let the natural texture of the branches do much of the work, add a gentle glow with warm lights, and keep the final styling balanced. The result can become one of those handmade decorations you look forward to bringing out every holiday season.