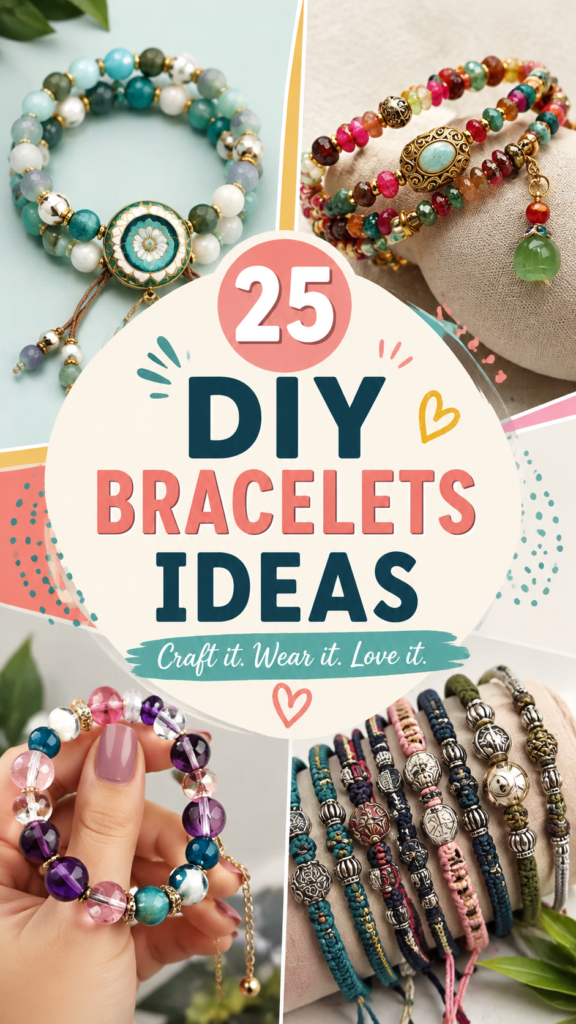
DIY bracelets are one of the easiest ways to turn simple beads, cords, charms, and creative color combinations into jewelry that feels completely personal. Whether you love colorful statement pieces, delicate beaded designs, friendship bracelets, or textured handmade styles, there are countless ways to create a bracelet that suits your taste. The collection of bracelet ideas featured here brings together a variety of looks, from polished gemstone-inspired designs to playful bead combinations and detailed woven bracelets.
Key Takeaways
- Explore colorful DIY bracelet ideas for different styles and skill levels.
- Combine beads, charms, textures, and colors to create a personalized design.
- Use simple bracelet-making techniques to create thoughtful handmade gifts.
- Experiment with layered bracelets for a stylish, collected look.
- Choose materials that complement the size, shape, and mood of your finished piece.
What makes DIY bracelets especially appealing is their flexibility. You do not need to follow one exact formula. A bracelet can be minimal and elegant, bold and colorful, rustic and handmade, or detailed with multiple strands and decorative elements. The most exciting part is choosing combinations that reflect your personality while learning a craft you can return to whenever you want a creative project.
25 DIY Bracelet Ideas to Inspire Your Next Project
If you are searching for bracelets DIY inspiration, start by looking at the overall design rather than trying to recreate every detail of one example. Notice how different beads work together, how colors are balanced, and how decorative focal pieces can make an otherwise simple bracelet stand out.
The designs shown feature several useful directions for inspiration. Some use large round beads for an eye-catching finish, while others combine smaller beads with decorative centers. There are also textured bracelets with woven or cord-based construction, proving that handmade jewelry does not have to rely on one material or technique.
1. Colorful Beaded Bracelets
Colorful bead bracelets are a great starting point for beginners because the design possibilities are almost endless. Choose a small palette of complementary colors, then arrange the beads in a repeating pattern or mix them randomly for a more relaxed appearance.
For a polished look, repeat the same colors throughout the bracelet. If you prefer something playful, combine contrasting shades and vary the bead sizes. A few metallic spacer beads can also help separate larger beads and create visual rhythm.
2. Multistrand Bracelet Ideas
Multistrand bracelets instantly create a fuller appearance. Several strands can be worn together as one coordinated piece, allowing you to mix different bead shapes, textures, and colors without making every strand identical.
Try pairing one strand of larger beads with another made from smaller beads. You can also combine a delicate strand with a textured cord bracelet. Keeping one color family consistent across the strands will help the finished piece look intentional.
3. Charm Bracelet Designs
Charms are an easy way to give a handmade bracelet a focal point. Choose one decorative centerpiece or several smaller charms spaced throughout the design. The charm can become the visual starting point for selecting the rest of your colors and materials.
For an understated bracelet, use one charm with neutral or softly colored beads. For a more expressive piece, surround the charm with bright beads and varied textures.
4. Friendship Bracelet Ideas
Handmade friendship bracelets remain a favorite because they are personal, affordable, and easy to customize. Beaded versions can be especially simple to personalize. Choose colors associated with a favorite memory, shared interest, or simply your friend’s favorite shades.
Creating matching bracelets is another fun approach. The bracelets do not have to be identical. You can use the same color palette while changing the bead arrangement so each person has a slightly different version.
5. Elegant Beaded Jewelry
DIY jewelry can look surprisingly refined when the materials are arranged carefully. Larger decorative beads can create a focal point, while smaller beads help transition toward the clasp or ends of the bracelet.
For an elegant style, limit the color palette to two or three shades. White, cream, soft pink, blue, green, and metallic accents can create a sophisticated appearance without making the design feel complicated.
6. Color-Coordinated Bracelet Sets
Instead of making one bracelet, consider creating a small collection. A coordinated set can include several designs that share similar colors while using different patterns and materials.
This approach is particularly useful if you enjoy stacking bracelets. One design might use large beads, another smaller beads, and a third could use woven cord. Because the colors connect the pieces, they can be worn together without looking overly matched.
Important: The best DIY bracelet designs usually balance variety with repetition. Repeating a color, bead shape, or texture gives the eye something familiar to follow, while a contrasting focal bead keeps the finished bracelet interesting.
How to Choose Materials for DIY Bracelets
Before beginning a bracelet project, decide what kind of finished look you want. Your material choices will influence not only the appearance but also the feel and flexibility of the bracelet.
Beads
Beads are available in countless shapes, sizes, colors, and finishes. Round beads create a classic appearance, while irregular shapes can make a bracelet feel more organic and artistic. Small beads are useful for detailed patterns, whereas larger beads can serve as focal points.
When combining different bead sizes, avoid placing too many large elements together. Alternating large and small beads often creates a more balanced arrangement.
Cord and Thread
Cord is a useful choice for woven, knotted, and casual bracelet designs. Different cord thicknesses can dramatically change the finished appearance. Thin cord creates a delicate look, while thicker cord gives the bracelet a more substantial handmade feel.
Choose a cord color that either blends with the beads or intentionally contrasts with them. A matching cord creates a seamless appearance, while contrast can make the construction itself part of the design.
Decorative Focal Pieces
A decorative centerpiece can transform a simple strand of beads into a statement bracelet. Look for an element with a distinctive shape, pattern, or finish. Place it near the center and use smaller elements around it to draw attention toward the focal point.
Expert Insight
When planning a bracelet, build the design around one main idea. It could be a color palette, a special focal bead, a particular texture, or a repeating pattern. Once that foundation is established, choose supporting materials that enhance it instead of competing with it.
How to Design a Bracelet That Looks Balanced
A bracelet can contain beautiful individual components and still feel visually crowded if everything has the same level of visual weight. Balance is what makes a handmade design look intentional.
Start With a Color Palette
Choose two to four primary colors before arranging your beads. This simple step can prevent the finished bracelet from becoming visually overwhelming.
- Select one main color that will dominate the bracelet.
- Add one or two supporting colors.
- Use a neutral or metallic accent if the design needs contrast.
- Lay the beads out before stringing them so you can adjust the pattern.
Mix Textures Carefully
Texture adds depth to DIY jewelry. Smooth beads can look beautiful next to woven cord, faceted beads, or decorative metal accents. However, too many competing textures can make the bracelet feel busy.
A useful approach is to choose one texture as the main feature and use the others as supporting details. For example, a heavily textured cord bracelet can be paired with relatively simple beads rather than several elaborate bead types.
Create a Focal Point
Every bracelet does not need a centerpiece, but adding one can make the design more memorable. A larger bead, decorative medallion-style element, colorful charm, or unusual bead can become the focal point.
Once you select the focal element, repeat one of its colors elsewhere in the bracelet. This small design trick helps connect the centerpiece with the rest of the piece.
Easy DIY Bracelet-Making Process
You can approach most bracelet projects with a simple planning process. Even when the final design looks intricate, breaking it into smaller decisions makes crafting much easier.
Step 1: Gather Your Supplies
Prepare your beads, cord or stringing material, decorative elements, and any finishing components you plan to use. Keeping everything nearby makes the creative process smoother and allows you to compare materials as you work.
Step 2: Plan the Arrangement
Place the beads on a flat surface and experiment with several combinations. Try symmetrical patterns, alternating colors, or a more relaxed arrangement. Photographing your favorite layout before assembling it can also help you remember the sequence.
Step 3: Build the Bracelet
String, knot, weave, or assemble the materials according to the style you have chosen. Work slowly, especially when handling small beads or detailed decorative pieces. The goal is not simply to finish quickly but to maintain an even and comfortable design.
Step 4: Check the Fit
Before completing the final fastening, check the bracelet around your wrist. Make sure it has enough room to move comfortably without feeling excessively loose. A little flexibility is helpful for everyday wear.
Step 5: Add the Finishing Details
Once the arrangement and fit are right, finish the ends securely. Check the bracelet from several angles and make any small adjustments needed to improve the spacing or overall appearance.
Creative Ways to Personalize Handmade Bracelets
The real advantage of making your own jewelry is the freedom to customize every detail. A bracelet can be designed around a favorite color, a seasonal palette, a special occasion, or a particular fashion style.
- Use meaningful colors: Build a palette around colors you naturally enjoy wearing.
- Mix bead sizes: Combine larger focal beads with smaller accents for dimension.
- Add charms: Use a decorative charm to give a bracelet a recognizable focal point.
- Create matching sets: Make several bracelets using the same palette but different patterns.
- Layer different styles: Combine beaded, woven, and delicate bracelets for a personalized stack.
Pro Tip: Lay your bracelet designs next to clothing or accessories you already own. This makes it easier to build color combinations you will actually want to wear. A beautiful bracelet becomes even more useful when it works naturally with your existing wardrobe.
DIY Bracelets Make Thoughtful Handmade Gifts
Handmade bracelets can also become meaningful gifts because the design can be customized for the person receiving it. Instead of choosing a generic accessory, you can select colors and details that reflect their style.
For a simple gift, create one polished bracelet with a small number of carefully selected colors. For a more creative present, make a coordinated set containing several bracelets that can be worn individually or stacked together.
DIY bracelets are also suitable for creative gatherings. Friends or family members can each create their own design while sharing beads and experimenting with different patterns. The activity can be as simple or detailed as the group prefers.
How to Make Bracelet Ideas Feel More Stylish
Trendy jewelry does not always require complicated construction. Often, a strong color combination and thoughtful spacing are enough to make a handmade bracelet look polished.
One effective approach is to create contrast. Pair soft colors with a deeper accent, combine small beads with a larger centerpiece, or place a textured bracelet next to a smooth beaded design. Contrast gives a bracelet stack more visual interest.
Another approach is repetition. Repeating the same bead color at regular intervals creates a rhythm that makes the design look organized. Repetition can be subtle, so the bracelet still feels handmade rather than overly mechanical.
At a Glance
- Choose a clear color palette before assembling your bracelet.
- Use one focal element to give the design a visual center.
- Mix bead sizes and textures without overcrowding the piece.
- Test the arrangement and fit before finishing the bracelet.
- Experiment with bracelet stacks and coordinated sets for more styling options.
Conclusion: Find Your Favorite DIY Bracelet Style
Making your own bracelets is a simple creative hobby with plenty of room for experimentation. From colorful beaded bracelets and charm designs to friendship bracelets and textured woven styles, there is no single right way to create handmade jewelry. The most successful designs are often the ones that combine a clear idea with a few carefully chosen details.
Use these DIY bracelet ideas as inspiration, then make them your own. Change the colors, swap the beads, add a focal charm, experiment with different textures, or combine several styles into a bracelet stack. Start with a simple design and gradually try more detailed patterns as your confidence grows.
Whether you are making jewelry for yourself, preparing a handmade gift, or looking for a relaxing craft project, bracelet making offers an easy way to turn creativity into something wearable. Save your favorite ideas, gather your materials, and start designing a bracelet that feels uniquely yours.