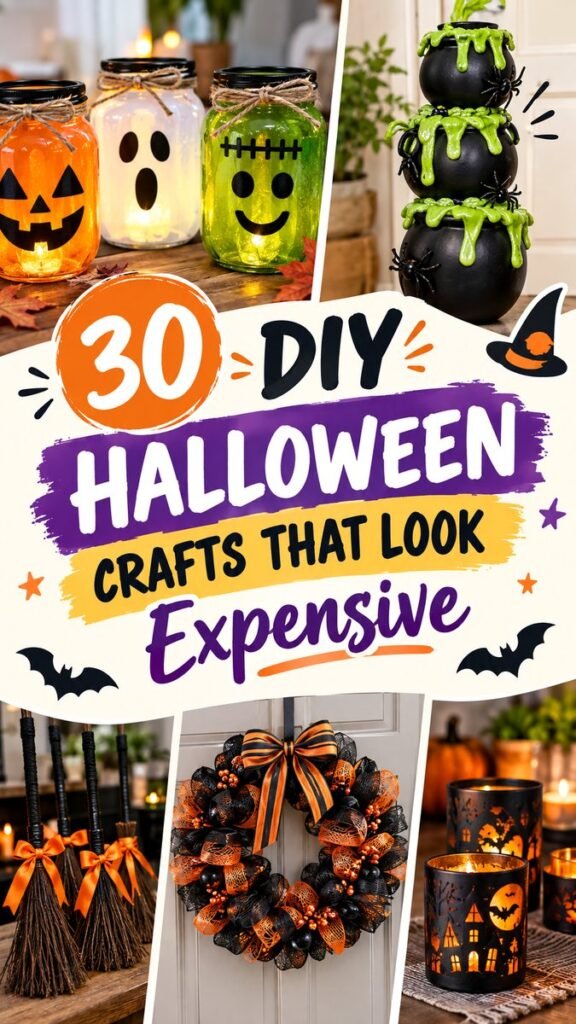
Halloween decorating does not have to mean spending a fortune on seasonal accessories. With a little creativity and a few affordable craft supplies, you can create spooky decorations that look polished, festive, and surprisingly expensive. From glowing mason jar lanterns and dramatic black cauldrons to decorative brooms, textured wreaths, and atmospheric candle holders, there are plenty of easy DIY Halloween decorations that can transform an ordinary room into a fun seasonal display.
Key Takeaways
- Simple household and craft supplies can create impressive Halloween decor.
- Black, orange, purple, green, and warm lighting create an instantly festive palette.
- Layering different textures makes inexpensive decorations look more thoughtfully designed.
- DIY lanterns, wreaths, brooms, and candle holders work well in multiple areas of the home.
- A cohesive color scheme can make several inexpensive projects feel like one complete collection.
Easy DIY Halloween Decorations That Look Expensive
The secret to impressive Halloween decor is not necessarily the price of the materials. It is the way those materials are combined. A few carefully chosen colors, interesting textures, warm lighting, and strong silhouettes can make a simple craft feel much more sophisticated.
That is exactly what makes these Halloween craft ideas so appealing. They capture the dramatic character of the season while remaining approachable enough for a weekend DIY project. You can create a spooky atmosphere without filling every surface with store-bought decorations.
Think of your Halloween decorating as a collection rather than a series of unrelated crafts. When several pieces share colors and materials, they naturally look more coordinated. A black wreath with orange accents can complement black candle holders, while green details can connect the display to other spooky decorations around the room.
Important: Expensive-looking Halloween decor usually comes down to presentation. Clean shapes, controlled colors, layered textures, and warm lighting can make basic materials appear much more polished.
1. Create Glowing Halloween Mason Jar Lanterns
Mason jars are one of the easiest starting points for DIY Halloween decorations. Their simple glass shape gives you plenty of room to experiment with colors, faces, silhouettes, and lighting. A few decorated jars grouped together can become a striking centerpiece for a table, shelf, or entryway.
Choose a Spooky Jar Theme
For a playful Halloween display, try creating several different characters rather than making every jar identical. Orange can suggest a classic pumpkin-inspired look, while pale glowing jars can create a ghostly effect. Green tones can add a fun monster-inspired appearance.
Keep the facial details simple. Large eyes, a curved mouth, or a few geometric shapes are often enough to communicate the Halloween theme. Simple designs are also easier to read when the jars are viewed from across a room.
Make the Lighting Part of the Design
Warm battery-powered lights can give glass jars a cozy glow. The light becomes especially effective when several jars are displayed together at slightly different heights. Place them on a tray, wooden shelf, or small side table to create a concentrated decorative moment.
For an elevated appearance, avoid overcrowding the display. A few carefully arranged jars often have more visual impact than a large collection scattered across a room.
2. Turn Simple Pots Into Spooky Cauldron Decor
Round black containers can easily become the foundation for dramatic Halloween displays. When stacked or grouped at different heights, they create a sculptural effect that immediately draws attention.
A particularly playful approach is to add bright green, slime-like decorative material around the edges. Let some of it appear to spill over the sides for a messy, exaggerated Halloween effect. The contrast between deep black and vivid green creates a strong visual statement.
Use Height to Create Drama
Instead of placing every decorative item at the same level, combine low, medium, and tall pieces. Stacking appropriately sized containers can create a tiered focal point, while separate pieces can be arranged around the base to make the display feel fuller.
Keep safety in mind when placing decorative containers near walkways, doors, or stairs. Heavy pieces should have a stable base, and decorative materials should be secured so they do not become tripping hazards.
3. Make DIY Halloween Brooms
Decorative brooms are another simple craft that can add height and personality to a Halloween arrangement. Their long, narrow shape works especially well beside a doorway, fireplace, porch display, or large indoor plant.
You can use natural-looking broom materials and finish them with colorful ribbons or fabric strips. Black and orange make an instantly recognizable Halloween combination, while purple, green, or metallic accents can give the project a more contemporary appearance.
Add a Decorative Bow
A large bow near the handle is a simple way to make an inexpensive broom look finished. Layer two ribbons with different textures or widths to create more visual depth. A patterned ribbon can also become the focal point against an otherwise neutral broom.
For a cohesive decorating scheme, repeat the same ribbon color somewhere else in the room. Repetition is one of the easiest ways to make separate DIY projects feel intentionally coordinated.
Expert Insight
- Choose two or three main Halloween colors and repeat them throughout your decorations.
- Combine smooth surfaces with rough, woven, fuzzy, or glossy textures for a richer look.
- Use lighting strategically to make simple decorations feel more atmospheric after dark.
4. Design a Dramatic Halloween Wreath
A wreath is one of the most useful DIY Halloween decorations because it instantly changes the appearance of a door or wall. You do not need a complicated design to create something eye-catching. A strong color combination and plenty of texture can do most of the work.
Black mesh, orange accents, ribbons, faux foliage, lightweight decorative balls, and small seasonal embellishments can all contribute to a layered wreath. The goal is to create dimension without making the arrangement so crowded that individual elements disappear.
Build the Wreath in Layers
Begin with a simple base and gradually add larger pieces before filling gaps with smaller details. Position the biggest bow or focal decoration where it can be seen immediately. Then distribute smaller accents around the rest of the wreath.
Do not worry about perfect symmetry. A slightly asymmetrical arrangement can look more natural and modern, particularly when different textures are involved.
5. Make Spooky Candle Holders
Candle holders can create some of the strongest Halloween atmosphere with very little effort. Dark containers with cutout shapes allow warm light to shine through, creating shadows and patterns on nearby surfaces.
Try simple silhouettes such as bats, pumpkins, haunted houses, or other classic Halloween shapes. The design does not have to be intricate. When a light source shines behind a simple silhouette, even basic shapes can look dramatic.
Create a Warm Evening Display
Arrange several candle holders together rather than placing them randomly throughout the room. A cluster creates a stronger focal point and makes the lighting feel intentional.
If using real candles, keep them on stable, heat-resistant surfaces and away from curtains, paper, dried materials, and other flammable objects. Battery-operated lights are a convenient alternative for many decorative displays.
How to Make Budget Halloween Crafts Look More Expensive
There are a few simple design principles that can dramatically improve the appearance of inexpensive Halloween crafts. The first is consistency. Instead of buying or making decorations in every color imaginable, select a small palette and repeat it throughout your home.
The second is texture. Smooth glass, matte black containers, woven materials, ribbons, mesh, and glossy accents can create a layered appearance. Even when each material is inexpensive, the combination can look thoughtfully styled.
The third is scale. Include a few larger statement pieces rather than relying entirely on tiny decorations. A dramatic wreath, tall broom arrangement, or stacked display can anchor the rest of your seasonal decor.
Pro Tip: Before buying more decorations, rearrange the pieces you already have. Grouping similar colors, varying heights, and leaving a little empty space can instantly make a display look more intentional.
Easy Ways to Style Your Halloween Decorations
Once your DIY projects are finished, placement becomes just as important as the crafts themselves. Think about where people naturally look when entering your home. A front door, entry table, mantel, shelf, dining table, or living room corner can become a seasonal focal point.
Style an Entryway
Use a wreath as the main feature and add one or two smaller decorations nearby. A decorative broom positioned beside the door can provide height, while a few small pumpkins or lanterns can fill the lower area.
Decorate a Shelf
Shelves are perfect for small Halloween crafts because they allow you to build a layered arrangement. Place taller items toward the back and smaller jars or candle holders toward the front. Leave small gaps between objects so the display does not become visually crowded.
Create a Table Centerpiece
For a table, combine glowing jars, dark containers, and a few seasonal accents on a tray or decorative runner. Keep the center relatively low if the table will be used for meals so the decorations do not interfere with conversation.
Choosing a Halloween Color Palette
Traditional Halloween colors remain popular because they create immediate seasonal recognition. Black provides a strong foundation, orange adds warmth, and purple introduces a playful accent. Green can be used sparingly to create a bright contrast against darker decorations.
For a more sophisticated look, allow one shade to dominate and use the others as accents. For example, mostly black decor with orange ribbons can feel dramatic, while black and cream with small orange details can create a softer seasonal style.
Lighting can also influence how your colors appear. Warm lights make orange and cream tones feel cozy, while brighter lighting can emphasize colorful green or purple accents.
Simple Materials for DIY Halloween Crafts
One of the best things about easy Halloween crafts is that many projects can begin with basic supplies. Before shopping, look around your craft storage and home for containers, jars, ribbon, fabric, paper, paint, mesh, and other reusable materials.
- Glass jars for lanterns and small displays
- Black or dark containers for spooky arrangements
- Orange, purple, green, and black ribbons
- Decorative mesh for wreaths
- Battery-operated lights for glowing accents
- Lightweight seasonal embellishments
- Paint and adhesive suitable for your chosen surfaces
Using a flexible supply list makes DIY decorating more affordable because you can adapt each project to whatever materials you already own. The finished result does not have to match a particular template. In fact, personal variations are what make homemade Halloween decor memorable.
Make Your Halloween Decor Feel Like a Collection
When several DIY projects are displayed together, repeat one or two recognizable details. A specific ribbon, color, texture, or shape can become the visual thread connecting everything.
For example, orange ribbon can appear on a wreath and decorative brooms, while warm lighting can be repeated in mason jars and candle holders. Black containers can provide another common element throughout the arrangement.
This approach keeps your Halloween decor from feeling random. Even inexpensive crafts can look carefully curated when they share a common visual language.
Quick Points
- Keep it simple: Strong silhouettes and clear colors make great Halloween decor.
- Layer textures: Mix glass, ribbon, mesh, matte surfaces, and woven materials.
- Repeat colors: A consistent palette makes separate crafts look coordinated.
- Use lighting: Glowing jars and candle holders add instant atmosphere.
- Vary the height: Tall, medium, and low decorations create a more dynamic display.
Conclusion
Creating impressive Halloween decorations at home is all about turning simple ideas into thoughtful displays. Glowing mason jars, spooky candle holders, decorative brooms, textured wreaths, and dramatic black containers can each make a statement on their own, but they become even more effective when styled together.
You do not need an enormous craft budget or advanced skills to create a festive Halloween atmosphere. Start with a small color palette, focus on a few standout projects, and use lighting and texture to add depth. The result can feel polished, creative, and completely personal.
Whether you are decorating an entryway, shelf, table, or an entire room, these easy DIY Halloween decorations offer plenty of opportunities to experiment. Choose your favorite idea, adapt it to the supplies you have, and add your own creative details. A little imagination can turn everyday materials into memorable seasonal decor.
Tags
DIY Halloween Halloween Decorations Halloween Crafts Easy DIY Decor Budget Halloween Decor Spooky Home Decor Halloween Home Ideas Seasonal Craft Ideas