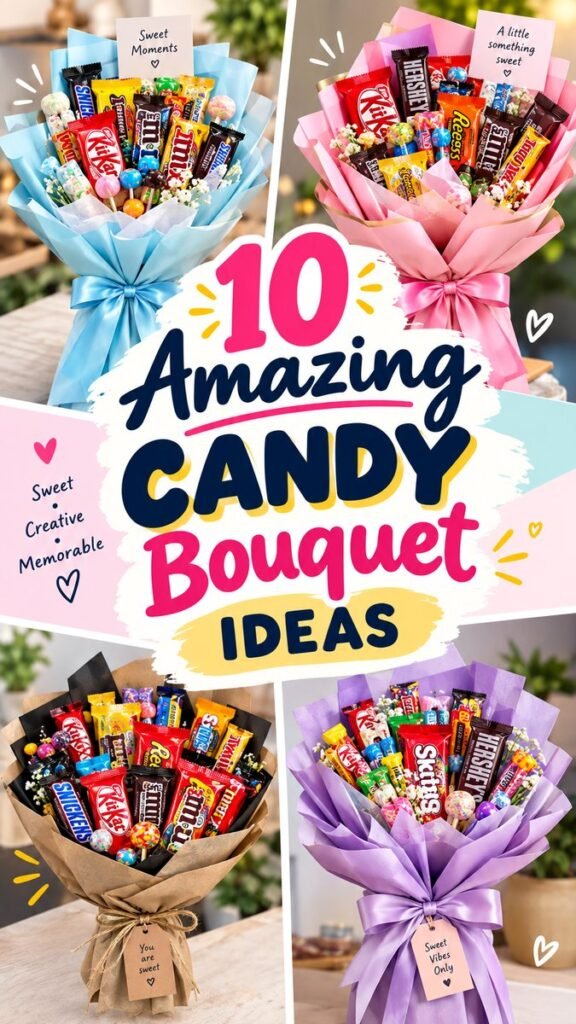
Candy bouquets are a cheerful way to turn ordinary sweets into a thoughtful handmade gift. Instead of placing candy in a traditional gift bag, you can arrange chocolate bars, lollipops, colorful wrapped treats, and decorative accents into a bouquet that looks festive, playful, and completely personal. The ideas shown here combine bright candy selections with layered wrapping, large bows, small tags, and simple decorative details to create eye-catching gifts for many occasions.
A candy bouquet DIY project is also wonderfully flexible. You can make a small arrangement with a handful of favorite treats or build a generous bouquet filled with different shapes, colors, and textures. Whether you are preparing a birthday surprise, graduation gift, celebration favor, or simple sweet gesture, a handmade candy bouquet gives you plenty of room to experiment.
Key Takeaways
- Choose a mix of candy sizes, shapes, and colors for visual interest.
- Use sturdy sticks or supports to arrange treats at different heights.
- Layer wrapping paper to create a fuller, more polished bouquet.
- Add a ribbon or bow to give the arrangement a finished appearance.
- Personalize the bouquet with a small handwritten gift tag.
- Save favorite candy bouquet ideas as inspiration for future gifts.
Why Candy Bouquet DIY Ideas Are So Popular
A candy bouquet combines two things that make handmade gifts especially appealing: creativity and personalization. The candy itself provides the fun, while the bouquet arrangement transforms it into something that feels carefully prepared. Even simple sweets can look completely different when grouped together with coordinated wrapping and decorative ribbons.
Another advantage is that there is no single correct design. A candy bouquet can be colorful and playful, soft and pastel, elegant and neutral, or bold and festive. You can choose the visual direction based on the recipient, occasion, or candy collection you already have at home.
Important: The best candy bouquet is not necessarily the one with the most candy. A balanced arrangement with varied heights, coordinated colors, and thoughtful wrapping often looks more impressive than an overcrowded bouquet.
What You Need for a Candy Bouquet
One of the best things about making a candy bouquet is that the supply list can remain fairly simple. The sweets are the main attraction, while the remaining materials help you create structure and presentation.
- Assorted candy, chocolate bars, lollipops, or other wrapped treats
- Wooden skewers, treat sticks, or another suitable support material
- Colorful tissue paper or bouquet wrapping paper
- Clear wrapping material if desired
- Ribbon for securing the bouquet
- Scissors
- Tape or another suitable method for attaching treats
- A small card or gift tag
- Optional filler decorations such as paper accents or small artificial flowers
The exact materials can vary depending on the size and style you want. For a simple candy bouquet, a few types of candy, wrapping paper, tape, and ribbon may be enough. For a more elaborate arrangement, you can introduce several layers of wrapping and decorative details.
How to Make a Candy Bouquet Step by Step
1. Choose Your Candy Collection
Start by selecting the sweets you want to feature. A mixture of chocolate bars, individually wrapped candies, lollipops, and smaller treats can create a rich and interesting arrangement. Think about the colors of the wrappers as well as the flavors.
You can keep the selection centered around the recipient’s favorite candies or create a colorful assortment. A coordinated color palette can make the finished bouquet look particularly polished, while a rainbow-style assortment creates a playful party feel.
2. Prepare the Candy Supports
For many candy bouquet designs, treats need to be raised above the wrapping so they can be arranged like flowers. Attach suitable sticks or supports securely to the back of individually wrapped treats. Make sure the attachment method is appropriate for the packaging and does not damage the candy.
Different support lengths can be useful because they allow you to create layers. Taller pieces can sit toward the back of the bouquet, while shorter pieces can fill the front and middle sections.
3. Build the Center of the Bouquet
Begin with a few of your larger or most visually interesting pieces. These can establish the overall height and shape of the bouquet. Place them near the center and back, then gradually add smaller candies around them.
Try to avoid arranging every piece at exactly the same height. A gentle variation creates depth and makes the bouquet look fuller. You can also alternate wrapper colors so that similar shades do not become concentrated in one area.
4. Add Smaller Treats and Fill Empty Spaces
Once the main structure is established, use smaller candies to fill spaces between the larger pieces. Lollipops and individually wrapped sweets are especially useful for adding height and movement.
Step back occasionally while arranging the bouquet. Looking at it from a short distance makes it easier to spot gaps, heavy areas, or sections that need more color balance.
5. Layer the Wrapping Paper
The wrapping is an important part of the overall look. The examples feature colorful layers of paper folded and positioned around the candy arrangement, creating a flower-like frame around the treats.
Try combining two complementary shades instead of using one sheet alone. Pink and pale pink can create a soft presentation, while blue and white can feel fresh and bright. Kraft paper can provide a more natural handmade appearance, while lavender or other pastel colors create a softer gift style.
6. Secure the Bouquet
Gather the wrapping beneath the candy arrangement and secure it firmly with ribbon or another suitable fastening method. This creates the recognizable bouquet shape and keeps the paper positioned around the treats.
A large bow can become an attractive focal point. Satin-style ribbon gives a polished appearance, while twine or a simple cord can create a more rustic DIY look.
7. Add a Personal Gift Tag
A small handwritten tag can make a candy bouquet feel much more personal. Keep the message short and cheerful. Phrases such as “Sweet Moments,” “A Little Something Sweet,” or “You Are Sweet” work well with the theme.
You can also write the recipient’s name, a birthday message, congratulations, or a short inside joke. The tag does not need to be elaborate. A small card attached to the ribbon is often enough to complete the presentation.
Expert Insight
Think of the bouquet as a composition rather than simply a collection of candy. Combine tall and short pieces, repeat a few colors, and leave enough visual space for the main treats to stand out.
10 Creative Candy Bouquet Ideas to Try
1. Classic Chocolate Candy Bouquet
Build the bouquet around a selection of popular chocolate bars. Use several larger pieces as the main structure and add smaller chocolate treats between them. Neutral, gold, brown, or colorful wrapping can complement the candy packaging.
2. Colorful Candy Bouquet
For a playful design, mix bright wrappers and colorful lollipops. Arrange the treats so the bouquet feels full without becoming visually chaotic. This style is especially suited to cheerful celebrations and fun gift-giving moments.
3. Pink Candy Bouquet
Use pink wrapping paper, a matching ribbon, and sweets with colorful or pink-toned packaging. Layering different shades of pink can create dimension while keeping the bouquet cohesive.
4. Blue Candy Bouquet
A blue candy bouquet offers a fresh alternative to traditional gift arrangements. Combine pale blue wrapping with contrasting candy wrappers and finish the base with a large blue bow.
5. Pastel Candy Bouquet
For a softer look, choose pastel wrapping in shades such as lavender, blush, pale blue, or cream. Add colorful sweets sparingly so the delicate wrapping remains part of the visual story.
6. Birthday Candy Bouquet
Create a birthday-focused arrangement by combining the recipient’s favorite candy with a festive tag. You can also coordinate the wrapping with a favorite color or birthday theme.
7. Graduation Candy Bouquet
A candy bouquet can be adapted into a celebratory graduation gift. Choose wrapping colors that complement the graduate’s celebration and add a short congratulatory message to the tag.
8. Mini Candy Bouquet
A smaller bouquet is perfect when you want a simple handmade gift. Use a compact selection of treats and a smaller amount of wrapping material. Even a miniature arrangement can look impressive when the colors are coordinated.
9. Mixed Treat Bouquet
Combine chocolate bars, lollipops, chewy sweets, and small packaged treats for a bouquet with lots of variety. The different shapes and sizes naturally create texture and visual movement.
10. Personalized Favorite Candy Bouquet
For the most meaningful option, build the entire bouquet around the recipient’s favorite sweets. You can still vary the wrapping and arrangement while keeping the candy selection personal. A custom tag makes the final gift even more thoughtful.
How to Make Your Candy Bouquet Look Fuller
A common challenge with DIY candy bouquets is making the arrangement appear generous without simply adding more candy. The easiest solution is to focus on height, layering, and wrapping.
- Place taller treats toward the back of the bouquet.
- Use medium-sized treats to create the middle layer.
- Position smaller sweets toward the front.
- Use folded wrapping paper to increase the apparent volume.
- Add a few decorative fillers where appropriate.
- Check the bouquet from several angles before securing everything.
Pro Tip: Use the wrapping paper as part of the design, not just as packaging. Crisp folds and multiple layers can make a modest candy collection look much more abundant and professionally arranged.
Choosing Colors for a Candy Bouquet
Color is one of the easiest ways to make a homemade candy bouquet feel intentional. You can take inspiration from the candy wrappers themselves or select the wrapping colors first and choose treats that complement them.
For a cheerful bouquet, combine several bright colors. For a softer arrangement, use two or three pastel shades. A neutral kraft-paper bouquet can also look attractive when paired with vivid candy packaging because the wrapping provides a calmer background.
Try repeating one or two colors throughout the arrangement. Repetition creates visual consistency even when the individual candy wrappers are very different.
Candy Bouquet Tips for Better Presentation
Keep the Main Treats Visible
A beautiful candy bouquet should make the sweets easy to see. Avoid wrapping the arrangement so tightly that the candy disappears behind layers of paper. The goal is to frame the treats while keeping them as the main attraction.
Create Visual Balance
Look for areas that feel too heavy or too empty. If one side contains several large chocolate bars, balance it with similarly sized pieces on the other side. Smaller candies can then be used to soften the spaces between them.
Coordinate the Finishing Details
Ribbon, tags, wrapping paper, and decorative accents should support the candy rather than compete with it. Matching or complementary colors usually create the most cohesive result.
Occasions for a DIY Candy Bouquet
There are countless moments when a candy bouquet can make a fun handmade gift. Because the arrangement is customizable, the same basic technique can be adapted for different celebrations.
- Birthdays
- Graduations
- Thank-you gifts
- Congratulations
- Friendship gifts
- Party favors
- Celebration surprises
- Simple “thinking of you” gifts
The key is personalization. Change the candy selection, colors, wrapping, and message to match the occasion. This makes one basic candy bouquet DIY technique useful for many different gift ideas.
Easy Ways to Personalize Your Bouquet
Personalization does not have to mean making the project complicated. Start with candy the recipient already enjoys. Then select a wrapping color that reflects their style or the occasion.
A handwritten note is another simple upgrade. You can add a short message to a kraft-paper tag, attach it to the ribbon, or place a decorative card among the treats. Even a few words can make the finished bouquet feel much more intentional.
You can also experiment with bouquet size. A small arrangement can be sweet and understated, while a larger design makes a dramatic presentation. The ideal size depends on how many treats you want to include and how substantial you want the finished gift to feel.
At a Glance
- Mix different candy shapes and sizes for depth.
- Coordinate wrapping and ribbon colors for a polished look.
- Use varied heights to create a fuller bouquet.
- Add a personal tag for an easy finishing touch.
- Save your favorite designs as inspiration for your next handmade gift.
Final Thoughts on Candy Bouquet DIY Ideas
A candy bouquet DIY project is a creative way to turn everyday sweets into a memorable handmade gift. With colorful candy, layered wrapping, a beautiful ribbon, and a personal message, you can create an arrangement that feels festive without requiring complicated crafting skills.
The most successful designs focus on simple details: varied heights, balanced colors, attractive wrapping, and a clear focal point. You can recreate the overall concept in countless ways, from a bright mixed-candy bouquet to a soft pastel arrangement or a personalized collection of favorite treats.
Most importantly, have fun with the process. There is no need to make every bouquet identical. Experiment with colors, candy combinations, ribbons, tags, and wrapping styles until you find a look that feels right. Once you have the basic technique down, you can adapt it for birthdays, celebrations, thank-you gifts, and many other occasions.
Save your favorite candy bouquet ideas and keep them handy for the next time you want to create a sweet, colorful, and thoughtful DIY gift.