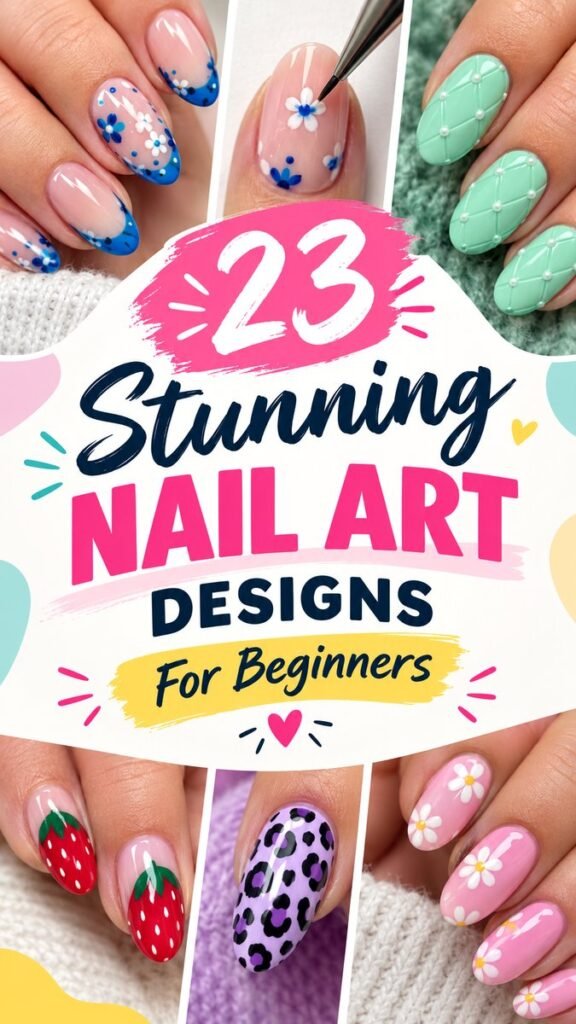
DIY nail art is one of the easiest ways to make a manicure feel personal, playful, and completely your own. You do not need professional-level skills to create beautiful nails at home. With a few simple tools, a little patience, and the right inspiration, beginner-friendly designs can look polished and eye-catching.
The ideas featured here combine cheerful colors, delicate flowers, playful fruit, animal-inspired patterns, pastel finishes, and textured details. From sweet strawberry nails to soft mint designs and colorful floral accents, there is plenty of inspiration for experimenting with your next manicure.
Key Takeaways
- Simple nail art can be created at home with basic tools.
- Floral, fruit, pastel, and animal-print designs are beginner-friendly choices.
- Short practice sessions can make detailed patterns much easier.
- Using a limited color palette helps a manicure look coordinated.
- Thin brushes and dotting tools make small decorative details easier to control.
- A quality top coat helps protect the finished design and add shine.
Why DIY Nail Art Is So Much Fun
There is something satisfying about turning a simple manicure into a small piece of wearable art. DIY nail art lets you experiment without committing to a complicated salon appointment or an elaborate technique. You can start with one accent nail, practice a pattern, and gradually build confidence.
Another advantage is flexibility. A design can be changed to match the season, an outfit, a celebration, or simply your mood. Soft pink nails can feel delicate and feminine, while bright red strawberry details create a cheerful statement. Mint green and white can create a fresh look, while purple and black patterns offer a more playful finish.
Important: Beginner nail art does not have to be perfectly symmetrical. Small variations often make handmade designs look charming and unique. Focus on clean shapes, consistent color, and a steady application rather than perfection.
Easy Nail Art Designs to Try at Home
1. Blue Floral Nail Art
Blue floral nails are a beautiful place to begin because the design can be created with a few basic shapes. A soft pink or neutral base allows the blue details to stand out without making the manicure feel too busy.
Start by applying your base color and letting it dry completely. Add small blue dots around a white or contrasting center to create simple flowers. You can place flowers near the tip, along one side of the nail, or across an accent nail. Tiny dots between the flowers can help fill empty spaces and give the design a finished appearance.
For an even easier version, create only one flower on each accent nail and leave the remaining nails with a simple glossy finish. This creates a balanced manicure while keeping the technique beginner-friendly.
2. Mint Green Quilted Nails
Textured-looking nail art can appear complicated, but geometric patterns are surprisingly approachable when broken into simple lines. A soft mint green polish provides a fresh background for a quilted or diamond-inspired design.
After your base coat dries, use a thin nail art brush to draw diagonal lines in opposite directions. The lines create diamond-shaped sections across the nail. Small dots or pearl-like accents can then be added where the lines intersect for extra dimension.
This style works especially well when the lines are kept delicate. There is no need to make every diamond identical. A relaxed hand-drawn appearance can make the manicure feel more creative and personal.
3. Strawberry Nail Designs
Strawberry nails are playful, colorful, and perfect for anyone who wants a cheerful DIY manicure. The design uses a bright red base, a green leafy detail, and small white dots to suggest strawberry seeds.
One of the easiest approaches is to paint the nail red first. Once the red polish is dry, add a small green leafy shape near the cuticle or tip. Finish with tiny white dots arranged across the red area. If freehand painting feels difficult, use the end of a dotting tool to create evenly sized dots.
Strawberry designs can also be used as accent nails rather than covering every nail. Pairing one or two strawberry nails with a simple pink or neutral manicure keeps the overall look wearable.
4. Purple Animal Print
Animal print is another beginner-friendly pattern because the shapes do not need to be perfectly uniform. A pastel purple base creates a fun alternative to traditional neutral leopard print.
Apply the purple polish and allow it to dry. Then use a small brush or dotting tool to create irregular dark spots. The most recognizable look comes from leaving some spots partially open rather than creating identical circles. Add smaller marks around the edges to create a playful animal-print effect.
If you prefer a softer manicure, use a lighter version of the same color family for the spots. For a stronger contrast, combine pastel purple with black details.
5. Pink Daisy Nails
Pink daisy nails offer a simple way to create a fresh and cheerful manicure. The design works particularly well on rounded or oval nails because the curved shape complements the soft petals.
Begin with a pink base. Create five small white dots around a yellow center to form each flower. Multiple small daisies can be placed across the nail, or you can create a single larger flower as an accent.
For a more delicate result, leave generous negative space between the flowers. This makes the individual details easier to see and prevents the manicure from becoming visually crowded.
Expert Insight
The easiest way to make DIY nail art look polished is to repeat colors throughout the manicure. Choose two or three main shades and use them consistently across flowers, dots, outlines, and accents. A coordinated palette can make simple designs look much more intentional.
Essential Tools for Beginner Nail Art
You do not need a large professional nail kit to get started. A small collection of reliable tools can handle most simple designs.
- Base coat: Creates a smooth foundation for your polish.
- Color polishes: Choose a few complementary shades instead of buying dozens at once.
- Thin nail art brush: Useful for lines, outlines, leaves, and tiny details.
- Dotting tool: Ideal for flowers, spots, seeds, and decorative dots.
- Clean-up brush: Helps tidy polish around the edges of the nail.
- Top coat: Adds shine and helps seal the finished design.
- Small detail brush: Helpful when working with geometric patterns and miniature decorations.
If you do not have a dedicated dotting tool, you can practice with another small rounded tool. The key is to use light pressure and work with small amounts of polish.
How to Make DIY Nail Art Easier
Start With a Clean Canvas
Before painting, make sure the nails are clean and free from leftover polish or oily residue. A smooth surface makes polish easier to apply and gives decorative details a better foundation.
Let Each Layer Dry
One of the biggest frustrations for beginners is accidentally smudging a design. Give the base color enough time to set before adding details. Rushing between layers can cause dots, lines, and patterns to drag across the nail.
Practice the Pattern First
Try drawing your design on paper before putting it on your nails. Practice can help you understand the size and spacing of the shapes. For flowers, practice making five dots around a center. For animal print, experiment with irregular outlines. For geometric designs, practice keeping lines relatively even.
Work One Nail at a Time
Instead of trying to complete every nail simultaneously, finish one design before moving to the next. This approach makes it easier to concentrate on detail and maintain a consistent look.
Pro Tip: If your hand feels unsteady, rest your wrist on a table while painting. Keep the nail art brush close to the tip and use gentle movements. Short strokes are usually easier to control than one long stroke.
Choosing Colors for a Cute DIY Manicure
Color selection can completely change the personality of a nail design. The inspiration here shows how the same basic concept can feel different depending on the palette.
Soft pinks create a delicate foundation for flowers and playful accents. Mint green gives geometric designs a fresh, clean appearance. Bright red immediately draws attention to fruit-inspired nails. Purple can turn an animal-print pattern into something colorful and youthful.
When choosing your colors, consider contrast. Light details are easier to see on darker backgrounds, while darker outlines stand out beautifully against pastel polish. If you want a subtle manicure, stay within one color family and vary the shades.
For a bolder Pinterest-inspired look, combine soft pastels with one vivid accent color. This keeps the manicure lively without making every nail compete for attention.
Simple Ways to Customize These Designs
The best part of DIY nail art is that you can change almost every detail. Use the featured designs as starting points rather than strict patterns.
- Swap blue flowers for pink, yellow, lavender, or white.
- Turn mint geometric nails into a neutral beige or soft pink version.
- Use cherries, lemons, or tiny hearts instead of strawberries.
- Change purple animal print to pastel blue, green, or peach.
- Make daisy petals larger or smaller depending on your nail length.
- Add glitter to one accent nail for extra sparkle.
- Use a matte top coat when you want a softer finish.
These small adjustments can make a familiar idea feel completely new. They also give beginners an opportunity to discover which techniques and colors they enjoy most.
Beginner Mistakes to Avoid
DIY nail art becomes much easier when you know which problems to avoid. Applying too much polish is one common issue. Thick layers take longer to dry and can make small details difficult to control.
Another mistake is using an oversized brush for tiny decorations. A thin brush or dotting tool gives you more precision. It is also helpful to wipe excess polish from the tool before making a detail. Too much product can create blobs instead of clean dots or lines.
Finally, avoid judging the design too quickly. Some patterns look uneven while the polish is wet but appear much more cohesive after the final top coat. Step back and look at the complete manicure before deciding whether a small imperfection actually needs correction.
How to Finish and Protect Your Nail Art
Once the artwork is completely dry, apply a thin layer of top coat. Use enough product to cover the design without repeatedly brushing over the same area. This helps create a smooth finish and can make colors appear more vibrant.
Give the manicure additional drying time before using your hands normally. Even when the surface feels dry, the layers underneath may still be setting. Being patient at this stage can help preserve all the tiny details you worked to create.
Regularly moisturizing the surrounding skin can also make a finished manicure look more polished. A neat nail shape, clean edges, and hydrated cuticles can complement even the simplest DIY design.
At a Glance
- Choose two to three coordinating colors.
- Let every layer dry before adding the next detail.
- Use dots and short lines for easy beginner patterns.
- Start with one or two accent nails if you are new to nail art.
- Seal your finished design with a thin top coat.
Final Thoughts on DIY Nail Art
DIY nail art does not have to be complicated to be beautiful. The most approachable designs often rely on simple flowers, dots, lines, color combinations, and playful shapes. These techniques are easy to practice and can be adapted to suit different nail lengths, personal styles, and color preferences.
Whether you love pastel manicures, cheerful fruit-inspired details, geometric textures, animal prints, or classic floral patterns, there is plenty of room to experiment. Start with one design that feels manageable, practice the individual elements, and then personalize it with your favorite colors.
The goal is not perfect nails on the first attempt. The goal is to enjoy creating something that feels like you. With a little practice and a few basic tools, simple DIY nail art can become an enjoyable part of your beauty routine and a creative way to refresh your manicure whenever inspiration strikes.
Ready to try a new manicure? Pick your favorite beginner-friendly design, gather a few complementary shades, and give your next DIY nail art session a creative twist.
Tags
DIY Nail Art Beginner Nail Art Easy Nail Designs Cute Nail Ideas At Home Manicure Floral Nail Art Creative Nail Designs Nail Art Ideas