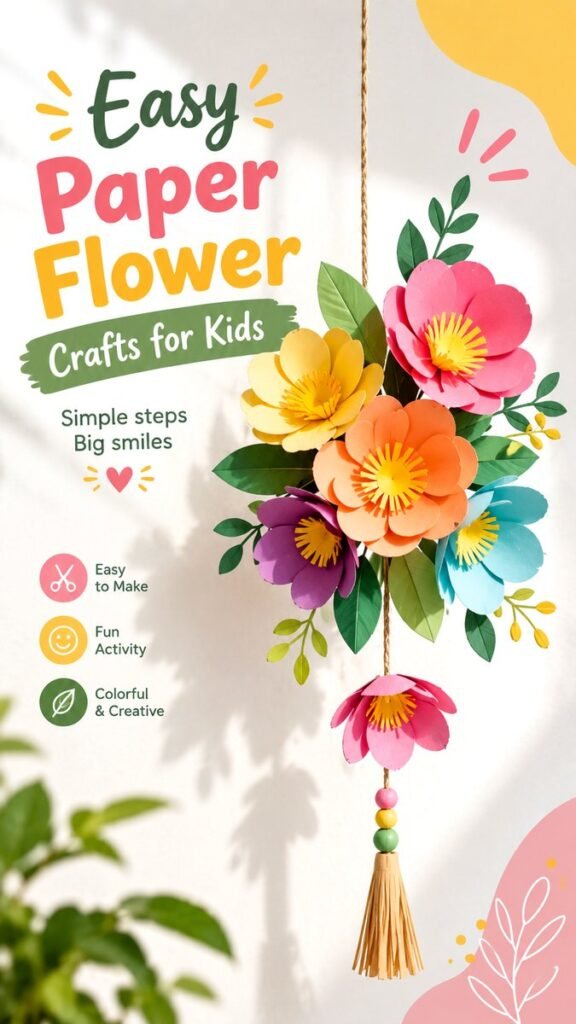
Bring a cheerful handmade touch to your space with a wall hanging DIY paper craft that combines colorful paper flowers, leafy details, twine, beads, and a simple tassel. This kind of decoration is an easy way to turn basic craft supplies into something bright, playful, and personal. The layered flowers create a beautiful focal point, while the hanging format makes the finished piece perfect for a bedroom, playroom, classroom, craft corner, or seasonal display.
Paper flower crafts are especially appealing because they offer plenty of room for creativity without requiring complicated materials. You can experiment with different flower shapes, colors, sizes, and arrangements to create a wall hanging that matches your favorite style. Whether you are planning a fun afternoon craft with children or simply want an inexpensive DIY wall decoration, this project is a wonderful place to start.
Key Takeaways
- A paper flower wall hanging can transform simple supplies into colorful decor.
- Layered petals create dimension and make each flower stand out.
- Mixing several colors gives the finished craft a cheerful, playful appearance.
- Twine, beads, leaves, and tassels add texture and visual interest.
- The project can be adapted for kids, classrooms, bedrooms, and craft spaces.
- Changing the flower palette makes the design easy to personalize for any occasion.
Why Make a DIY Paper Wall Hanging?
A handmade wall hanging adds personality in a way that store-bought decorations often cannot. The image of this colorful paper flower arrangement shows how a few carefully assembled elements can create an eye-catching vertical display. Instead of filling an entire wall, the decoration uses a narrow hanging shape that draws attention without overwhelming the surrounding space.
Another advantage is flexibility. Paper is lightweight, easy to cut, and available in almost any color. That makes it simple to create flowers that coordinate with a room or match a particular season. Soft pinks can create a gentle look, while orange, yellow, teal, green, and purple can make the display feel energetic and playful.
Important: The most attractive paper wall hangings do not need to be perfectly identical. Slight differences in petal shapes, leaf sizes, and flower placement can make the finished decoration feel more handmade and charming.
Materials for a Paper Flower Wall Hanging
You do not need a large collection of supplies to make a colorful DIY paper wall hanging. The basic construction can be adapted to whatever materials you already have at home. Gather a selection of colorful craft paper or cardstock, green paper for leaves, scissors, glue, and a piece of twine or cord for hanging.
For extra decoration, consider adding small beads and a lightweight tassel near the bottom. These details create movement and give the project a finished look. A pencil can also be useful for sketching simple petal and leaf shapes before cutting them.
- Colored paper or lightweight cardstock
- Green paper for leaves and stems
- Scissors
- Craft glue or another suitable adhesive
- Twine, string, or decorative cord
- Optional beads for a colorful accent
- Optional tassel for the bottom of the hanging
- Pencil for lightly marking shapes
How to Create Easy Paper Flowers
1. Choose Your Flower Colors
Start by selecting several paper colors that work well together. The example uses a lively combination of pink, yellow, orange, purple, and blue tones, surrounded by different shades of green. You can recreate the colorful feeling without copying the exact arrangement.
For a more coordinated wall hanging, choose three or four main colors and one or two supporting shades. If children are making the craft, letting them choose the palette themselves is part of the fun.
2. Cut the Petal Shapes
Draw simple rounded or pointed petals on your paper and cut them out. You can make all the petals the same size for a neat appearance or combine larger outer petals with smaller inner petals for more depth.
Layering is one of the easiest ways to make handmade paper flowers look dimensional. Arrange the petals in a circle, slightly overlap their edges, and secure them in the center. A contrasting paper center can then be added to make the flower more noticeable.
3. Add Decorative Flower Centers
Bright centers can make simple flowers much more expressive. Cut narrow strips of yellow paper, create small fringed pieces, or use small circular shapes to form the middle of each flower. Combining a light center with darker petals can create a strong contrast.
Do not worry about making every flower identical. A mixture of flower sizes gives the wall hanging a natural arrangement and prevents it from looking too rigid.
4. Create the Paper Leaves
Green leaves balance the bright flowers and help connect the different elements visually. Cut simple leaf shapes from one or more shades of green paper. Add a folded center line if you want a little extra dimension.
Small branches can be created by attaching several leaves along a narrow strip of paper or directly arranging them around the flowers. Try placing some leaves behind the flowers and others toward the outside of the arrangement.
Expert Insight
A strong composition usually benefits from a clear focal point. Place your largest or brightest flower near the center, then use smaller flowers and leaves around it to guide the eye through the hanging.
Assemble the DIY Wall Hanging
Once your paper flowers and leaves are ready, begin arranging them before gluing anything permanently. This makes it easier to experiment with the balance of colors and shapes. A vertical composition works particularly well because it naturally follows the direction of the hanging cord.
- Cut a suitable length of twine or decorative cord.
- Arrange the largest paper flowers around the central area.
- Place smaller flowers above, below, or beside the main arrangement.
- Fill open spaces with paper leaves and small branches.
- Attach the pieces securely once you are happy with the layout.
- Add optional beads below the flower arrangement.
- Finish the lower end with a lightweight paper or fiber tassel.
Pro Tip: Leave a little breathing room between some of the leaves and flowers. Negative space helps the individual shapes remain visible and keeps a colorful design from becoming visually crowded.
Creative Ways to Personalize Your Paper Craft
The beauty of a wall hanging DIY paper project is how easily it can be changed. You can create a completely different result simply by switching the colors or adjusting the arrangement. For a soft look, combine blush pink, cream, pale yellow, and muted green. For a brighter kids’ craft, try bold orange, turquoise, yellow, purple, and pink.
Try Different Flower Sizes
Large flowers make an immediate visual statement, while smaller flowers are useful for filling gaps. Combining both creates a layered effect that feels more dynamic. You can also create one oversized flower as the main focal point and surround it with tiny paper blooms.
Experiment With the Hanging Details
Twine gives the project a warm handmade appearance, but other lightweight cords can work too. Colorful beads add a playful accent, while a tassel creates a graceful finishing detail. If you are making the craft with kids, these small decorative choices can become an easy way to encourage personal expression.
Make It Seasonal
Paper flowers can be adapted throughout the year. Use fresh greens and cheerful colors for spring-inspired decor, warm orange and yellow combinations for an autumn mood, or soft pinks and reds for a festive display. Because the materials are simple, you can make a new version whenever you want to refresh a room.
Paper Wall Hanging Ideas for Kids
This craft can also become a creative activity for children. Cutting basic shapes, choosing colors, arranging flowers, and decorating the finished piece all offer opportunities to make individual choices. Younger children can focus on arranging and gluing with appropriate supervision, while older kids can experiment with more detailed petals and leaves.
For a group activity, prepare paper in several colors and let each child design one or two flowers. The individual flowers can then be combined into one large classroom or playroom wall hanging. This creates a collaborative decoration while keeping each child’s contribution visible.
Where to Display Your Handmade Decoration
A colorful paper flower wall hanging can add a cheerful accent to many areas. Hang it in a craft corner to reinforce a creative atmosphere, place it in a child’s bedroom for playful decor, or use it as a small decorative feature in a classroom. It can also brighten an otherwise plain wall without requiring a large amount of space.
Because paper is lightweight, choose a secure hanging method appropriate for the wall surface and the weight of the finished piece. Keep the decoration away from moisture and areas where it could be easily damaged by frequent contact.
Quick Points
- Layer petals to create depth.
- Use contrasting colors for bright flower centers.
- Mix flower sizes for a balanced arrangement.
- Add leaves, beads, and a tassel for texture.
- Personalize the palette to match your space.
Conclusion
A wall hanging DIY paper project is a simple and rewarding way to create colorful handmade decor. With paper flowers, leafy shapes, twine, and a few optional embellishments, you can turn everyday craft materials into a decoration full of character. The project is flexible enough for beginners and engaging enough for a creative activity with kids.
The key is to have fun with the arrangement. Try different flower sizes, combine unexpected colors, and add small details that reflect your personal style. Whether you are decorating a bedroom, classroom, playroom, or craft space, a handmade paper flower wall hanging can bring an inviting pop of color to an otherwise simple wall. Gather your favorite paper, start cutting, and let your creativity shape the final design.
Tags
Paper Crafts DIY Wall Hanging Paper Flowers Kids Crafts DIY Wall Decor Easy Paper Crafts Flower Crafts Handmade Decor