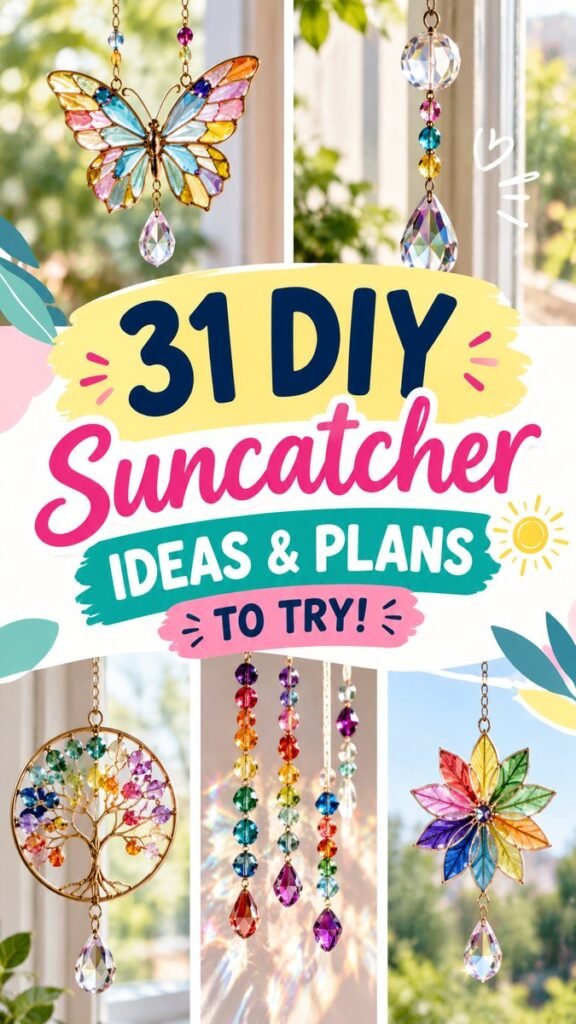
Bring a little extra color and sparkle into your home with creative sun catchers DIY projects that turn ordinary windows and sunny corners into beautiful displays. The ideas featured here explore colorful beads, faceted crystals, floral shapes, butterflies, hoops, and hanging strands that can catch natural light and create an inviting decorative accent.
DIY sun catchers are especially appealing because they can be customized in so many ways. You can experiment with different bead colors, crystal shapes, metal hoops, chains, charms, and decorative forms to create something that feels completely your own. Whether you prefer a simple strand or an elaborate statement piece, this craft offers plenty of room for creativity.
Key Takeaways
- Use colorful beads and faceted pieces to create eye-catching light-catching decorations.
- Mix shapes, sizes, and colors to give each DIY sun catcher a unique personality.
- Hang finished pieces near bright windows where their colors and reflections can be appreciated.
- Floral, butterfly, geometric, and simple strand designs offer different creative directions.
- DIY sun catchers can become thoughtful handmade gifts as well as cheerful home décor.
- Start with a simple design and add details as your crafting confidence grows.
Why Sun Catchers Make Beautiful DIY Décor
There is something special about décor that interacts with natural light. Instead of simply sitting on a shelf, a sun catcher can become part of the room throughout the day. When light reaches colorful beads or faceted decorative pieces, the materials can add sparkle, color, and visual movement to the surrounding space.
This makes sun catchers DIY projects particularly versatile. They work well in rooms where you want a small decorative detail without adding bulky furniture or large wall art. A finished piece can be placed near a window, glass door, covered porch, or another bright area where its details are easy to see.
The designs shown in this collection also demonstrate how different materials can create completely different looks. A strand made with transparent beads feels light and delicate, while a circular arrangement can create a more substantial focal point. Floral and butterfly-inspired shapes bring a playful handmade quality to the finished décor.
Important: The best DIY sun catcher is not necessarily the most complicated one. A thoughtful combination of color, shape, and placement can make even a simple hanging strand look polished and intentional.
Colorful DIY Sun Catcher Ideas to Try
One of the most enjoyable parts of making a sun catcher is choosing the visual direction. The colorful examples in this collection offer plenty of inspiration, from jewel-toned beads and crystal drops to playful rainbow arrangements.
1. Rainbow Beaded Sun Catchers
Rainbow colors are an easy way to make a handmade sun catcher feel cheerful and energetic. Combine beads in several bright shades and arrange them in a repeating pattern or let the colors transition gradually from one hue to another.
For a softer appearance, choose pastel beads and transparent pieces. For a bolder look, combine saturated jewel tones. You can also add a larger faceted piece at the bottom of the strand to create a visual finishing point.
2. Crystal Strand Suncatchers
Long hanging strands are a simple format that can be adapted to many styles. Start with a vertical arrangement and combine several sizes of decorative beads. Larger pieces can be positioned toward the bottom while smaller beads create detail higher up.
Several strands grouped together can create an especially attractive window display. Try varying the lengths so the arrangement has a natural, layered appearance rather than making every strand exactly the same.
3. Butterfly-Inspired Designs
Butterfly shapes bring a whimsical touch to DIY window décor. A colorful butterfly centerpiece can become the main focal point, with a small faceted drop hanging beneath it.
When creating this style, let the butterfly shape guide the color palette. Multicolored wings can make the project lively, while two or three coordinated shades can create a more refined appearance.
4. Floral Sun Catchers
Flower-inspired designs are another charming option. Arrange colorful sections around a central bead or decorative accent to create a flower-like shape. A larger crystal or bead beneath the flower can complete the design.
This approach is useful when you want a sun catcher to feel more like a decorative ornament than a simple hanging strand. Try different petal shapes and color combinations until you find a composition that suits your space.
5. Geometric Beaded Designs
For a more modern appearance, experiment with circles, diamonds, triangles, and other geometric forms. Metal hoops provide a simple foundation for arranging beads and hanging accents.
Geometric sun catchers can look especially attractive when you limit the palette to a few complementary colors. Transparent beads combined with metallic details can also create a clean and contemporary effect.
Materials for a DIY Sun Catcher
You do not need an enormous craft collection to begin. The exact supplies depend on the design you want to create, but several basic materials can be useful for experimenting with different styles.
- Colorful glass or acrylic beads
- Faceted decorative beads or crystal-style drops
- Metal hoops or rings
- Jewelry wire, strong craft cord, or suitable stringing material
- Small chains for hanging
- Decorative charms or shaped components
- Jewelry-making pliers
- Small connectors or jump rings
- Scissors or wire cutters appropriate for your chosen materials
- A secure hanging hook or attachment point
Transparent and faceted pieces are particularly useful when your goal is to create a light-catching effect. Colorful beads can then be used to introduce personality and make the design stand out.
How to Plan Your Suncatcher Design
Before assembling anything, take a few minutes to plan the overall arrangement. This small step can make the finished project look much more balanced.
Choose a Focal Point
Decide which element should attract attention first. It could be a large faceted bead, a butterfly, a flower, a circular centerpiece, or a particularly colorful ornament.
Once you have selected the focal point, use smaller beads and connecting elements around it. This creates visual hierarchy and prevents every component from competing for attention.
Create a Color Palette
Color is one of the strongest features of a handmade sun catcher. You can choose a rainbow palette for a playful look, several shades of one color for a coordinated style, or contrasting colors for a more dramatic effect.
A useful approach is to select one dominant color, two supporting shades, and a neutral or transparent element. This keeps the design colorful without making it feel visually chaotic.
Vary the Shapes and Sizes
Using pieces of different sizes adds depth and interest. Small round beads can be paired with larger faceted shapes, while long drops can balance compact decorative components.
Try laying the components on a flat surface before attaching them. Moving pieces around first allows you to test different arrangements without having to undo your work later.
Expert Insight
Think about the finished piece as a small composition rather than a collection of beads. Repeating colors, alternating shapes, and leaving enough visual breathing room can make a handmade project look much more intentional.
Simple Steps for Making a Beaded Sun Catcher
The exact construction will vary depending on the materials and design, but a basic beaded version can be approached in a few straightforward stages.
- Sketch the arrangement. Decide whether you want one central strand, multiple strands, a hoop design, or a shaped centerpiece.
- Sort your beads. Group your colors, shapes, and sizes so you can easily compare combinations.
- Prepare the hanging structure. Cut the appropriate length of wire, cord, or other stringing material for your design.
- Add the decorative elements. Place beads according to your planned pattern, varying the sizes where appropriate.
- Secure the components. Make sure connections are firm and suitable for the materials you are using.
- Add the focal piece. Attach a larger bead, crystal-style drop, flower, butterfly, or other centerpiece.
- Finish the hanger. Add a chain or secure loop that allows the finished piece to hang comfortably.
- Check the balance. Hold the project up and adjust the arrangement if one side looks heavier than the other.
Patience is especially helpful during assembly. Small beads and connectors can be fiddly, so working slowly can make the process much more enjoyable and help you achieve a cleaner result.
Pro Tip: Photograph or sketch your bead arrangement before you begin connecting everything. If several pieces need to follow the same pattern, this gives you an easy visual reference while assembling the project.
Where to Display DIY Sun Catchers
Placement can make a major difference in how your finished project looks. A sun catcher is most effective when it is positioned somewhere bright enough for its colors and reflective surfaces to be appreciated.
Bright Windows
A sunny window is the natural choice for this type of décor. Hang a single statement piece in a small window or arrange several pieces at different heights for a fuller display.
Glass Doors and Sunlit Corners
Glass doors and bright corners can also provide a beautiful backdrop. A long beaded strand can work particularly well where there is enough vertical space for the design to hang freely.
Covered Outdoor Areas
If the materials are appropriate for the environment, a covered porch or sheltered outdoor area can provide another place to display handmade pieces. Always consider the durability of the materials and protect delicate components from conditions they are not designed to withstand.
Creative Ways to Customize Your Suncatchers
The beauty of DIY crafts is that there is no need to follow one exact pattern. Use the ideas in this collection as starting points and adapt them to your own preferences.
- Use a monochromatic palette for a simple, coordinated appearance.
- Create rainbow patterns for a cheerful window accent.
- Combine clear and colorful beads to balance sparkle with color.
- Layer several hanging strands at different lengths.
- Use a large centerpiece to create a statement design.
- Experiment with floral, butterfly, circular, or geometric silhouettes.
- Make smaller versions that can be used as handmade gifts.
You can also create seasonal versions by changing the colors and decorative shapes. A fresh palette can make the same basic construction feel completely different without requiring a brand-new technique.
Tips for a More Polished Handmade Finish
A few simple design decisions can make your DIY sun catcher look more finished and cohesive. Start by keeping the arrangement balanced. If one section contains a large decorative piece, consider using smaller elements around it to maintain visual proportion.
Consistency also matters. Repeating a particular bead color, shape, or spacing pattern creates a connection between different sections of the design. Even when you use many colors, repetition helps the finished piece feel intentional.
Finally, do not be afraid of empty space. Leaving small gaps between components can help individual beads and decorative shapes remain visible. A crowded design can hide the beauty of the materials, while thoughtful spacing allows each element to contribute to the overall look.
DIY Suncatchers as Handmade Gifts
Colorful sun catchers can also make thoughtful handmade gifts. Because the designs are easy to customize, you can choose colors and shapes based on the recipient’s décor or general style.
A small beaded design can be packaged as a cheerful handmade accent, while a larger multi-strand piece can become a more substantial decorative gift. Adding a simple handmade card can make the presentation feel even more personal.
Another advantage is that you can create several variations from the same basic materials. Once you have settled on a construction method, experiment with different color palettes and focal shapes to create a collection of unique designs.
At a Glance
- Choose a clear focal point before assembling your design.
- Combine colorful beads with faceted pieces for visual interest.
- Vary strand lengths to create a layered window display.
- Use repetition and spacing to keep the composition balanced.
- Display finished sun catchers in bright areas where their details stand out.
Conclusion: Bring More Color to Your Windows
Making sun catchers DIY style is a creative way to add color, sparkle, and personality to your home. From rainbow bead strands and geometric hoops to butterfly and flower-inspired designs, there are countless ways to turn simple craft materials into attractive hanging décor.
The most important part is to have fun with the process. Start with a color palette you love, choose a simple arrangement, and gradually experiment with more detailed designs as you become comfortable with the materials. A few carefully selected beads can be just as effective as an elaborate arrangement.
Whether you are creating a single decoration for a sunny window, making several pieces for a coordinated display, or preparing handmade gifts, these colorful suncatcher ideas offer an approachable project with plenty of room for personal expression. Gather your favorite beads, play with your layout, and create a piece that makes your space feel brighter and more cheerful.
Tags
Sun Catchers DIY DIY Suncatchers Beaded Crafts Window Decor Crystal Crafts DIY Home Decor Handmade Crafts Beaded Suncatchers