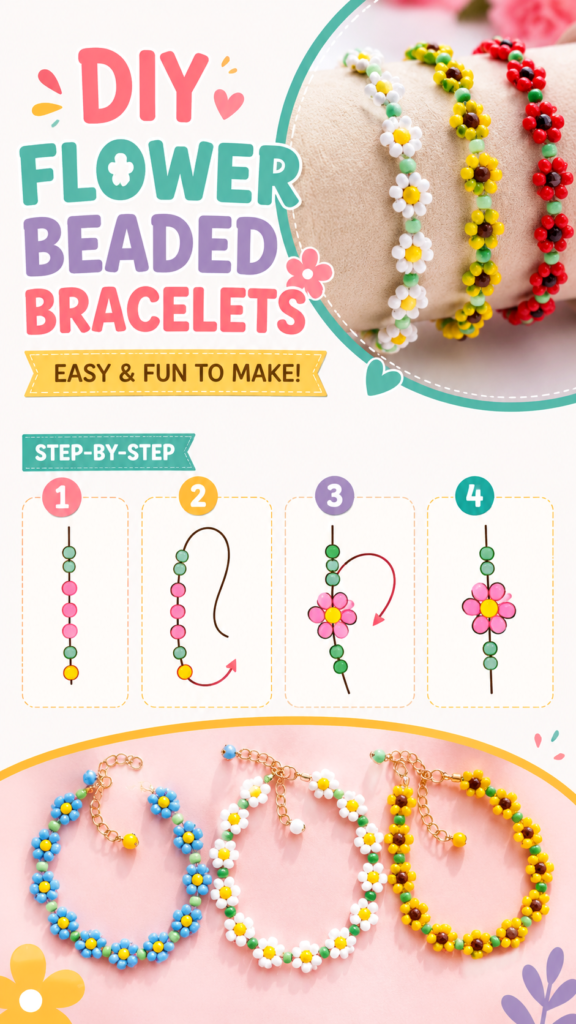
DIY accessories are a fun way to turn simple craft supplies into colorful pieces that feel completely personal. Flower beaded bracelets are especially appealing because they combine bright colors, playful patterns, and an easy-to-follow design that works beautifully for beginners. With a few strands of beads, some elastic or jewelry cord, and a little creativity, you can create handmade bracelets that look cheerful, unique, and ready to wear.
The colorful floral designs featured in this project show how a simple arrangement of small beads can create eye-catching flowers. White petals with yellow centers, sunny yellow flowers with darker centers, and colorful variations all create different moods while using the same basic idea. This makes flower bead jewelry a great project for experimenting with color combinations and developing your own DIY accessory style.
Key Takeaways
- Flower beaded bracelets are beginner-friendly DIY accessories.
- Small colorful beads can create petals, flower centers, and connecting sections.
- Mixing contrasting colors makes floral patterns stand out.
- Simple bead arrangements can be customized for different styles and occasions.
- Adding charms or colorful accents can give handmade bracelets a personal touch.
Why Flower Beaded Bracelets Make Great DIY Accessories
Handmade accessories have a special charm because they do not have to look exactly like anything found in a store. A bracelet can reflect your favorite colors, a playful aesthetic, or simply the mood you want to create. Flower bead bracelets are particularly versatile because the floral pattern can be made colorful and bold or soft and delicate.
Another reason this project works so well is its visual simplicity. A flower can be formed from a small group of petal beads surrounding a center bead. Repeating that pattern along a strand creates a decorative bracelet without requiring complicated jewelry-making techniques. Once you understand the basic pattern, you can begin changing the colors and spacing to make your own variations.
Important: The beauty of DIY beaded jewelry is that there is no single correct color combination. Use the floral pattern as your starting point, then adjust the palette, spacing, and decorative details to create an accessory that feels like your own.
Supplies for a Simple Beaded Bracelet
You do not need a large collection of specialized tools to begin making flower beaded accessories. The exact supplies can vary depending on the bracelet style you want, but a basic project can be built around colorful craft beads and a suitable bracelet cord.
Colorful Beads
Choose small beads in several complementary colors. White beads work well as flower petals, while yellow, pink, red, blue, or darker beads can be used for flower centers. Green beads are useful between flowers because they create a fresh botanical-inspired appearance.
Try choosing three to five colors before you start. A limited palette often makes a handmade bracelet look more coordinated. For a bright summer-inspired accessory, combine yellow, white, green, and blue. For a softer look, try pastel pink, lavender, pale blue, white, and cream.
Elastic Cord or Jewelry String
Flexible elastic cord is a convenient option for simple stretch bracelets. It allows the finished piece to slide over the hand without requiring a traditional clasp. If you prefer a bracelet with a chain and clasp, you can use appropriate jewelry findings and connecting components instead.
Scissors and Optional Jewelry Findings
A pair of sharp scissors can be useful for cutting cord. You can also experiment with small charms, jump rings, clasps, extension chains, or decorative beads if you want to create a more detailed accessory. The floral pattern itself can remain simple while the finishing details add personality.
How to Make a Flower Beaded Bracelet
The basic concept is to arrange beads so that several petal beads surround a center bead. The surrounding beads form the flower while additional beads connect one flower to the next. The process becomes much easier once you understand the repeating pattern.
Step 1: Choose Your Flower Colors
Start by deciding which color will represent the petals and which will represent the flower center. For a classic floral look, white petals with yellow centers are an easy choice. You can also create pink flowers with yellow centers, blue flowers with contrasting centers, or a bracelet featuring several different flower colors.
Think about contrast when making your selection. A bright center against pale petals is easy to see and gives the flower a defined shape. If the petal and center colors are too similar, the floral pattern may be less noticeable.
Step 2: Build the First Flower
Thread the beads in the order needed to form the floral shape. The petal beads should be arranged around the center bead so that they visually gather into a flower. Keep the cord flexible while arranging the beads rather than pulling everything tightly too early.
The first flower is your practice section. Take a moment to look at the arrangement from different angles. If the petals do not sit evenly around the center, adjust the bead order before continuing.
Step 3: Add Connecting Beads
Once the first flower is formed, add a few connecting beads before creating the next flower. Green beads are a natural-looking option because they visually separate the flowers and reinforce the botanical theme.
You can also use a single neutral color between every flower. This creates more breathing room in the pattern and can make the flowers appear more defined. For a busier bracelet, reduce the spacing and place flowers closer together.
Step 4: Repeat the Pattern
Continue alternating flowers and connecting beads until the bracelet reaches the desired length. Repetition is what gives the finished accessory its decorative rhythm. If you want a symmetrical bracelet, keep the flower colors and spacing consistent throughout.
For a more playful handmade look, deliberately change the flower colors. A bracelet with alternating blue, pink, white, and yellow flowers can feel cheerful and creative without becoming difficult to make.
Step 5: Finish the Bracelet
When the beaded strand reaches the appropriate length, check the fit before securing the ends. Make sure the bracelet is comfortable and that the beads are sitting in the desired arrangement. Then finish the cord using the closure method appropriate for your chosen material.
If you are using stretch cord, make sure the finished connection is secure before trimming away excess material. If you are using a clasp and chain, attach the jewelry findings carefully and check that each connection is closed properly.
Expert Insight
The most attractive beaded bracelets usually have a clear visual rhythm. Repeat a few colors consistently, then use one contrasting shade for flower centers or accents. This keeps the design playful while still making it look intentional.
Creative Color Combinations to Try
Color is one of the easiest ways to transform the personality of a DIY accessory. The same flower pattern can look completely different when you change the bead palette.
Classic White and Yellow
White petals with bright yellow centers create a daisy-inspired appearance. Add green connecting beads for a fresh, natural palette. This combination is simple, cheerful, and easy to coordinate with casual outfits.
Bright Rainbow Flowers
Use several petal colors throughout the bracelet to create a playful rainbow effect. Keep the center bead consistent if you want the flowers to feel connected. Alternatively, change the center color as well for a more eclectic handmade style.
Soft Pastel Beads
Pastel pink, lavender, pale blue, cream, and soft green can create a delicate accessory. This palette works particularly well when you want the flower pattern to feel subtle rather than highly saturated.
Bold Red and Dark Accents
For a stronger look, combine bright red or coral beads with darker centers and small green accents. High-contrast combinations make each flower easier to see and give the bracelet a more energetic appearance.
Pro Tip: Before threading all your beads, arrange a small section of the planned pattern on a flat surface. This makes it easy to test the color balance and change the sequence before committing to the full bracelet.
Ways to Personalize Your DIY Accessories
Once you have mastered the basic flower bracelet, there are plenty of ways to make the design more personal. Handmade accessories become even more enjoyable when each piece has a small detail that reflects the maker or the person who will wear it.
Try adding a letter bead to create a personalized bracelet. You could use an initial, a short word, or a meaningful combination of letters. Another option is to add a small decorative charm near the closure. Hearts, stars, fruit shapes, animals, and simple geometric charms can all change the overall style of the bracelet.
You can also experiment with the size of the flowers. Smaller beads can produce a delicate design, while larger beads make the floral pattern more prominent. Combining different bead sizes can create texture and visual interest, although keeping the flower components relatively consistent often makes the pattern easier to recognize.
DIY Bracelet Ideas for Gifts
Flower beaded bracelets can also make thoughtful handmade gifts. Because the design is easy to customize, you can choose colors based on someone’s favorite shades or create matching bracelets for friends.
For a coordinated gift set, make several bracelets using the same basic flower pattern but change the dominant colors. One bracelet could feature white and yellow flowers, another could use pink and green, and another could combine blue and white. Presenting several variations together creates a small handmade collection.
Handmade gifts do not need to be complicated to feel special. The time spent selecting colors, arranging beads, and creating the pattern is part of what makes a DIY accessory meaningful.
Common Mistakes to Avoid
When making beaded jewelry for the first time, a few small issues can affect the final result. One common mistake is pulling the cord too tightly while arranging the flowers. This can make the beads difficult to reposition and may prevent the flowers from sitting naturally.
Another mistake is choosing too many unrelated colors. A colorful bracelet can be exciting, but using a clear palette usually creates a more polished result. Select a few main colors and repeat them throughout the design.
It is also helpful to check the bracelet length before finishing it. A beautiful bead pattern will not be enjoyable to wear if it is too tight or too loose. Test the fit and make adjustments before securing the final connection.
How to Make Your Beading Process Easier
Organization can make a big difference when working with tiny beads. Sort your colors into small containers or sections before beginning. This prevents you from constantly searching for individual beads and helps you maintain the planned pattern.
It can also help to prepare several flower color combinations before threading the bracelet. Place the beads in small groups and compare them visually. This simple step allows you to identify combinations that look balanced and makes the actual bracelet-making process faster.
If you are new to bead crafts, start with a short bracelet or a small practice section. Once you are comfortable creating the flower pattern, move on to a full-length accessory. Learning the pattern gradually makes the project more enjoyable and reduces wasted materials.
At a Glance
- Choose a simple flower color palette before starting.
- Arrange petal beads around contrasting center beads.
- Use connecting beads to separate repeating flowers.
- Check the bracelet fit before securing the ends.
- Personalize the finished accessory with colors, letters, or charms.
Conclusion
Making flower beaded bracelets is an easy and creative way to explore DIY accessories without needing complicated techniques. A handful of colorful beads can become a cheerful floral pattern, and small changes in color, spacing, and decorative details can create an entirely different look.
The most important part is to have fun with the process. Start with a simple flower pattern, experiment with contrasting colors, and gradually introduce your own ideas. Whether you are making a bracelet for yourself, creating matching accessories with friends, or preparing a handmade gift, these beaded designs offer plenty of room for creativity.
Once you have made your first bracelet, save your favorite color combinations and try another variation. With a few beads and a little imagination, you can build a collection of handmade accessories that are colorful, personal, and completely your own.
Tags
DIY Accessories Flower Beaded Bracelets DIY Jewelry Beaded Jewelry Bracelet Ideas Flower Jewelry Handmade Accessories Bead Crafts