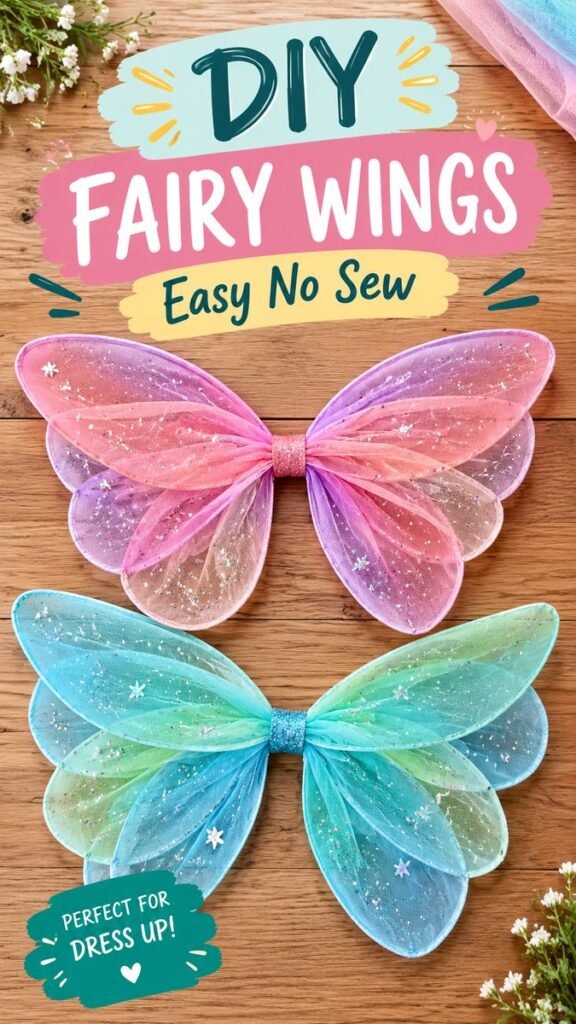
DIY fairy wings are a delightful craft project for anyone who loves colorful costumes, imaginative play, and handmade accessories. The finished wings shown here feature soft, translucent layers in dreamy shades of pink, purple, blue, and green, creating a playful look without requiring complicated sewing. With a simple no-sew approach, you can turn lightweight craft materials into charming wings that work beautifully for dress-up, pretend play, parties, school projects, and creative afternoons at home.
One of the best things about making DIY fairy wings is the freedom to customize them. You can experiment with different colors, layer translucent materials, add subtle sparkle, or keep the design simple and elegant. The basic concept is approachable, while the decorative possibilities are almost endless.
Key Takeaways
- Create colorful DIY fairy wings with a simple no-sew technique.
- Use lightweight, translucent materials for a soft wing effect.
- Layer different shades to create depth and dimension.
- Customize the wings with glitter, stars, ribbons, or other decorative accents.
- Make the design practical for dress-up, imaginative play, and themed occasions.
Why DIY Fairy Wings Make a Great Craft Project
Fairy wings have an instantly recognizable whimsical shape, but they do not have to be difficult to make. A DIY version gives you the chance to choose the colors, proportions, textures, and decorative details yourself. That makes the project especially appealing when you want something personal rather than a generic costume accessory.
The layered appearance of the wings is particularly eye-catching. Transparent or semi-transparent fabric allows the colors beneath it to remain visible, producing a soft effect that feels light and airy. Combining pink with purple, or blue with green, can create a beautiful palette while still keeping the project playful.
Important: The charm of homemade fairy wings comes from their flexibility. They do not need to look perfectly identical on both sides to feel magical. Small variations, layered textures, and handmade details can make the finished piece feel more creative and unique.
Choosing Materials for No-Sew Fairy Wings
A no-sew project is ideal when you want to avoid a sewing machine, complicated stitching, or a long list of specialized tools. The materials should be lightweight enough to shape comfortably while still providing enough structure for the wings to hold their general form.
For the translucent sections, look for lightweight decorative fabric, mesh, tulle, or another sheer craft material that can create a soft wing-like appearance. Several colors can be combined to create the layered effect seen in colorful fairy designs.
You can also consider materials such as:
- Lightweight translucent fabric
- Flexible craft wire or another suitable wing framework material
- Ribbon for securing or decorating the wings
- Craft adhesive appropriate for the chosen materials
- Small decorative accents
- Optional glitter or shimmering embellishments
Keep the overall construction lightweight. Fairy wings are meant to be whimsical accessories, so a bulky design can make them less comfortable and harder to manage during play or a costume activity.
Picking a Color Palette
Color is one of the easiest ways to make DIY fairy wings feel distinctive. Soft pink and lavender create a classic dreamy combination, while turquoise, aqua, and mint produce a fresh and playful look. You can also choose a monochromatic palette by layering several tones from the same color family.
For a more balanced result, choose two or three main colors and repeat them throughout the design. This creates visual harmony without making the wings look overly busy.
How to Create DIY Fairy Wings Without Sewing
The basic process involves creating a wing shape, covering the framework with translucent material, securing the layers, and adding decorations. Since this is a no-sew concept, the focus is on simple assembly rather than advanced fabric construction.
1. Plan the Wing Shape
Start by deciding how large you want the wings to be. A symmetrical design generally creates the familiar fairy-wing silhouette, but the individual sections can vary in size. Sketching a simple outline first can help you visualize the proportions before cutting or shaping anything.
Think about the four main areas of the wings: upper sections, middle sections, lower sections, and the center connection. Rounded or elongated shapes tend to produce a soft appearance that works well with translucent materials.
2. Shape the Framework
Form a lightweight framework around the planned outline. The structure should define the edges of each wing section while leaving enough open space for the translucent material to create its airy appearance.
Try to keep both sides reasonably balanced. You can compare the left and right wings as you work so that the finished pair feels cohesive. Exact mathematical symmetry is not necessary, especially for a handmade craft.
3. Add the Translucent Layers
Place the selected fabric over each wing section and secure it carefully. The goal is to keep the material smooth enough to show the wing shape while allowing some gentle folds or overlaps where appropriate.
Layering is where the design really starts to come alive. A pink layer over a lavender layer can create a richer tone, while blue and mint can blend into a cool, airy combination. Different levels of transparency will also change how the colors interact.
4. Secure the Center
Once the individual sections are covered, bring the wing pieces together at the center. A wrapped section of ribbon or another decorative material can help visually connect the two sides while adding a polished finishing touch.
The center should feel secure and neat because it becomes the visual focal point of the entire accessory. A contrasting color can make this area stand out, while a matching shade creates a more coordinated look.
5. Add Decorative Details
Now comes the fun part. Small embellishments can completely change the personality of your fairy wings. Consider adding subtle glitter, tiny stars, lightweight decorative shapes, ribbons, or other craft accents.
Keep heavier decorations limited so the wings remain lightweight. A few carefully placed details can often create more visual impact than covering every available space.
Expert Insight
Layer translucent colors instead of relying on one thick layer. Overlapping sheer materials creates natural variation, depth, and a softer handmade appearance while keeping the wings visually light.
Creative Ways to Customize Your Fairy Wings
There is no single correct way to decorate fairy wings. The basic structure can become a starting point for many different themes. A pastel design can feel soft and dreamy, while brighter colors can create an energetic costume accessory.
Pastel Fairy Wings
Use shades such as blush pink, lavender, mint, aqua, and pale blue for a gentle color story. Layering these tones produces a soft, cloud-like appearance that works especially well for imaginative dress-up.
Sparkly Fairy Wings
If you want more shimmer, add small amounts of glitter or reflective embellishments. Concentrate sparkle around the edges or center rather than applying it everywhere. This keeps the design visually clean while still giving it a magical finish.
Nature-Inspired Fairy Wings
For a nature-inspired craft, choose greens, blues, soft yellows, and other gentle tones. Small floral or leaf-inspired decorations can complement the translucent layers without overwhelming the wing shape.
Rainbow Fairy Wings
For a cheerful version, combine several translucent colors across different sections. You can repeat the same shades on both sides or arrange them in a gradual color sequence. The transparency of the materials helps the palette blend naturally.
Tips for Making the Wings Look Polished
A few simple design choices can make homemade fairy wings look much more finished. First, pay attention to the overall silhouette. Even the prettiest materials will look less effective if the wing sections are crowded or unevenly arranged.
Second, create a clear focal point. The center connection is a natural place to add a decorative wrap, while the outer edges can remain relatively simple. This gives the eye somewhere to settle.
Third, repeat colors throughout the design. If you use pink in one upper section, consider bringing a touch of pink into another area. Repeated colors help tie the whole design together.
Pro Tip: Step back from the project occasionally and view the wings from a distance. Details that seem tiny up close can become surprisingly noticeable in the finished design, while a little empty space can help the colors and shapes stand out.
Making DIY Fairy Wings Comfortable for Dress-Up
Because fairy wings are often made for costumes and imaginative play, comfort matters just as much as appearance. Keep the structure light and avoid unnecessary bulk. The finished accessory should be easy to move with and should not have sharp or exposed edges.
Before using the wings for an extended activity, inspect the entire design. Check that the framework is covered where needed and that decorative pieces are firmly secured. If the wings are intended for children, adult supervision during crafting and appropriate use is especially important.
It can also be helpful to make the attachment method adjustable. Ribbons or soft straps can provide flexibility, allowing the accessory to sit comfortably without making the design overly complicated.
Fun Occasions for Homemade Fairy Wings
DIY fairy wings can be used for far more than a single costume. They are a versatile craft project that can become part of imaginative play, themed activities, creative photography, or a homemade dress-up collection.
- Dress-up play: Pair the wings with a colorful outfit for imaginative adventures.
- Costume activities: Create a handmade accessory for a themed event or dress-up day.
- Craft afternoons: Turn wing-making into a creative project with different color combinations.
- Pretend play: Encourage storytelling and imaginative games using the finished wings.
- Decorative projects: Smaller wing designs can also inspire room decor or craft displays.
Simple Ways to Make the Project Your Own
The most enjoyable part of a DIY fairy wings project is making choices that reflect your own style. You can change the number of wing sections, alter the proportions, experiment with color combinations, or add different decorative details.
For a minimalist version, use two complementary colors and very few embellishments. For something more playful, combine several translucent shades and add small decorative accents. You could even create several pairs with different palettes for different costumes or creative activities.
Rather than trying to reproduce a particular design exactly, use the basic idea as inspiration. Handmade projects become more meaningful when there is room for personal creativity.
At a Glance
- No-sew construction keeps the project approachable.
- Translucent layers create a soft, colorful wing effect.
- Pastel shades work beautifully for a whimsical appearance.
- Small decorative accents add personality without excessive weight.
- A handmade design can be customized for dress-up and imaginative play.
Conclusion: Create Your Own Whimsical Fairy Wings
DIY fairy wings are a wonderful example of how simple craft materials can become something imaginative and eye-catching. With lightweight translucent layers, a thoughtfully shaped framework, and a few decorative details, you can create a colorful accessory without relying on complicated sewing techniques.
The real appeal is the creative freedom. Try soft pink and purple for a dreamy design, aqua and mint for a fresh look, or several colors for a playful rainbow effect. Add just enough sparkle and texture to make the wings special while keeping the overall design light and comfortable.
Whether you are planning a dress-up activity, creating a handmade costume accessory, or simply looking for a fun craft project, these DIY fairy wings offer plenty of room for creativity. Start with the basic shape, experiment with layers, and let your color choices make the finished wings uniquely yours.
Tags
DIY Fairy Wings Fairy Craft No Sew Craft DIY Costume Kids Crafts Fairy Costume Ideas Dress Up Crafts Creative Craft Ideas