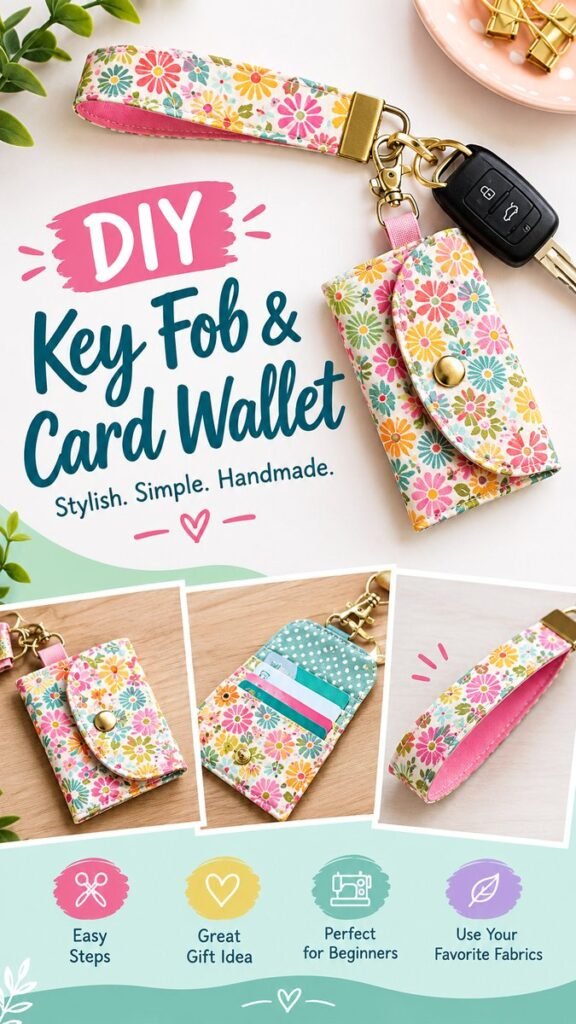
A DIY wallet is one of those sewing projects that combines creativity and everyday usefulness in the best possible way. A compact fabric wallet can keep cards organized while adding a cheerful handmade touch to your daily essentials. The colorful floral design shown here pairs a practical card wallet with a matching wristlet-style key fob, creating a coordinated accessory that is both attractive and convenient.
This type of project is especially appealing for anyone who enjoys simple sewing crafts, fabric accessories, and beginner-friendly handmade gifts. With a few coordinating fabrics, basic sewing supplies, and a little patience, you can create a DIY wallet that reflects your favorite colors and patterns instead of relying on a mass-produced design.
Key Takeaways
- A DIY fabric wallet is practical, compact, and easy to personalize.
- Floral cotton fabrics can create a bright and cheerful handmade accessory.
- Card slots and a secure flap help keep everyday essentials organized.
- A matching key fob adds convenience and makes the set easier to carry.
- This project works well as a handmade gift or a beginner sewing project.
Why Make a DIY Wallet?
Making your own wallet gives you much more freedom than buying one from a store. You can choose the fabric, size, closure, lining, and overall style. A simple fabric wallet can be adapted to hold only a few cards, or it can be expanded with additional compartments for cash, identification, receipts, and other small essentials.
The wallet in this design has a compact shape with a decorative outer fabric, a flap closure, and an interior that is suitable for cards. The matching wristlet key fob makes the project even more useful because the wallet and keys can stay together.
Important: The best DIY wallet projects balance appearance with function. Before cutting your fabric, think about what you normally carry and design the wallet around those everyday needs rather than adding unnecessary bulk.
Choosing Fabric for a Handmade Wallet
Fabric selection is one of the most enjoyable parts of creating a DIY wallet. The floral print shown in the design gives the finished accessory a playful, colorful appearance, but you can achieve a completely different personality with the same basic construction simply by changing the fabric.
Cotton fabric is a popular choice for small sewing projects because it is easy to cut, press, and sew. A small-scale print can look charming on a compact wallet, while larger patterns can create a bold statement. Solids also work beautifully when paired with a patterned lining.
Ideas for Coordinating Fabrics
- Pair a colorful floral exterior with a subtle geometric lining.
- Use a solid accent fabric for the wrist strap or key fob.
- Choose two shades from the main print for a coordinated look.
- Try polka dots, stripes, or small botanical prints for contrast.
- Use bright colors for a playful accessory or neutrals for an understated style.
The reference design demonstrates how a single floral fabric can be used throughout the wallet and key fob for a polished matching effect. If you prefer a more varied appearance, mixing two or three complementary fabrics can make each section stand out.
Supplies for a DIY Fabric Wallet
You do not need an extensive collection of sewing equipment to begin. A basic home sewing setup is enough for a project like this. Gather your fabric and notions before cutting so you can work efficiently and avoid interruptions.
- Coordinating cotton fabric for the exterior and lining
- Matching or contrasting sewing thread
- Fabric scissors or a rotary cutter
- Ruler and fabric marking tool
- Sewing machine or hand-sewing supplies
- Iron and pressing surface
- Small snap or suitable wallet closure
- Key ring, clasp, or swivel hook for the wristlet
- Interfacing if additional structure is desired
The exact materials will depend on the pattern and size you choose. If your fabric is lightweight, interfacing can help the finished wallet feel more substantial. For a softer accessory, you may prefer a flexible construction without heavy interfacing.
Planning the Wallet Before Sewing
A little preparation can make the sewing process much easier. Start by deciding what the wallet needs to hold. If your goal is a small card wallet, you can keep the design slim. If you want room for cash or additional cards, consider increasing the width or adding another pocket.
Use paper or scrap fabric to experiment with the proportions before cutting your final materials. Fold the pieces together and test whether the wallet feels comfortable in your hand or pocket.
Think About the Closure
A secure closure is an important detail in a handmade wallet. The example uses a flap-style design with a snap, creating a neat finish while helping keep the contents contained. Snaps are particularly useful for small wallets because they do not take up much room.
You can also explore other closure options depending on the look you want. A magnetic snap can provide a clean finish, while a zipper can offer additional security. For a very simple card holder, you may even choose a folded construction without a separate closure.
Expert Insight
- Press fabric carefully between sewing steps to create cleaner edges and sharper folds.
- Test your snap placement on a fabric scrap before attaching it to the finished wallet.
- Keep seams consistent, especially around the flap and outer edges.
How to Approach the Sewing Process
Once your pieces are prepared, the construction can be approached in a logical sequence. The goal is to create clean layers, secure the pocket sections, and finish the outside edges neatly.
- Prepare and press the fabric before cutting your pieces.
- Cut the exterior, lining, pocket, and strap pieces according to your chosen pattern.
- Apply interfacing where extra structure is needed.
- Prepare the card pocket sections and press the folds carefully.
- Sew the interior layers together while keeping the edges aligned.
- Construct the exterior portion of the wallet.
- Join the exterior and lining, leaving the appropriate opening for turning.
- Turn the wallet right side out and press the edges.
- Topstitch around the finished edges for a polished appearance.
- Attach the snap or selected closure and finish the matching key fob.
Exact construction steps will vary depending on the sewing pattern you use, so treat these as general project-planning guidelines rather than a replacement for a specific pattern’s measurements and instructions.
Creating the Matching Key Fob
The coordinating key fob is a small detail that adds a lot of personality to this DIY wallet idea. It also makes the finished set more practical. A wristlet strap can be attached to a key ring or swivel clasp, allowing the wallet and keys to travel together.
When making a fabric key fob, accurate pressing is especially helpful. Fold the long strip evenly, press the layers into place, and stitch along the edges. A sturdy seam is important because the strap may experience regular pulling when attached to keys.
For an especially cohesive handmade set, use the same outer fabric on both pieces. You can also reverse the combination by using the wallet lining fabric for the key fob, creating a subtle mix-and-match effect.
Pro Tip: If you are making the wallet as a gift, choose a fabric that reflects the recipient’s favorite colors or style. The small size of the project makes it a wonderful way to use a special fabric remnant.
Ways to Personalize Your DIY Wallet
The basic wallet shape is only a starting point. Personalization is what makes handmade accessories so enjoyable. Even a simple change in fabric can make the finished piece look completely different.
Experiment With Color
Try warm florals, cool blues, cheerful pastels, earthy botanical prints, or classic black and white combinations. If the exterior is busy, a quieter lining can create balance. If the outside is simple, a colorful lining can provide a fun surprise whenever the wallet opens.
Add Functional Details
Depending on the pattern, you can add extra card slots, a small cash compartment, a key attachment, or a different closure. Keep in mind that every added layer increases the thickness of the wallet, so simplicity is often the best choice for a compact everyday accessory.
Try Different Prints
Floral fabric is perfect for a bright spring-inspired wallet, but there are countless alternatives. Tiny fruit prints, abstract shapes, stars, checks, stripes, dots, and botanical patterns can all work beautifully. Seasonal fabrics can also turn the same sewing idea into a thoughtful holiday or birthday gift.
Common Sewing Tips for Better Results
Small accessories often require more precision than their size suggests. Because the wallet is compact, uneven seams or bulky corners can be noticeable. Taking your time during preparation can make the finished project look much more professional.
- Press fabric before cutting and throughout the construction process.
- Use sharp scissors or a rotary cutter for cleaner edges.
- Check seam allowances carefully before joining pieces.
- Backstitch at stress points to reinforce important seams.
- Trim bulky corners before turning the wallet right side out.
- Use a pressing cloth when working with delicate or heat-sensitive materials.
- Test decorative hardware on scrap fabric before committing to the final placement.
Another useful habit is to pause and check alignment before sewing each major seam. A few seconds of preparation can prevent the need to unpick stitches later.
Why This Makes a Great Handmade Gift
A DIY wallet is small enough to be approachable but useful enough to feel meaningful. Handmade accessories are especially appealing as gifts because the fabric choice can be personalized for the person receiving them.
The matching key fob adds another thoughtful touch. Together, the two pieces create a coordinated set that can be used every day. You could make several versions for birthdays, teacher gifts, craft fairs, stocking-style gifts, or simply as a practical handmade surprise for a friend.
Another advantage is that fabric wallets can make excellent scrap-busting projects. Small amounts of beautiful leftover fabric that might otherwise sit unused can become useful accessories.
At a Glance
- Project: DIY fabric wallet and matching key fob
- Style: Colorful, compact, and practical
- Best for: Sewing beginners, handmade gifts, and fabric scraps
- Customization: Fabric, lining, closure, pockets, and strap
- Key benefit: A useful everyday accessory with a personal handmade finish
Final Thoughts on Making a DIY Wallet
A DIY wallet is a wonderful project when you want something that is creative, useful, and easy to personalize. The floral fabric style shown here brings color and personality to a compact accessory, while the matching key fob adds practical convenience. The design also demonstrates how thoughtful details such as a flap, snap closure, card compartments, and coordinated fabric can turn a simple sewing project into something polished.
Whether you are new to sewing or already enjoy making fabric accessories, this is the kind of project that encourages experimentation. Try different prints, adjust the organization to suit your needs, and use fabric remnants to create unique combinations. Once you find a wallet construction you love, you can make several variations for yourself, friends, and family.
The best part of a handmade wallet is the personal touch. Choose fabric that makes you smile, take your time with the small details, and create an accessory that is both beautiful and genuinely useful.
From colorful floral card holders to minimalist fabric wallets and matching wristlets, there are endless ways to make this simple sewing idea your own. Gather your favorite fabric, prepare your sewing supplies, and turn a small piece of material into an everyday accessory you will be happy to carry.
Tags
DIY Wallet Fabric Wallet Sewing Project Card Wallet Sewing For Beginners Handmade Accessories Fabric Crafts span style=”display:inline-block;background:#ffffff;border:1px solid #cfe1dc;border-radius:20px;padding:7px 13px;margin:4px;font-size:14px;”>DIY Sewing