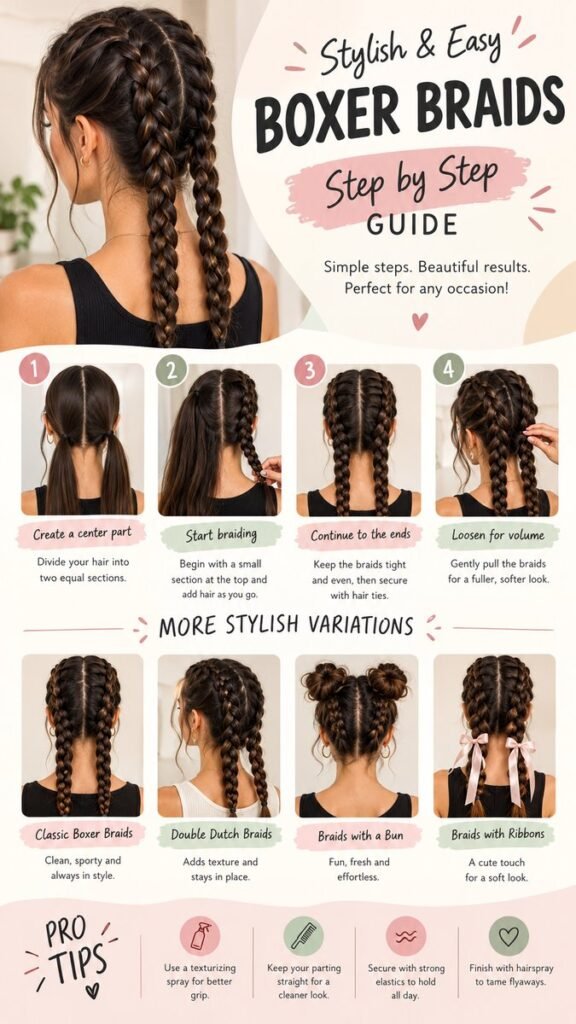
Boxer braids are one of those hairstyles that look polished and impressive while being surprisingly practical to wear. With two defined braids running neatly from the top of the head toward the ends, this style works beautifully for casual days, workouts, busy mornings, and occasions when you want your hair to stay organized without sacrificing style. The best part is that boxer braids can be adapted in countless ways, from sleek and sporty to soft, voluminous, colorful, or playful.
If you are searching for easy DIY hairstyles that you can create at home, boxer braids are a great place to start. Once you understand the basic technique, you can experiment with Dutch braids, added texture, ribbons, cuffs, extensions, buns, and other creative finishes. This guide breaks down the process, explores stylish variations, and shares practical tips to help you create a cleaner, longer-lasting look.
Key Takeaways
- Start with a clean, even center part for balanced boxer braids.
- Keep sections consistent as you add hair while braiding.
- Use texturizing spray when extra grip is needed.
- Loosen the finished braid gently for a fuller appearance.
- Try ribbons, cuffs, buns, color, or extensions to personalize the style.
- Strong elastics and a light finishing product can help maintain the look.
What Are Boxer Braids?
Boxer braids are a practical braided hairstyle created by dividing the hair into two sections and braiding each side separately. The finished look creates two symmetrical braids that frame the back of the head. They are often associated with an athletic, confident aesthetic because the hair is secured close to the scalp and kept away from the face.
The style shown in this hairstyle guide focuses on a structured, defined finish. The braids begin near the upper part of the head and continue downward, creating a neat pattern while keeping the lengths contained. Depending on your technique, you can make the braids tight and sleek or gently pull them apart for additional fullness.
What makes boxer braids especially appealing for DIY styling is their versatility. The same basic foundation can become a completely different hairstyle simply by changing the finish. Add soft ribbons for a feminine touch, combine the braids into a bun for an elegant variation, or incorporate extensions when you want extra length and thickness.
How to Do Boxer Braids Step by Step
Creating boxer braids becomes much easier when you approach the style in sections. You do not need a complicated collection of tools. A comb, a few strong hair elastics, and a product that provides light grip are usually enough to get started.
1. Create a Clean Center Part
Begin by brushing through the hair to remove obvious tangles. Use the end of a styling comb to create a straight center part from the forehead toward the back of the head. Divide the hair into two equal sections and keep one side temporarily secured so it does not interfere with the other.
A precise part makes a major difference in the final appearance. When both sections are similar in size, the finished braids look more balanced and intentional. If you prefer a relaxed hairstyle, the part does not have to be perfectly straight, but a clean division is helpful when you are learning the technique.
2. Start the First Braid
Take a small section near the top of one side. Divide it into three pieces and begin your braid close to the scalp. As you work downward, gradually incorporate small sections of loose hair into the braid. Keeping the sections similar in size helps create a consistent pattern.
For a more pronounced boxer braid appearance, focus on maintaining steady tension rather than pulling extremely tightly. The goal is a secure braid that follows the shape of the head while remaining comfortable.
3. Continue Braiding Toward the Ends
Once you reach the area where all of the loose hair has been incorporated, continue braiding the remaining length. Keep the three strands organized and try to maintain similar tension from top to bottom. Secure the end with a strong elastic that matches the hair or blends discreetly into the style.
Repeat the process on the opposite side. Take your time comparing the two braids as you work. Small adjustments during styling can make the final result look much more symmetrical.
4. Gently Loosen for Volume
If you want a softer, fuller finish, gently tug the outer edges of the completed braid. This technique is sometimes called pancaking because it expands the braid and makes it appear wider. Work gradually rather than pulling large sections at once.
For a sleek athletic look, leave the braids compact and defined. For a more relaxed everyday hairstyle, gently loosening the braid can create a softer silhouette and make the overall style feel less structured.
Pro Tip: The most important part of a polished boxer braid is consistency. Similar section sizes and steady tension usually create a cleaner result than simply pulling the braid tighter.
Boxer Braid Variations to Try
Once you have mastered the basic style, there is no reason to stop with classic boxer braids. Small changes can completely transform the finished look. The variations below provide plenty of inspiration for creating DIY hairstyles that match different outfits, moods, and occasions.
Classic Boxer Braids
The classic version keeps both braids neat, defined, and relatively compact. This is a great option when you want a sporty hairstyle that looks organized without requiring additional accessories. Keep the finish sleek for a streamlined appearance or loosen the braids slightly for more texture.
Pancake Boxer Braids
Pancake boxer braids focus on volume. After completing the braids, gently pull small sections outward to make each braid look wider and fuller. This is particularly useful when you want a more relaxed hairstyle with visible braid texture.
Work slowly and adjust both sides as you go. Over-pulling one braid can make the pair look uneven, so compare the width of each braid regularly.
Boxer Braids With Cuffs
Small decorative hair cuffs can add personality without changing the basic braiding technique. Place them strategically along the finished braids rather than covering every section. Metallic or neutral accessories can create a subtle finish, while brighter pieces can make the hairstyle more playful.
Boxer Braids With Ribbon
Ribbon creates an easy way to soften the sporty character of boxer braids. Tie small bows at the ends or weave ribbon through sections of the braid for a decorative effect. Pastel ribbon can create a delicate appearance, while darker or contrasting shades can make the style feel bolder.
High Boxer Braids
Starting the braids slightly higher can give the hairstyle a more dramatic, lifted appearance. This variation works particularly well when you want the braid pattern to be visible from the front and side. Keep the sections neat around the hairline for a crisp finish.
Boxer Braids With Buns
For a playful change, finish the two braids by wrapping the remaining lengths into small buns. This creates a compact hairstyle with the detail of braids and the charm of space buns. It is a fun choice for casual outings, creative looks, or days when you want your hairstyle to feel a little different.
Boxer Braids Into a Ponytail
Another useful variation is to stop the braids around the back of the head and combine the remaining hair into a sleek ponytail. This gives you the visual interest of braiding while keeping a simple ponytail shape through the lengths.
Boxer Braids With Extensions
Extensions can be incorporated when you want additional length or thickness. Choose an extension method that is appropriate for your hair and secure everything carefully before braiding. The added length can make the finished braids more dramatic and gives you additional options for decorative finishes.
Boxer Braids With Color
Color can turn a familiar braid into a statement hairstyle. Temporary colored extensions, ribbons, or other hair-safe accessories can introduce a pop of color without requiring a permanent change. Consider using one accent shade throughout both braids to keep the result visually balanced.
Messy Boxer Braids
If polished braids are not your style, try a deliberately relaxed version. Allow a few soft pieces around the face and avoid making every section perfectly uniform. Gently loosen the completed braids to create texture and movement while keeping enough structure to preserve the recognizable boxer braid shape.
Expert Insight
A beautiful braid starts before the actual braiding begins. Detangled hair, a controlled center part, manageable sections, and the right amount of grip can make the process easier and the finished hairstyle noticeably cleaner.
Tips for Better DIY Boxer Braids
Learning a new hairstyle can feel frustrating at first, especially when working on the back of your own head. The key is to focus on technique rather than perfection. With practice, your hands become more familiar with maintaining the three sections and adding hair evenly.
- Use a little texture: Very silky hair can be harder to control. A lightweight texturizing spray can provide extra grip.
- Keep your part visible: Check the center division before you begin both sides.
- Work with small sections: Smaller additions can produce a more defined braid pattern.
- Maintain steady tension: Try to use a similar amount of tension throughout each braid.
- Secure the ends well: Choose elastics that hold the braid comfortably without constantly slipping.
- Loosen selectively: Pull only the sections needed to create your desired volume.
Important: A secure braid should still feel comfortable. Avoid excessive tension, particularly around the hairline, and give your scalp a break if the style begins to feel uncomfortable.
How to Make Boxer Braids Look More Polished
The difference between a basic braid and a polished hairstyle often comes down to finishing details. After securing the braids, inspect the hairline and gently smooth obvious flyaways. A small amount of lightweight styling product can help control stray hairs without making the hairstyle appear stiff.
Pay attention to symmetry as well. The two braids do not need to be mathematically identical, but similar positioning and width will make the overall hairstyle appear more intentional. If one braid looks significantly wider, gently adjust the other instead of repeatedly pulling at the same braid.
Accessories should complement the hairstyle rather than overwhelm it. A pair of small ribbons, a few decorative cuffs, or a subtle color accent can be enough to create a new look while keeping the braids as the main focus.
When to Wear Boxer Braids
One reason boxer braids remain such a useful hairstyle is their flexibility. They can fit naturally into an active day because the hair stays organized and away from the face. At the same time, softer variations with ribbons, volume, or decorative details can work beautifully for casual social occasions and everyday outfits.
Try sleek boxer braids when you want a practical, low-fuss appearance. Choose pancake braids when you want additional texture. Add ribbons for a softer aesthetic, or turn the braids into buns when you want something playful. With a few adjustments, the same basic technique can support many different personal styles.
Building Your Own DIY Hairstyle Routine
Once you become comfortable with boxer braids, use them as a starting point for experimenting with other braided hairstyles. Try changing the braid placement, combining braids with ponytails, or adding accessories. You can also experiment with how tightly you braid and how much you loosen the finished style.
Keeping a small collection of useful hair tools nearby makes experimentation easier. A fine-tooth comb can help with clean parts, strong elastics can secure the ends, and a light styling product can improve manageability. You do not need dozens of products to create attractive DIY hairstyles. Consistent technique and patience usually have a greater impact.
If you are new to braiding, practice on one side first rather than attempting both sides simultaneously. Once your hands understand the movement, repeat the technique on the opposite side. Over time, you will spend less time thinking about each strand and more time refining the overall shape.
At a Glance
- Part the hair evenly down the center.
- Braid each side while gradually adding hair.
- Secure the ends with strong elastics.
- Loosen the braid edges for extra volume if desired.
- Personalize the look with buns, ribbons, cuffs, color, or extensions.
Conclusion
Boxer braids are a perfect example of how a practical hairstyle can also become a creative beauty statement. The basic technique is straightforward, yet the possibilities are almost endless. You can keep the braids sleek and sporty, loosen them for a fuller finish, decorate them with ribbons or cuffs, or transform them into buns and ponytails.
The most important ingredients are patience, consistent sections, and a comfortable amount of tension. Start with a clean center part, work through the hair methodically, and make small adjustments as you go. Once the basic boxer braid becomes familiar, experimenting with different finishes becomes much easier.
Whether you are looking for a quick everyday hairstyle, a practical active-day look, or fresh inspiration for your next hair experiment, these DIY boxer braid ideas offer plenty of room to personalize. Pick your favorite variation, gather a few simple tools, and give the style your own twist.