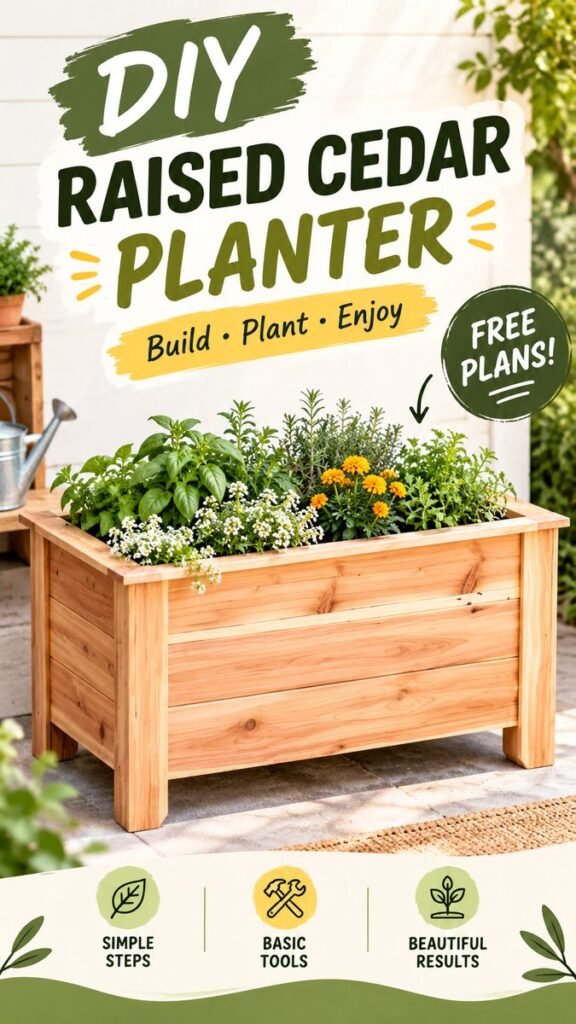
DIY planter boxes are a simple way to add structure, warmth, and greenery to an outdoor space without taking on an overwhelming construction project. A raised cedar planter box, like the one shown here, combines the natural beauty of wood with the practical benefits of elevated gardening. Its clean rectangular shape creates a polished focal point while providing plenty of room for herbs, flowers, and other garden favorites.
Whether you are refreshing a patio, improving a backyard, or creating a dedicated growing area, a wooden planter box can make the space feel more intentional. The design featured here has a timeless appearance, sturdy proportions, and a natural finish that works beautifully with lush green plants. Best of all, the basic concept can be adapted to different sizes, finishes, and planting styles.
Key Takeaways
- A raised cedar planter can add practical growing space and visual appeal to a patio or backyard.
- Cedar is a popular choice for outdoor projects because it has a naturally attractive appearance and good outdoor durability.
- A simple rectangular planter design can be customized for herbs, flowers, vegetables, or mixed plantings.
- Good drainage is essential for keeping plants healthy in any DIY planter box.
- Thoughtful dimensions, sturdy construction, and a clean finish can make a homemade planter look professionally built.
Why DIY Planter Boxes Are Worth Making
One of the biggest advantages of building your own planter box is flexibility. Store-bought planters come in predetermined sizes and styles, but a DIY planter can be designed around the space you actually have. You can make a narrow box for a small balcony, a long planter for a fence line, or a larger raised bed that becomes the centerpiece of a backyard garden.
The planter pictured in the design is especially appealing because it has a substantial, furniture-like appearance. The horizontal cedar boards create visual texture while the thicker corner supports give the box a sturdy presence. This makes it more than just a container for plants. It can become part of the overall outdoor decor.
DIY planter boxes also make gardening feel more accessible. A raised container can bring plants to a more convenient height than traditional in-ground gardening, while clearly defining where the growing area begins and ends. This can be particularly useful when you want a neat, organized garden rather than a sprawling planting area.
Important: The success of a raised planter depends just as much on its internal drainage and construction as its exterior appearance. A beautiful box will perform much better when excess water has a reliable way to escape.
Choosing the Right Wood for a Raised Planter
The warm, natural appearance of cedar is one of the defining features of this planter style. Cedar has a distinctive grain that can look beautiful even without an elaborate finish. Its color also pairs naturally with green foliage, making it an easy choice for garden furniture and outdoor containers.
When selecting lumber for a DIY planter box, consider both appearance and outdoor performance. Boards should be reasonably straight and free from major damage. Since the planter will be exposed to moisture, sunlight, soil, and changing temperatures, choosing materials intended for outdoor use is important.
Cedar is not the only possible option. Other suitable outdoor woods may work depending on your climate, budget, and preferred look. If you choose another material, make sure it is appropriate for the intended gardening application and understand how it should be protected from weather.
Consider the Natural Look
The reference design highlights how attractive natural wood can be when it becomes part of the garden rather than being hidden beneath paint. A clear exterior finish can preserve more of the original character, while a stain can shift the planter toward a darker, richer, or more contemporary appearance.
If you prefer a painted planter, choose an exterior product suitable for outdoor wood. The key is to balance protection with the visual style you want. A simple finish often works particularly well when the plants themselves provide most of the color.
Planning Your DIY Planter Box
Before cutting any boards, think about where the planter will live and what you want to grow inside it. The location affects the ideal dimensions, while the plants influence the depth and amount of growing space you need.
Start by measuring the available area. Leave enough room around the planter to walk comfortably, water plants, and perform routine maintenance. A box that looks perfect on paper can become inconvenient if it blocks a walkway or sits too close to a wall.
Next, decide whether you want one large growing area or several sections. A single open container is versatile and easy to plant. Divided sections can be useful when you want to group herbs or create distinct combinations of flowers and foliage.
Think About Height
The raised construction shown here lifts the planting area above ground level, giving the box a strong visual presence. The exact height is a matter of preference and intended use. Consider who will be tending the plants and how frequently you will need to reach into the container.
A taller planter can also help create a clear boundary between a patio surface and the garden. That makes this type of project especially useful for outdoor entertaining areas where you want greenery without creating a traditional garden bed.
Plan for Weight
Soil becomes considerably heavier once it is inside a planter and saturated with water. A large wooden planter should therefore be constructed with adequate support. The legs, corners, bottom, and joints all need to work together to handle the finished weight.
This is one reason the substantial corner posts in the featured design are so effective. They provide visual strength while also supporting the overall structure. When adapting the design, avoid making a large planter unnecessarily flimsy just to save a small amount of material.
Expert Insight
A successful DIY planter is a balance between appearance and function. The exterior should look clean and intentional, but the interior needs to prioritize drainage, structural support, and healthy growing conditions.
Basic Materials and Tools
The exact materials will depend on the dimensions of your planter, but a project inspired by this style generally requires outdoor-rated lumber, screws or other suitable fasteners, and materials for creating the internal planting area. A basic woodworking setup is usually enough for a straightforward rectangular design.
Useful tools may include:
- Measuring tape
- Pencil and marking tools
- Woodworking saw suitable for your lumber
- Drill and appropriate drill bits
- Screwdriver or driver bit
- Clamps for holding boards in position
- Sandpaper or a sanding tool
- Level for checking the finished structure
Always choose fasteners that are suitable for outdoor conditions. The planter will repeatedly encounter moisture, so ordinary indoor hardware may not be the best choice for long-term performance.
How to Build a Wooden Planter Box
The beauty of this style is its straightforward construction. The box consists primarily of boards assembled into a rectangular container, with structural supports at the corners and a planting area inside.
1. Measure and Cut the Boards
Begin by deciding the final length, width, and height of the planter. Create a simple cutting plan before purchasing or cutting your lumber. This helps reduce waste and makes it easier to keep both sides of the planter symmetrical.
Measure carefully and mark each piece before cutting. Even small inconsistencies can become noticeable when several horizontal boards are stacked together. Labeling pieces as you go can also prevent confusion during assembly.
2. Prepare the Wood
Inspect the cut boards and lightly sand rough edges or splinters. You do not necessarily need to create an ultra-smooth furniture finish, especially for a garden project, but clean edges make assembly easier and improve the final appearance.
Pay particular attention to the surfaces and corners that will be touched during planting and maintenance. A few minutes of preparation can make the finished planter much more comfortable to use.
3. Assemble the Frame
Build the main rectangular structure by attaching the boards to the supporting corner pieces. Keep the first boards square and level because they establish the alignment for everything above them.
Continue adding the horizontal boards while checking alignment regularly. Avoid rushing this stage. A small adjustment early in the build is much easier than correcting a noticeably crooked planter after the entire box has been assembled.
4. Create a Strong Base
The bottom of the planter needs enough support to hold the growing medium. Depending on the design, this may involve structural boards or a supported internal base. The goal is to prevent sagging while allowing excess water to drain.
Do not create a completely sealed container. Plants need adequate drainage, and trapped water can create an unhealthy growing environment while also keeping the wood wetter than necessary.
5. Check Drainage
Drainage is one of the most important parts of any raised planter box. Water needs to move away from the root zone instead of remaining trapped inside the container.
Before adding soil, inspect the bottom and make sure the drainage system is unobstructed. Position the planter somewhere that allows excess water to leave without collecting directly beneath the wood.
Pro Tip: Test the planter with water before filling it completely. It is much easier to correct a drainage issue while the box is empty than after several bags of soil have been added.
Choosing Plants for Your Raised Planter
Once the construction is complete, the fun part begins. The generous planting area shown in this style of planter works well for a mix of textures and colors. You can use it for ornamental plants, culinary herbs, vegetables, or a combination that matches your outdoor space.
Herbs are an especially practical option for a raised planter. Basil, parsley, thyme, rosemary, mint, and other culinary herbs can turn an attractive container into a useful kitchen garden. Be sure to research the growing needs of each plant because light, moisture, and spacing requirements vary.
For a decorative approach, combine plants with different heights. Taller plants can create a vertical focal point, while lower-growing varieties can soften the edges of the planter. Flowers can add seasonal color, while leafy plants provide a dependable green backdrop.
Create Contrast With Texture
One of the strongest visual features of a planter like this is the contrast between warm cedar and fresh foliage. You can enhance that effect by combining plants with different leaf shapes, heights, and shades of green.
Rather than filling every section with identical plants, consider creating a layered arrangement. A few taller plants toward the center or rear can frame shorter plants near the edges. This creates depth while keeping the planter visually full.
Where to Use DIY Planter Boxes
A wooden planter box does not need a large garden to make an impact. It can work surprisingly well in compact outdoor spaces. Place one beside a patio seating area to introduce greenery, along an exterior wall to soften hard surfaces, or near an entrance to create a welcoming garden accent.
Several matching planter boxes can also help define different areas of a backyard. For example, they can create a subtle border between a dining zone and a planting area without requiring a permanent wall or fence.
The natural cedar appearance is particularly versatile. It complements modern patios, rustic outdoor spaces, cottage-inspired gardens, and simple contemporary landscapes. Changing the plants can completely transform the personality of the same basic box.
Simple Ways to Customize the Design
One of the best things about DIY planter boxes is how easily the basic concept can be personalized. You do not have to reproduce a particular set of dimensions to achieve the same overall effect.
- Change the size: Build a compact version for a small patio or a longer version for a spacious backyard.
- Adjust the height: Create a lower container for flowers or a taller raised design for easier access.
- Change the finish: Keep the cedar natural, use a suitable outdoor stain, or choose an exterior paint color.
- Modify the trim: Add a wider top edge for a more substantial, furniture-inspired appearance.
- Mix plant types: Use herbs, flowers, foliage plants, or vegetables depending on the purpose of your garden.
Small details can make a homemade planter feel much more polished. Consistent board spacing, neatly finished edges, square corners, and carefully aligned supports are all visible in the final result.
Tips for Long-Lasting Outdoor Planters
Outdoor wood needs to cope with moisture and changing weather conditions. Keeping the planter reasonably clean and checking it periodically can help you catch problems before they become serious.
Make sure water can drain freely and avoid allowing soil or debris to remain against the exterior for long periods. If the finish begins to fade or wear, follow the recommendations for the specific product used on the wood.
It is also worth checking the fasteners and joints occasionally. Seasonal expansion and contraction can place stress on outdoor woodworking projects. A quick inspection can help keep the planter sturdy and attractive.
Keep the Planting Area Healthy
The planter itself is only part of the gardening system. Healthy soil, suitable plants, appropriate watering, and adequate sunlight all contribute to better results. Avoid treating a raised planter like a decorative container that can simply be filled with any soil and left alone.
Match your planting choices to the conditions where the box will sit. A sunny patio and a shaded corner may require completely different plants. Planning around the actual environment will usually produce better results than choosing plants based only on appearance.
At a Glance
- Use outdoor-suitable wood and hardware.
- Keep the structure square and well supported.
- Provide reliable drainage before adding soil.
- Choose plants based on sunlight, moisture, and available space.
- Customize the finish and dimensions to match your outdoor area.
Conclusion: Build a Planter That Fits Your Garden
A DIY raised cedar planter box can completely change the feel of an outdoor space while remaining approachable as a woodworking project. The combination of warm natural wood, clean lines, sturdy construction, and abundant greenery creates a garden feature that feels both practical and decorative.
The design shown here is a great starting point rather than a rigid template. Adjust the dimensions to suit your space, choose plants that thrive in your conditions, and customize the finish to match your style. With careful measuring, solid construction, and proper drainage, you can create a planter box that looks beautiful and gives your plants a dedicated place to grow.
Whether you are building your first raised garden bed or simply looking for a new backyard project, a wooden planter box is a rewarding place to start. The finished structure adds character immediately, while the plants bring even more life and color as they grow. A few boards, some basic tools, and thoughtful planning can turn an ordinary outdoor corner into a welcoming garden feature.
Tags
DIY Planter Box Cedar Planter Raised Garden Bed Wooden Planter DIY Garden Projects Backyard Gardening Herb Garden Outdoor Woodworking