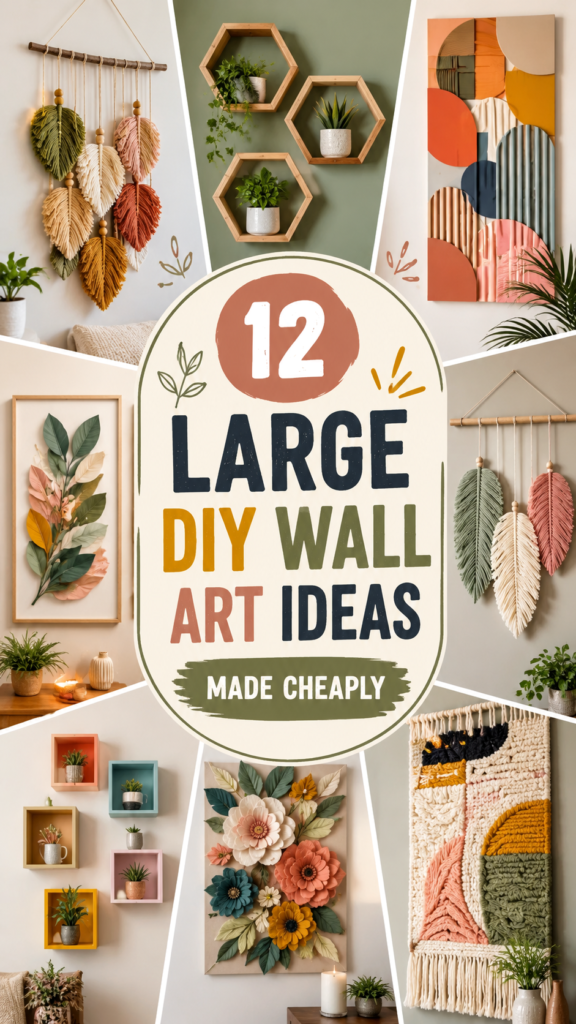
Blank walls have a way of making a room feel unfinished, but creating a beautiful focal point does not have to mean spending a fortune on large framed artwork. With a little creativity, affordable materials can become impressive pieces that add color, texture, personality, and warmth to your home. These large DIY wall art ideas show how simple handmade projects can transform an ordinary wall into a statement feature.
Key Takeaways
- Large wall art can make a room feel more finished and intentional.
- Macramé, woven textiles, botanical designs, and painted panels offer plenty of creative options.
- Simple materials can be combined to create oversized statement pieces on a budget.
- Mixing color, texture, and natural elements adds visual interest without overwhelming the room.
- DIY wall decor can be adapted to match modern, cozy, boho, minimalist, or eclectic interiors.
Why Large DIY Wall Art Makes Such a Difference
Small decorations are useful for filling narrow spaces, but a large wall often needs something with enough visual weight to balance the room. Oversized DIY wall art solves that problem while giving you much more freedom than store-bought decor. Instead of searching for one expensive piece that happens to fit your space, you can create something that suits your wall, furniture, and preferred color palette.
A large handmade piece can also become the first thing people notice when they enter a room. It might be a textured wall hanging above a sofa, a colorful abstract panel in a hallway, a botanical arrangement in a bedroom, or a collection of small shelves arranged as one larger composition.
Important: The secret to successful large wall decor is not complexity. A simple design can look incredibly polished when its scale, spacing, colors, and texture are carefully considered.
12 Large DIY Wall Art Ideas to Try
1. Oversized Macramé Wall Hanging
Macramé is one of the easiest ways to introduce texture to a large empty wall. A simple wooden dowel, cotton cord, and a little patience can create an impressive hanging with plenty of visual presence. Try varying the lengths of the cords to create a layered shape rather than making every strand identical.
For a calm interior, natural cream or beige cord works beautifully. If your room needs more personality, consider incorporating muted rust, olive, mustard, dusty pink, or terracotta tones. Hang the finished piece above a sofa, bed, console table, or reading corner where the texture can become a natural focal point.
2. Handmade Botanical Wall Panel
Botanical wall art brings an organic quality to interiors and can be surprisingly inexpensive to make. A wooden board or canvas provides the base, while pressed leaves, paper foliage, fabric flowers, or carefully arranged artificial stems can create a layered botanical composition.
For a modern look, keep the arrangement relatively simple and allow some negative space around the leaves. For a more decorative result, overlap different shapes and textures to create the appearance of a small indoor garden.
3. Geometric Abstract Wall Art
Abstract geometric art is perfect when you want something colorful and contemporary without needing advanced painting skills. Start with a large canvas, wood panel, or several smaller boards. Use painter’s tape to create clean sections, then experiment with circles, arches, rectangles, curves, and organic shapes.
Warm neutrals combined with one or two stronger accent colors can make the finished piece feel intentional. Terracotta, mustard, olive, cream, navy, and muted coral work particularly well for a cozy contemporary palette.
4. DIY Hexagon Plant Shelves
Wall art does not have to be a flat picture. Small geometric shelves can become part of the artwork while also providing useful display space. Hexagonal wooden shelves are especially effective because their shape creates an interesting pattern across an otherwise plain wall.
Place small potted plants, decorative objects, or simple ceramics inside the shelves. For a cohesive arrangement, repeat a few colors instead of using a completely different color in every section.
5. Layered Paper Flower Art
Large paper flowers can create an impressive wall installation for very little money. Use cardstock or other sturdy craft paper to cut petals in different sizes. Layer the pieces to create depth, then arrange several flowers together on a canvas, wooden board, or directly on the wall with removable hanging methods when appropriate.
This idea works particularly well in bedrooms, creative spaces, nurseries, and cozy living areas. Choose several shades from the same color family for a sophisticated effect, or combine contrasting tones for a cheerful statement.
6. Oversized Woven Textile Art
Woven wall decor adds softness that painted artwork cannot always provide. You can repurpose fabric strips, yarn, rope, or other suitable textiles to build a textured panel. Combine different stitches, patterns, or materials to make the surface visually interesting.
This approach is especially useful for rooms that already feature wood, linen, rattan, baskets, or other natural materials. The repeated textures help create a warm and relaxed atmosphere.
7. Colorful Patchwork Wall Art
If you love bold interiors, consider creating a patchwork-inspired art panel from painted wood pieces, fabric scraps, paper shapes, or repurposed materials. Arrange blocks of different sizes to create an energetic composition.
The key is to establish a limited palette before you begin. Even a colorful piece will look more cohesive when several shades repeat throughout the design.
8. DIY Floral Canvas Composition
A floral canvas can bring softness and color to an otherwise neutral room. Instead of painting a realistic bouquet, experiment with simplified flowers and leaves. Large petals, loose brushstrokes, and overlapping shapes can produce a modern handmade appearance.
You can also create several coordinating canvases and hang them together as one oversized arrangement. This gives you the visual impact of large wall art while keeping each individual project manageable.
9. Painted Wooden Wall Panels
Wood is an excellent foundation for affordable wall decor because it brings natural texture while providing a durable surface for paint. Reclaimed-looking boards, simple plywood panels, or inexpensive wooden canvases can all become decorative features.
Try painting broad arches, abstract lines, blocks of color, or botanical silhouettes. Leaving portions of the wood visible can add warmth and prevent the design from feeling too flat.
10. Mini Shelf Gallery Wall
Instead of hanging one enormous artwork, create the impression of a large installation using several small shelves. Arrange them in a balanced grid or an intentionally irregular pattern. Add small plants, framed prints, handmade objects, or decorative pieces.
This idea is easy to update, which makes it useful for anyone who enjoys changing their home decor throughout the year. You can refresh the display without rebuilding the entire wall.
11. Textured Fiber Art Panel
Fiber art can turn an empty wall into a tactile feature. Use yarn, thick cord, fabric strips, or woven materials to create rows, patterns, fringes, and raised sections. A simple rectangular frame can give the project a finished appearance.
For a sophisticated result, combine only a few neutral shades. If the surrounding room is fairly plain, introduce one richer accent color to give the piece more personality.
12. Mixed-Material Statement Wall
When you cannot decide between painting, textiles, plants, and shelving, combine them. A large DIY wall arrangement can include several complementary elements rather than relying on one technique.
For example, pair a textured hanging with a botanical panel and a few small shelves. The individual elements remain simple, but together they create a layered statement wall that feels collected rather than mass-produced.
Why This Matters
When making large wall art, think about the entire wall rather than only the individual craft. Scale, negative space, repeated colors, and texture are what make a DIY project look cohesive and intentional.
How to Choose the Right DIY Wall Art for Your Space
The best wall art idea depends on the size of your wall, the furniture nearby, and the atmosphere you want to create. Before purchasing supplies, stand back and look at the wall as a whole.
Consider the Scale
A common mistake is choosing artwork that is too small for a large wall. Large furniture, such as a sofa or bed, usually benefits from artwork with enough width or height to visually connect with it.
If you prefer smaller pieces, group several together. A collection can provide the same sense of scale as one oversized artwork while allowing more flexibility.
Build a Simple Color Palette
Choose two or three main colors from the room and let them guide your DIY project. You do not need to match every shade exactly. Repeating a few tones throughout the artwork is enough to create visual connection.
Neutral interiors can handle stronger accents, while already colorful rooms may benefit from simpler wall decor. Natural wood, cream, olive, beige, terracotta, and muted pink are versatile choices for a warm handmade look.
Mix Texture With Flat Surfaces
One of the easiest ways to make homemade wall decor look more sophisticated is to combine different textures. Pair a smooth painted surface with woven fibers, natural wood, paper flowers, or greenery.
Pro Tip: If your wall art feels too busy, remove one element rather than adding another. Strong DIY decor often looks better when each material has enough space to be appreciated.
Budget-Friendly Materials to Keep on Hand
You do not need an expensive craft collection to make impressive DIY wall decor. Many projects can start with basic materials that are easy to find or repurpose.
- Canvas or inexpensive wooden panels
- Cardstock and craft paper
- Yarn, cotton cord, and fabric scraps
- Wooden dowels and simple frames
- Paint and painter’s tape
- Artificial or paper greenery
- Small wooden shelves
- Decorative textiles and leftover craft materials
Repurposing materials can make a project even more affordable. An old frame can become the foundation for a botanical display, while leftover fabric can be transformed into a woven wall hanging. The goal is to focus on the finished composition rather than the original purpose of each material.
Tips for Making DIY Wall Art Look Expensive
Affordable does not have to look cheap. A few design choices can make even simple craft materials feel polished.
- Keep your palette controlled. Repeating a few colors creates a more sophisticated appearance.
- Pay attention to spacing. Give individual pieces enough breathing room so the wall does not feel crowded.
- Use consistent materials. Repeating wood tones, frame finishes, or textile textures helps connect separate pieces.
- Prioritize scale. A correctly sized piece often makes a bigger impact than a highly detailed but undersized decoration.
- Layer carefully. Combine flat artwork with texture, depth, or small decorative objects for a richer composition.
Where to Display Large DIY Wall Art
Large wall decor can work in almost any part of the home. Above a sofa is an obvious choice, but there are plenty of other possibilities.
- Living room: Create a statement wall above the sofa or console.
- Bedroom: Use soft textiles or botanical art above the bed.
- Entryway: Make the first wall guests see feel welcoming and personal.
- Dining area: Add colorful abstract art to create a lively focal point.
- Home office: Use geometric designs, shelves, or inspiring color combinations.
- Hallway: Turn a long blank section into a gallery-style display.
Think about sight lines as well. Wall art should be easy to see from the main seating or walking areas. A beautiful piece loses some of its impact if furniture, doors, or other decorations constantly block it.
Create a Wall That Feels Like You
The biggest advantage of DIY wall art is the opportunity to make something personal. Store-bought decor can be beautiful, but handmade pieces allow you to choose the exact colors, textures, shapes, and proportions that work in your home.
You can keep the design minimalist with natural fibers and neutral tones, embrace a colorful abstract style, or combine botanical elements with woven textures for a relaxed look. There is no requirement to follow one decorating trend from beginning to end.
Start with one wall and one idea. Once you see how the new piece changes the room, you can decide whether to add complementary artwork or leave the rest of the space simple.
At a Glance
- Choose artwork that suits the wall’s scale.
- Repeat colors already present in the room.
- Combine smooth, natural, and woven textures.
- Repurpose affordable materials whenever possible.
- Leave enough negative space for the design to breathe.
Final Thoughts on Affordable DIY Wall Art
Large DIY wall art is proof that decorating a home does not have to come with a large price tag. With simple materials, thoughtful color choices, and a little creativity, an empty wall can become one of the most memorable features in a room.
From oversized macramé and woven textiles to botanical panels, geometric paintings, handmade shelves, and colorful mixed-media displays, there are countless ways to create a statement without buying expensive artwork. The most successful projects are often the ones that balance simplicity with personality.
Choose an idea that genuinely fits your space, start with materials you already have when possible, and focus on creating a composition that feels natural in your home. Whether you make one oversized piece or combine several smaller projects, your finished wall can add warmth, character, and a distinctly personal touch.
Tags
DIY Wall Art DIY Wall Decor Budget Home Decor Large Wall Decor Handmade Home Decor Macramé Wall Hanging Botanical Wall Art Creative Home Decor