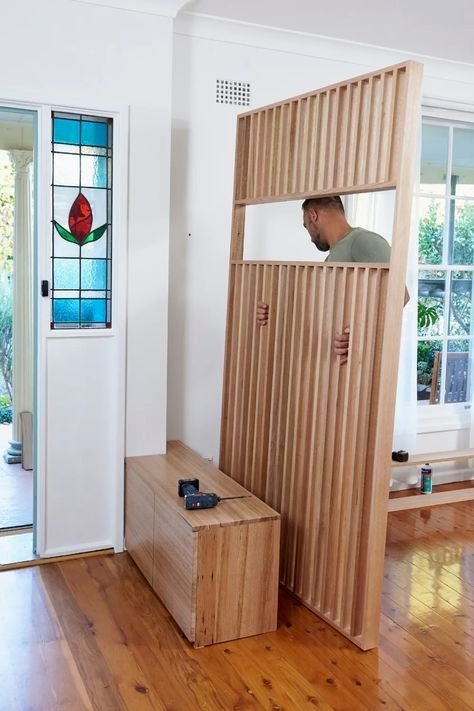
Creating a DIY privacy screen is one of the easiest ways to make an outdoor area feel more comfortable, secluded, and thoughtfully designed. Whether you want to add privacy to a patio, deck, balcony, garden seating area, or small backyard corner, a well-planned screen can turn an exposed space into a relaxing retreat while adding visual interest.
The best part is that a privacy screen does not have to look bulky or complicated. With the right materials, proportions, and finish, it can become an attractive part of your outdoor decor rather than something that simply blocks a view. From simple wood panels and slatted designs to creative vertical arrangements, there are plenty of ways to adapt the concept to your space and personal style.
Key Takeaways
- A DIY privacy screen can create a more comfortable and defined outdoor living area.
- Choose a design that balances privacy, airflow, natural light, and visual appeal.
- Simple materials can create a polished result when proportions and spacing are carefully planned.
- Wood, lattice, slats, panels, and greenery can all be incorporated into a privacy solution.
- Always consider stability, weather exposure, and the appropriate installation method for your space.
Why Add a DIY Privacy Screen?
Outdoor spaces are often designed for relaxation, but privacy can be overlooked. A patio may face a neighboring yard, a balcony may overlook another building, or a garden seating area may feel too exposed. A privacy screen helps define the area and creates a visual boundary without requiring a complete enclosure.
Unlike a traditional fence, a decorative privacy screen can be designed around the exact area where privacy is needed. This makes it particularly useful for smaller spaces. Instead of covering an entire perimeter, you can concentrate the screen behind a dining table, beside a lounge chair, around a hot tub area, or along one exposed side of a patio.
One of the biggest advantages of a DIY privacy screen is flexibility. You can control the height, width, spacing, materials, finish, and overall appearance. That allows the finished project to complement your existing outdoor furniture instead of competing with it.
Choosing the Right Privacy Screen Design
Before gathering materials, think about what you actually want the screen to accomplish. Privacy can mean completely hiding an area from view, reducing visibility while preserving daylight, or simply making a space feel more enclosed and intentional.
A solid screen provides the greatest visual separation, while slatted and lattice designs offer a lighter appearance. Open designs can also allow air and sunlight to pass through, which may be especially desirable in an outdoor setting.
Solid Panel Screens
Solid panels are a practical choice when maximum visual privacy is the priority. They create a strong backdrop and can also help hide less attractive views. A simple panel can be painted, stained, or left with a natural finish depending on the look you want.
Because a solid surface can appear visually heavy, consider breaking up the design with surrounding plants, outdoor lighting, or decorative elements. This can make the screen feel like part of the landscape rather than a wall.
Vertical Slat Screens
Vertical slats are popular because they provide privacy while maintaining a modern, airy appearance. The gaps between the boards can be adjusted according to the amount of visibility you want.
The vertical orientation can also create the impression of height, making it a useful choice for compact patios or balconies. A clean slatted pattern works especially well with contemporary outdoor furniture and simple landscaping.
Lattice and Open-Pattern Screens
Lattice-style screens offer a softer alternative to solid panels. Their open structure can support climbing plants while creating a decorative backdrop for an outdoor seating area.
This style works well when you want privacy without completely closing off the space. As greenery grows through the openings, the screen can become increasingly integrated into the surrounding garden.
How to Plan a DIY Privacy Screen
Good planning makes the construction process much easier. Start by identifying the exact location where the screen will go and observe the space at different times of day. Think about what you want to hide, where people normally sit, and how the screen will interact with sunlight and airflow.
- Measure the area. Determine the available width and the approximate height needed for privacy.
- Mark the viewing direction. Identify the angles from which the area feels most exposed.
- Select the style. Decide between solid panels, slats, lattice, or a combination.
- Choose appropriate materials. Outdoor projects need materials suitable for weather exposure.
- Plan the support structure. The screen should be securely supported rather than simply resting against another structure.
- Consider the finish. Choose a color or natural finish that complements the surrounding space.
It is also helpful to sketch the design before building. Even a simple drawing can reveal whether the proportions feel balanced and whether the screen will provide the privacy you expect.
Expert Insight
Privacy is not always about creating a completely solid barrier. Strategic placement and carefully chosen spacing can provide enough visual separation while keeping an outdoor area bright, open, and comfortable.
Materials to Consider for a DIY Privacy Screen
The material you choose has a major impact on both appearance and durability. Wood is one of the most versatile choices because it can be cut, assembled, painted, stained, or combined with other outdoor elements.
- Wood boards: Ideal for solid or slatted privacy designs.
- Outdoor-rated panels: Useful when you want a simpler panel-based approach.
- Lattice: A decorative option that works particularly well with plants.
- Metal elements: Can introduce a contemporary look when incorporated appropriately.
- Planters: Useful for combining privacy with greenery and visual separation.
For any outdoor project, select materials and finishes appropriate for the conditions where the screen will be installed. Moisture, sunlight, wind, and temperature changes can all affect the longevity of an outdoor structure.
Do not overlook the support system. A beautiful privacy panel will not perform well if it is unstable. The installation method should suit the surface and conditions of the location, and permanent or structural installations should be approached carefully.
Make Your Privacy Screen Part of the Decor
A privacy screen can do more than block an unwanted view. With a little styling, it can become the visual anchor of an outdoor space.
Add Greenery
Plants are an easy way to soften the appearance of a screen. Place planters in front of the structure or incorporate climbing greenery where appropriate. The combination of wood and foliage can create a warm, natural atmosphere.
For smaller spaces, vertical planting is particularly useful because it adds greenery without taking up much floor area. Choose plants based on the available light and local growing conditions.
Use Outdoor Lighting
Lighting can make a privacy screen useful after sunset while also highlighting its structure. Small outdoor lights positioned around or near the screen can create a soft, inviting atmosphere.
Avoid overwhelming the area with too many fixtures. The goal is usually to create gentle illumination rather than turn the screen into the brightest feature in the yard.
Coordinate Colors
The finish of your DIY privacy screen can dramatically change its character. Natural wood tones tend to create a relaxed outdoor feeling, while darker finishes can provide a crisp contemporary backdrop. Lighter finishes can make a compact area feel brighter.
Consider the colors already present in your furniture, planters, flooring, and surrounding landscaping. A cohesive palette will make the entire space feel more intentional.
DIY Privacy Screen Ideas for Small Spaces
You do not need a large backyard to benefit from a privacy screen. In fact, compact outdoor spaces can often benefit the most from thoughtful screening.
For a balcony, a narrow vertical screen can define one section without making the entire area feel enclosed. On a small patio, a screen positioned behind seating can create the feeling of a dedicated outdoor room.
Another smart approach is to use a partial screen instead of covering the entire side. This can reduce the amount of material required and preserve the open feeling of the space.
If you’re working with limited floor space, consider combining the screen with vertical planters. This creates multiple functions in one area and can make the design feel more integrated.
Common DIY Privacy Screen Mistakes to Avoid
A few planning mistakes can affect both the appearance and performance of a privacy screen. Fortunately, most are easy to avoid.
- Making the screen too large: Oversized structures can make a small space feel cramped.
- Ignoring wind exposure: Outdoor screens need appropriate support, especially in exposed locations.
- Using unsuitable materials: Materials intended for indoor use may not perform well outdoors.
- Blocking too much light: A solid screen may make the area darker than expected.
- Forgetting the surrounding design: The screen should complement the existing outdoor space.
- Skipping measurements: Accurate measurements help prevent unnecessary cutting and material waste.
A good privacy screen should feel intentional. Before installing it, step back and look at the planned location from several viewpoints. This simple check can help you spot proportions or placement issues before they become difficult to change.
Ways to Make the Project More Budget-Friendly
One reason DIY privacy screens are so appealing is that the design can be adapted to the available budget. You do not necessarily need an elaborate structure to make a noticeable difference.
Start by focusing on the area where privacy matters most. A smaller screen can often accomplish the goal without requiring a full enclosure. Simple repeated elements, such as evenly spaced slats, can also create a polished appearance without complicated construction.
Reuse can be another creative option when suitable materials are available. However, any reclaimed material should be checked carefully for condition, stability, and suitability for outdoor use before becoming part of the project.
Pro Tip: Spend more attention on spacing, alignment, and finishing than on unnecessary decorative details. A straightforward design with clean lines can look far more sophisticated than an overly complicated screen.
How to Style the Finished Outdoor Space
Once the privacy screen is installed, style the surrounding area as if you were decorating an outdoor room. Start with the main seating or dining area, then add a few carefully selected accessories.
Outdoor cushions, planters, rugs, lantern-style lighting, and small tables can help create a comfortable setting. Keep the arrangement practical and leave enough space for movement.
The privacy screen itself can serve as a backdrop. Instead of covering it with too many decorations, allow its pattern, texture, and natural surroundings to remain visible.
If your screen has a simple geometric design, repeat those shapes subtly through furniture or accessories. If it has a natural wood appearance, greenery and organic textures can reinforce the relaxed look.
Safety and Installation Considerations
Before beginning construction, consider the structure and location carefully. A freestanding screen needs enough stability for the conditions where it will be used. A screen attached to an existing structure should be installed using an appropriate method for that surface.
Take care when cutting, drilling, lifting, and assembling materials. Use suitable protective equipment and follow the instructions for any tools or hardware you use.
For larger or permanently installed structures, local building requirements may apply depending on the location and design. When in doubt, check the applicable requirements before construction.
Why DIY Privacy Screens Are Worth Saving
A privacy screen can completely change the feeling of an outdoor area without requiring a full renovation. It adds definition, helps create a sense of seclusion, and gives you another opportunity to express your decorating style.
The most successful designs usually combine practicality with simplicity. They provide privacy where it is needed while still allowing the space to feel open and welcoming.
Whether you prefer a modern slatted wall, a natural wood panel, a plant-covered lattice, or a minimalist screen, the basic concept can be adapted to almost any outdoor setting.
Quick Points
- Measure first and design around the area that needs privacy most.
- Choose materials that can handle outdoor conditions.
- Balance privacy with light, airflow, and the size of the space.
- Use plants, lighting, and coordinated colors to integrate the screen into your decor.
- Prioritize stability and safe installation from the beginning.
Conclusion
A DIY privacy screen is a practical project with plenty of creative potential. It can make an exposed patio feel more intimate, give a balcony greater separation, or transform an unused backyard corner into a comfortable retreat.
The key is to design around your actual needs rather than simply building the largest barrier possible. Consider where privacy is needed, how much light you want to preserve, what materials fit your environment, and how the finished screen will work with your existing outdoor decor.
With thoughtful measurements, a suitable design, and a little attention to detail, even a simple privacy screen can make a major difference. Add a few plants, comfortable seating, and subtle lighting, and you can create an outdoor space that feels more private, polished, and inviting.
Tags
DIY Privacy Screen Privacy Screen Ideas Outdoor Privacy Patio Ideas Backyard Ideas DIY Outdoor Projects Deck Privacy Outdoor Decor