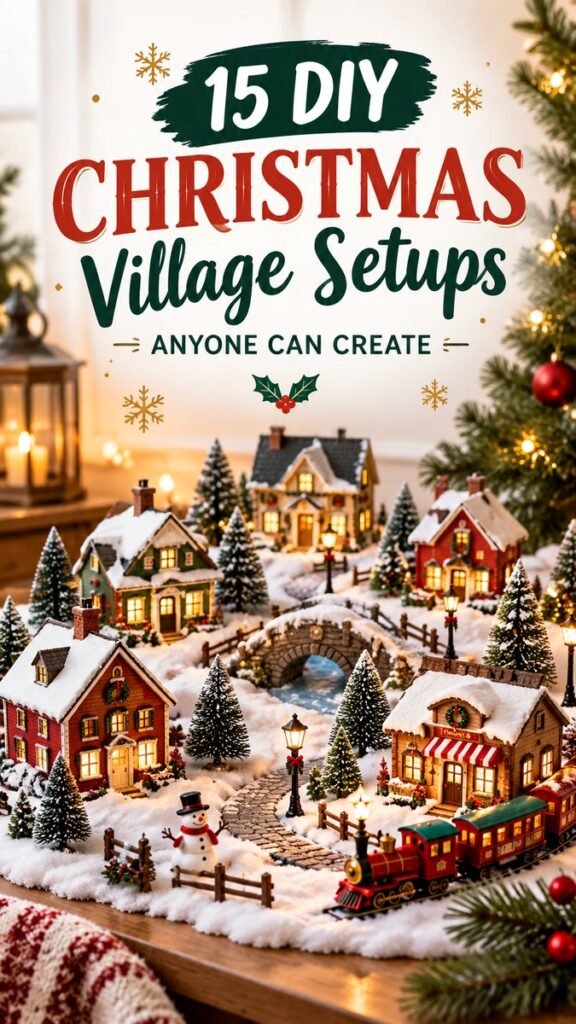
A miniature Christmas village can turn an ordinary tabletop, shelf, mantel, or corner of your home into a cozy winter wonderland. With snowy cottages, evergreen trees, warm glowing lights, winding paths, a charming stone bridge, and festive little details, a DIY Christmas village display feels magical without requiring a complicated decorating project. The beauty of this idea is that you can build the scene gradually, use pieces you already own, and arrange everything to match your personal holiday style.
Key Takeaways
- Create visual depth by combining houses, trees, paths, and small accessories.
- Use warm miniature lights to make the village feel inviting after dark.
- Layer faux snow around buildings and pathways for a convincing winter scene.
- Mix different house shapes, colors, and sizes to keep the display interesting.
- Leave enough breathing room between pieces so the village does not look overcrowded.
- Build the display in sections so it is easier to rearrange and refresh each year.
Why Christmas Village Displays Feel So Magical
There is something especially charming about a tiny neighborhood covered in snow. A Christmas village display gives you the chance to create an entire festive scene on a small scale. Instead of decorating with individual objects placed around a room, you are creating a miniature environment where every detail works together.
The display pictured here captures that feeling with clusters of small houses surrounded by snowy trees and winding pathways. Warm lights bring attention to the homes and create a soft glow across the snow. A miniature train, snowman, bridge, fences, and other small accessories make the scene feel like a tiny community rather than a collection of unrelated decorations.
Important: The most successful Christmas village displays are not necessarily the ones with the most decorations. A thoughtful arrangement with clear pathways, varied heights, warm lighting, and a consistent color palette usually feels more polished than a crowded display.
Choose a Christmas Village Theme
Before placing anything on your table, decide what kind of atmosphere you want to create. The reference-inspired scene has a traditional, cozy winter village feeling, with colorful cottages, snowy roofs, evergreen trees, and warm illumination. You can follow that direction or adapt the concept to suit your home.
A traditional Christmas village works beautifully with red, green, cream, brown, and natural wood tones. If you prefer a more modern look, choose white buildings, neutral accessories, soft greenery, and simple lighting. For a playful display, combine colorful cottages with miniature figures, vehicles, signs, trees, and other whimsical pieces.
- Classic winter village: Think snowy rooftops, evergreen trees, warm lights, and traditional cottages.
- Cozy woodland village: Emphasize natural textures, pine trees, wood details, and earthy colors.
- Colorful holiday village: Mix cheerful red, green, cream, and festive accents for a lively display.
- Minimal winter scene: Use fewer buildings, plenty of white space, and a restrained palette.
Build the Foundation With Faux Snow
Faux snow is one of the easiest ways to establish the winter setting. Rather than treating snow as a small accessory, use it as the visual foundation of the entire village. A white base helps the colorful houses and evergreen trees stand out while making the different sections feel connected.
You can use artificial snow blankets, loose decorative snow, white fabric, or another suitable seasonal surface. Arrange it in gentle layers rather than creating a completely flat surface. Slight variations in height make the miniature landscape feel more natural.
For an especially dimensional look, create small raised areas beneath some houses or trees. This allows certain buildings to sit higher than others and gives the finished display a more realistic landscape.
Arrange the Houses for Depth and Balance
The houses are usually the stars of a Christmas village, so their placement deserves extra attention. Avoid lining every building up in a straight row. Instead, arrange them at different distances from the front edge and vary their orientation slightly.
Place one or two larger or visually important homes toward the center or rear of the display. Smaller cottages can sit closer to the foreground. This creates layers that make the scene appear larger than it really is.
- Start with the largest buildings and place them toward the back.
- Add medium-sized homes through the middle section.
- Use smaller cottages and accessories toward the front.
- Turn a few buildings slightly rather than facing everything directly forward.
- Step back regularly to check whether the arrangement feels balanced.
Create Natural Clusters
Think about how a real neighborhood might be organized. A few houses can form one cluster while another group sits farther away. Trees can separate the clusters, and a pathway can visually connect them. This approach creates a sense of movement throughout the display.
Add Evergreen Trees for Height
Miniature evergreen trees are essential for creating height and texture. They also help fill empty areas between houses without competing with the buildings. Use trees in several sizes rather than placing identical pieces at equal intervals.
Taller trees work well toward the back of the scene, while shorter trees can frame pathways and foreground houses. A few larger trees placed near the edges can also help create a natural frame around the entire village.
Pro Tip: Varying the height of your trees is one of the simplest ways to make a miniature display look more professionally styled. Repeating the same height and spacing can make the arrangement feel too rigid.
Design Winding Paths Through the Village
A pathway gives the eye somewhere to travel. In the featured style, a winding route moves between the houses and creates a natural connection from the foreground toward the back of the village.
You can make paths from miniature paving materials, cardboard covered with a textured finish, wooden pieces, craft materials, or other suitable decorative surfaces. The exact material matters less than the shape and placement.
Try to avoid making every path perfectly straight. Gentle curves feel more organic and allow you to guide the viewer’s attention toward different buildings. Keep the paths wide enough to remain visible after trees, figures, and other accessories are added.
Use Warm Lights to Transform the Display
Lighting can completely change the mood of a Christmas village. During the day, the miniature buildings and snowy landscape provide most of the visual interest. In the evening, warm lights make the windows, paths, and surrounding snow glow.
Small LED string lights are especially useful because they can be tucked around the base of houses, beneath snow, beside pathways, or around trees. Concealing portions of the wire helps keep attention on the village rather than the lighting equipment.
- Place lights near houses to emphasize their windows and entrances.
- Use small points of light along pathways for a welcoming effect.
- Hide excess wiring beneath the display surface where practical.
- Avoid placing every light in one area, which can make the scene feel visually unbalanced.
Add a Miniature Bridge or Focal Feature
A bridge is a wonderful focal point because it adds architectural interest and creates a transition between different parts of the scene. The miniature stone bridge shown in the display gives the village a central landmark and makes the layout feel like a complete landscape.
If you do not have a bridge, another feature can serve the same purpose. A small train station, gazebo, decorated tree, market stall, clock tower, bench area, or particularly detailed cottage can become the visual anchor.
Choose one main focal point instead of making every accessory equally prominent. The goal is to give the eye a place to land before it explores the smaller details.
Bring the Scene to Life With Small Details
The smallest pieces often make a Christmas village display feel surprisingly realistic. Miniature fences, snowmen, lamps, benches, trees, animals, vehicles, signs, and other seasonal figures can add personality without requiring much space.
The key is moderation. Too many accessories can make the display look cluttered, especially when the houses already have detailed facades. Place small figures where they naturally support the story of the scene.
Why This Matters
A Christmas village looks most inviting when the decorations suggest a little story. Instead of filling every open space, create small moments that encourage people to look closer.
- Use a few figures near paths and entrances.
- Place accessories in groups rather than scattering them randomly.
- Keep important architectural details visible.
Make the Miniature Train a Feature
A miniature train adds movement and nostalgia to a Christmas village. In the displayed arrangement, the train occupies the foreground and introduces a strong horizontal element that contrasts with the vertical trees and houses.
If you use a train, think carefully about its position. It can travel around the perimeter, pass through the front of the village, or circle a central feature. Leave enough open space around the track so it remains visible rather than disappearing behind too many decorations.
Create a Cozy Color Palette
Color plays a major role in making a Christmas village feel cohesive. The combination of snowy white, evergreen green, warm wood tones, red accents, and golden light creates the classic cozy holiday atmosphere seen in this style of display.
You do not need every house to match. In fact, slight differences can make the scene more interesting. Instead, repeat a few colors throughout the display. For example, red doors can be echoed by red accents on trees or miniature vehicles, while green trees can connect the different sections visually.
Keep the Snow Bright and the Lighting Warm
The contrast between cool-looking snow and warm lights is especially effective. It creates the feeling of a cold winter evening while making the tiny homes appear comfortable and welcoming.
Christmas Village Display Ideas for Small Spaces
You do not need a large table to create an impressive Christmas village. A compact arrangement can still have plenty of character if you focus on vertical layering and careful composition.
- Use a narrow console table for a linear village.
- Build a small cluster of cottages on a shelf.
- Create a tabletop centerpiece around one main house.
- Use stacked platforms to create different elevations.
- Place a few taller trees behind smaller houses to increase depth.
For smaller spaces, choose fewer houses and make each one count. A display with three beautifully arranged cottages, several trees, a winding path, and warm lighting can feel more intentional than a crowded collection of pieces.
How to Style Your Christmas Village Step by Step
- Clear the display area. Start with a clean, stable surface that can support all of your decorations.
- Create the snowy base. Spread your faux snow or chosen white foundation across the area.
- Plan the layout. Decide where the main houses, pathways, trees, and focal feature will go.
- Place the largest buildings. Position them toward the back or in important central locations.
- Add pathways. Create curves that visually connect different areas of the village.
- Layer in the trees. Use different sizes to fill gaps and add height.
- Add lighting. Place warm lights around houses, paths, and other focal points.
- Introduce accessories. Add fences, figures, lamps, vehicles, and other small details.
- Check the balance. Look at the display from several angles and move anything that feels too crowded.
- Finish with small accents. Add touches of greenery, snow, and seasonal details to complete the scene.
Common Christmas Village Decorating Mistakes to Avoid
Even a collection of beautiful miniature pieces can lose its impact if everything is placed without a clear plan. One common mistake is putting all the largest buildings at the front. This can block the smaller pieces and make the display look flat.
Another mistake is using too many identical trees in evenly spaced rows. Natural variation creates a more relaxed and realistic appearance. You should also avoid covering every available inch with accessories. Open areas are important because they give the eye a visual break.
Finally, check the lighting before you finish. A few carefully positioned warm lights can create a beautiful glow, while too many exposed wires or overly bright points can distract from the village itself.
Easy Ways to Personalize Your DIY Christmas Village
One of the best things about DIY Christmas village displays is that there is no single correct arrangement. You can make the scene as traditional, colorful, minimalist, rustic, or playful as you like.
Try changing the placement of the houses each year. Introduce a new focal feature, move the train to another section, add a different group of trees, or create a new pathway. Small changes can make familiar decorations feel fresh.
You can also use seasonal greenery around the outside of the display to frame the miniature landscape. Evergreen branches, pinecones, warm fairy lights, and subtle red accents can connect the village with the rest of your Christmas decor.
At a Glance
- Start with a snowy base and build upward.
- Layer houses and trees to create depth.
- Use winding paths to connect the village.
- Add warm lights for an inviting evening glow.
- Keep accessories balanced so the scene remains easy to admire.
Create a Christmas Village Display You’ll Love
A DIY Christmas village display is more than a collection of miniature houses. It is an opportunity to create a cozy seasonal scene filled with texture, light, color, and tiny details. Snow-covered rooftops establish the winter atmosphere, evergreen trees provide height, winding paths create movement, and warm lights make the entire arrangement glow.
Start with the pieces you already have and build the scene slowly. Focus first on the foundation and large shapes, then add smaller details once the overall layout feels right. By paying attention to height, spacing, lighting, and color, even a simple collection of decorations can become an eye-catching Christmas village.
Whether you are decorating a large tabletop or a small shelf, the goal is to create a display that feels warm, inviting, and uniquely yours. Let the houses, snowy landscape, miniature trees, glowing lights, and festive accessories tell a little holiday story. With a thoughtful arrangement and a few creative touches, your Christmas village can become one of the most memorable parts of your seasonal decorating.
Save these Christmas village display ideas for your next holiday decorating project and come back when you’re ready to build your own cozy miniature winter wonderland.