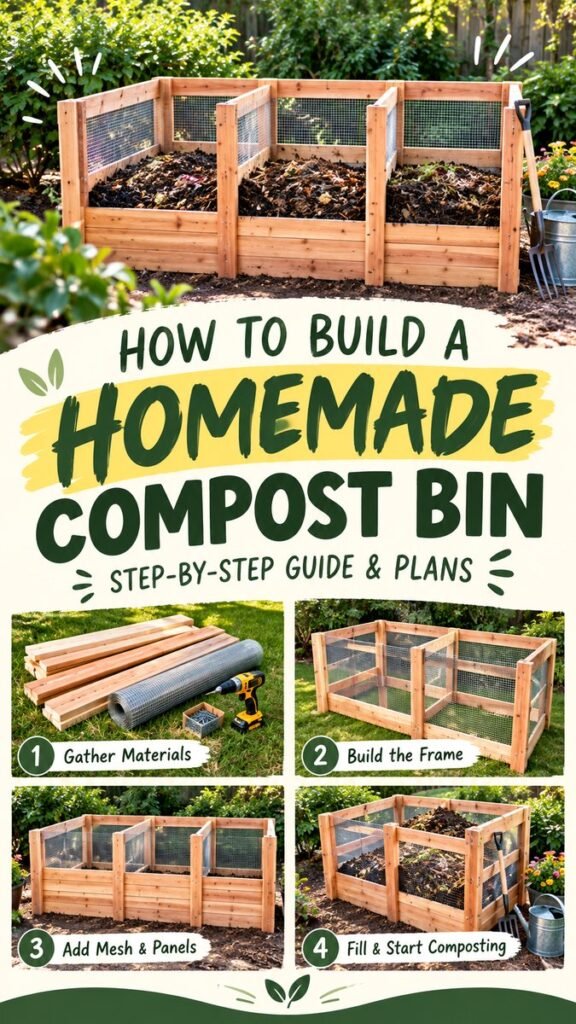
Building a compost bin at home is one of the simplest ways to make better use of kitchen scraps, yard waste, and other organic materials while creating a more productive garden routine. A well-designed compost bin gives organic matter a dedicated place to break down, keeps the composting area organized, and makes it easier to manage the materials as they decompose.
The design shown here uses a practical wooden frame with mesh sides and multiple sections. Its open construction provides plenty of airflow while the divided layout makes it easier to separate fresh material from compost that is further along. Whether you are starting your first backyard compost pile or upgrading an untidy setup, a homemade compost bin can be a rewarding weekend project.
Key Takeaways
- A wooden compost bin can create a neat, dedicated space for organic materials.
- Mesh panels allow air to move through the composting area.
- Multiple sections make it easier to manage different stages of compost.
- A sturdy frame can make backyard composting more organized and convenient.
- A balanced mixture of green and brown materials supports effective composting.
Why Build a Homemade Compost Bin?
Loose compost piles can work, but they often spread beyond the area where you intended to keep them. A dedicated compost bin gives the materials structure and creates a more defined gardening space. It can also make turning, adding, and monitoring organic matter much easier.
The design in the image is especially useful because it combines solid wooden framing with mesh panels. The wood provides structure, while the mesh leaves the sides open enough for ventilation. This balance is important because composting depends on microorganisms breaking down organic material in an environment with adequate air and moisture.
A homemade compost bin also gives you flexibility. Instead of relying on a small store-bought container, you can create a larger setup that fits the available space in your backyard. The basic concept can be adapted to different garden layouts, materials, and household composting habits.
Important: Good composting is about balance rather than simply filling a container with scraps. Combine nitrogen-rich green materials with carbon-rich brown materials, maintain reasonable moisture, and allow sufficient airflow for a healthier composting environment.
Understanding the Compost Bin Design
The featured setup has a long, rectangular footprint divided into several compartments. Each compartment is framed with wood and partially enclosed with mesh. This creates a practical station that can accommodate compost at different stages.
The front of each section uses horizontal wooden boards, while vertical posts help support the structure. Mesh occupies much of the upper side area, giving the bin a lighter, more open appearance than a completely enclosed box.
This type of arrangement can be particularly useful for gardeners who want to move material through stages instead of keeping everything in one pile. Fresh scraps and yard waste can go into one section, partially decomposed material can move to another, and finished compost can eventually be separated for garden use.
The Main Components
A project inspired by this design generally includes a few basic components:
- Wooden boards: These create the main frame and solid lower sections.
- Vertical support posts: These help hold the walls and dividers in position.
- Mesh or wire panels: These provide containment while allowing airflow.
- Outdoor-rated fasteners: Screws or suitable hardware can be used to assemble the wooden components.
- Basic tools: A measuring tool, saw, drill, and appropriate protective equipment are useful for construction.
The exact dimensions do not have to match the pictured structure. One of the biggest advantages of a DIY compost bin is that you can adjust the proportions to suit your available space and the amount of organic material your household produces.
How to Plan Your Compost Bin DIY Project
Before cutting any boards, choose a suitable location. A level area in the garden or backyard is usually easier to work with than a steep or uneven site. Think about access too. You will want enough room to add material, turn the compost, and eventually remove finished compost.
It is also worth considering how close the compost bin will be to your garden. A location that is convenient for adding organic material and transporting finished compost can make the entire process easier to maintain.
1. Choose the Location
Look for a practical outdoor location with enough space for the bin and comfortable access around it. Avoid placing the structure where water regularly collects. A well-drained location helps prevent the compost from becoming excessively wet.
2. Decide on the Number of Sections
A single-compartment bin is simple, but a divided compost bin offers greater flexibility. Multiple sections allow you to manage fresh, active, and more mature material separately.
The pictured design uses several compartments, which creates a natural workflow for moving compost from one stage to another. You can make the structure smaller if you have limited space or build a larger version if you regularly generate substantial amounts of garden waste.
3. Measure Before Cutting
Careful measuring can save both time and materials. Sketch the basic structure first and identify the length of the front, depth of each compartment, height of the walls, and position of the internal dividers.
Keep the design straightforward. A simple rectangular frame is easier to construct, repair, and modify later than an unnecessarily complicated structure.
Step-by-Step Guide to Building a Compost Bin
Step 1: Gather the Materials
Start by gathering your lumber, mesh, fasteners, and basic construction tools. The reference design uses a warm natural wood appearance that blends easily into a garden setting. Choose materials appropriate for outdoor use and avoid lumber that has been treated with substances unsuitable for contact with garden soil or compost.
Measure all pieces before making your cuts. Organizing the materials first can make assembly considerably smoother.
Step 2: Build the Base and Frame
Begin by creating the basic rectangular framework. The frame establishes the footprint of the compost bin and provides the foundation for the remaining panels.
Use a level while assembling the structure so the sections remain reasonably straight. Secure the corners firmly and check that the frame does not wobble before continuing.
Step 3: Add the Vertical Supports
Install vertical posts at the corners and at the locations where the compost sections will be divided. These supports give the structure strength and provide solid attachment points for the wooden boards and mesh.
Take your time during this stage. Keeping the posts aligned will make the rest of the construction process much easier.
Step 4: Install the Wooden Lower Panels
Attach horizontal boards along the lower portions of the structure. These boards help contain the heavier composting materials while giving the bin the attractive finished appearance visible in the design.
Leave appropriate openings where the mesh will be installed. The goal is to create a strong structure without completely sealing the composting material away from air.
Step 5: Attach the Mesh
Measure and cut the mesh panels to fit between the wooden supports. Attach them securely so there are no large gaps where composting material can easily spill out.
Mesh is one of the defining features of this compost bin DIY design. It creates a contained space while keeping the sides relatively open. Make sure exposed edges are secured safely so they do not create sharp points.
Step 6: Add the Internal Dividers
Install the divider sections to create separate composting compartments. Check each divider for stability before adding organic material.
Dividers can make compost management much easier because you can use different sections for different stages of decomposition. This is especially helpful when you want to continuously add fresh material without disturbing compost that is already breaking down.
Expert Insight
A multi-section compost bin is more than a storage structure. It can become a simple workflow for your garden. Keep newer material separate from older material, then shift compost between sections as it breaks down.
- Turn or mix active compost when needed to encourage airflow.
- Monitor moisture so the pile is not excessively dry or waterlogged.
- Keep finished compost separate from newly added scraps.
What to Put in a Backyard Compost Bin
Once your homemade compost bin is assembled, the next step is learning what materials belong inside. Compost works best when a variety of organic materials are combined rather than relying heavily on one type of waste.
Green Materials
Green materials are generally rich in nitrogen. Common examples include fresh grass clippings, many fruit and vegetable scraps, and other suitable fresh plant material.
Adding a variety of green materials helps provide the nitrogen component needed by the microorganisms responsible for decomposition.
Brown Materials
Brown materials provide carbon and can include dry leaves, small amounts of untreated paper or cardboard, and other suitable dry plant matter. These materials are especially useful for adding structure and helping balance wetter green ingredients.
A simple habit is to keep a supply of dry leaves or other appropriate brown material nearby. That way, you can add it whenever the compost becomes too wet or whenever a fresh addition needs more carbon-rich material.
Materials to Avoid
Not every household waste item belongs in a backyard compost bin. Avoid adding materials that can create unpleasant odors, attract unwanted pests, or introduce harmful substances. Meat, dairy products, pet waste, chemically contaminated materials, and diseased plant material may require different handling depending on your composting method and local guidance.
When in doubt, keep your composting system focused on appropriate plant-based organic materials and clean carbon-rich additions.
How to Keep Your Compost Healthy
Building the bin is only the beginning. Regular attention helps maintain a productive composting environment. The three basic factors to watch are moisture, airflow, and the balance of materials.
Maintain the Right Moisture
Compost should have enough moisture to support decomposition, but excessive water can reduce airflow and create unpleasant conditions. If the pile seems extremely wet, adding dry brown materials and improving aeration can help.
Keep Air Moving
Airflow is another important part of successful composting. The mesh construction shown in the design helps keep the sides open. Turning or loosening the material periodically can also improve air circulation throughout the pile.
Mix Different Types of Material
Try not to create a compost pile made almost entirely from grass clippings, food scraps, or dry leaves. Mixing different suitable materials creates a more balanced environment for decomposition.
Pro Tip: Keep a small reserve of dry leaves, shredded cardboard, or another suitable carbon-rich material beside the bin. Having browns ready makes it much easier to balance fresh, moist additions as you build your compost pile.
Benefits of a Multi-Section Compost Bin
The divided design offers several practical benefits for gardeners. Instead of treating compost as one single pile, you can organize the material according to its stage of decomposition.
- Better organization: Separate sections keep the composting process visually and physically organized.
- Easier management: You can add new scraps without constantly disturbing older compost.
- Efficient use of space: A structured bin can make a composting area feel much neater than an open pile.
- Flexible workflow: Material can be moved from an active section into another area as it progresses.
- Garden-friendly appearance: Natural wood and simple mesh can blend into a backyard or garden setting.
Simple Ways to Improve Your Compost Bin
Once you have used your compost bin for a while, you may notice small changes that could make it more convenient. Consider adding removable front boards if you want easier access to mature compost. You could also create a nearby storage spot for dry leaves or garden tools.
Another useful improvement is to keep the area around the bin clear. A clean working space makes it easier to move organic material, turn compost, and remove finished material without creating unnecessary mess.
If your garden produces a lot of organic waste, the multi-section layout can also help you establish a consistent routine. Rather than waiting until the bin is completely full, use the compartments as stages and keep the process moving.
At a Glance
- Build a sturdy wooden frame sized for your backyard.
- Use mesh panels to create an open, ventilated structure.
- Divide the bin into sections for easier compost management.
- Balance fresh green materials with dry brown materials.
- Monitor moisture and airflow throughout the composting process.
Conclusion
A compost bin DIY project can turn an unused corner of your backyard into a practical part of your gardening system. The wooden multi-section design offers a clean, organized approach to composting while the mesh panels help maintain the open structure that compost needs.
The real value of a homemade compost bin is its flexibility. You can adapt the size, number of compartments, materials, and placement to match your garden. Once the structure is ready, a simple routine of adding suitable organic materials, balancing greens and browns, maintaining moisture, and encouraging airflow can keep the system productive.
Whether you are growing vegetables, maintaining flower beds, or simply looking for a practical way to reuse garden and kitchen scraps, a well-planned compost bin is a worthwhile addition to a backyard. Start with a straightforward design, build it carefully, and give your compost time to do its work. With a little consistency, your DIY composting station can become an everyday part of a more resourceful garden.
Tags
Compost Bin DIY DIY Compost Bin Backyard Composting Composting Ideas Garden DIY Organic Gardening Homestead Gardening Sustainable Gardening