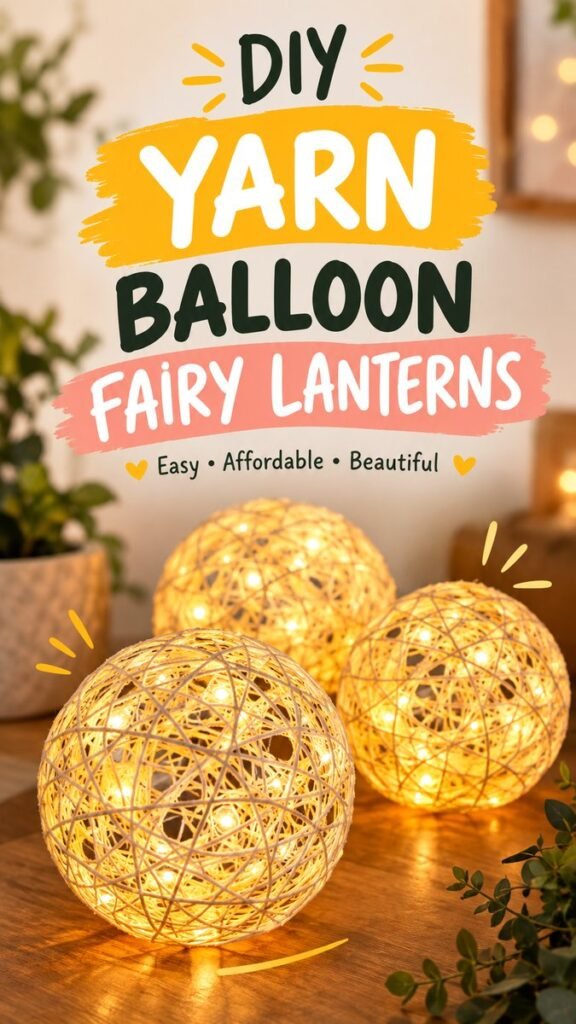
DIY lanterns are a wonderful way to add warmth, personality, and a cozy handmade touch to your space. These glowing yarn balloon fairy lanterns turn simple craft materials into eye-catching decorative lights that look beautiful on a tabletop, shelf, party display, or relaxing corner of the home. Their open woven texture allows tiny lights to shine through, creating a soft and inviting glow without making the project feel complicated.
If you love easy DIY home decor, yarn crafts, or creative lighting ideas, this project is especially appealing because it combines an inexpensive crafting technique with a finished look that feels decorative and special. You can experiment with colors, sizes, and arrangements to create a display that fits your own style.
Key Takeaways
- Yarn balloon lanterns create a warm, textured decorative light.
- The basic concept uses yarn formed around a balloon to create a rounded shape.
- Small LED lights can add a cozy glow to the finished lantern.
- Different yarn colors and balloon sizes make the design easy to personalize.
- Several lanterns grouped together can create a stronger visual display.
- This craft works well for everyday decor, celebrations, and cozy seasonal styling.
What Are Yarn Balloon Fairy Lanterns?
Yarn balloon lanterns are decorative spheres made by wrapping yarn around an inflated balloon and forming an open, web-like structure. Once the yarn has been shaped and set, the balloon is removed, leaving behind a lightweight shell with plenty of small openings.
When a small light source is placed inside, the openings become part of the design. Light filters through the yarn in different directions, highlighting the irregular texture and producing a soft, layered effect.
The appeal comes from the contrast between the simple construction and the finished appearance. The lanterns look intricate, yet the visual concept is surprisingly straightforward. That makes them a fun option for crafters who want decorative DIY lighting without creating an overly complicated project.
Why DIY Lanterns Make Great Home Decor
Lighting has a major influence on how a room feels. Bright overhead lighting can make a space practical, while smaller decorative lights can make it feel softer and more relaxed. DIY lanterns combine that decorative quality with the satisfaction of making something by hand.
The rounded shape of yarn balloon lanterns is particularly versatile. A single lantern can act as a small accent, while a group of different-sized lanterns can become a focal point. Because the yarn creates an airy pattern, the finished pieces can add visual interest without looking too heavy.
They also pair naturally with cozy decorating styles. Warm wood, neutral fabrics, plants, baskets, candles, and other soft textures can complement the woven appearance of the yarn. The result is a relaxed atmosphere that works well in many parts of the home.
Important: The most attractive yarn lanterns often come from embracing their handmade character. The strands do not need to form a perfectly uniform pattern. Slight variations create the organic, handcrafted texture that makes each lantern feel unique.
Materials for a Simple Yarn Lantern Project
The exact materials can vary depending on the method you choose, but the basic concept is built around a few accessible craft supplies. The reference design shows a natural-toned yarn structure paired with small glowing lights, creating a warm decorative effect.
- Yarn or string in your preferred color
- Inflatable balloons for shaping the lanterns
- A suitable adhesive or stiffening medium for securing the yarn
- Protective covering for your work surface
- Small battery-powered LED lights
- Scissors
- A container or tray for holding materials while you work
Natural beige, cream, tan, and soft white yarn can produce an especially warm appearance. However, there is no reason to stop there. Pastel shades can create a playful display, while darker yarn can provide stronger contrast around brighter lights.
How to Make Yarn Balloon Fairy Lanterns
The process is based on creating a temporary balloon form and building the yarn structure around it. Take your time with each stage, especially when arranging the yarn, because the spacing of the strands will influence the appearance of the finished lantern.
1. Prepare Your Work Area
Begin by protecting your work surface. The adhesive or stiffening material used for the yarn can become messy, so covering the table makes cleanup much easier. Arrange your yarn, scissors, balloons, and other supplies within easy reach.
A well-organized workspace also helps you concentrate on the shape of the lantern instead of stopping repeatedly to look for materials.
2. Inflate the Balloon
Inflate a balloon to the approximate size you want your lantern to be. A rounder balloon generally creates a more spherical lantern, while a slightly different shape can produce a more playful result.
Think about where you plan to display the finished piece before choosing the size. Several smaller lanterns can look charming as a group, while one larger sphere can make a stronger statement.
3. Wrap the Yarn Around the Balloon
Start wrapping the yarn around the balloon in different directions. The goal is to create a loose network of overlapping strands rather than completely covering the surface.
Leave enough openings for light to pass through. At the same time, make sure there are enough intersecting strands to give the lantern structure and a recognizable woven appearance.
Try changing the direction of the yarn as you work. Random-looking overlaps can produce a more organic effect, while a more deliberate pattern can create a cleaner appearance.
4. Secure the Yarn Structure
Apply your chosen adhesive or stiffening medium according to its intended use and allow the yarn structure to become firm around the balloon. This stage is important because the yarn needs enough stability to hold its rounded form after the balloon is removed.
Avoid rushing this part. Giving the structure enough time to set can make the finished lantern much easier to handle.
5. Remove the Balloon Carefully
Once the yarn shell is sufficiently firm, release and remove the balloon carefully. You should be left with a hollow woven sphere.
If a section feels unusually fragile, handle it gently rather than forcing the balloon out quickly. The open structure is part of the charm, but it also means the finished shell should be treated with care.
6. Add the Lights
Place small LED lights inside the finished yarn sphere. Battery-powered options are convenient for decorative displays because they do not require a nearby wall outlet.
Arrange the lights so their glow spreads throughout the interior. Once illuminated, the yarn pattern becomes much more visible and creates the cozy effect that makes these DIY lanterns so appealing.
Expert Insight
For the prettiest glow, focus on balance rather than perfect uniformity. Open areas allow more light to escape, while denser yarn sections create shadows and texture. That contrast gives the lanterns their distinctive handmade look.
Creative Ways to Display DIY Yarn Lanterns
Once your lanterns are complete, the decorating possibilities are wide open. The warm glow works especially well in areas where you want a relaxed atmosphere rather than strong functional lighting.
Create a Cozy Tabletop Display
Place two or three lanterns together on a wooden tabletop, console, shelf, or sideboard. Mixing sizes can make the arrangement feel more natural. The glowing spheres can also be surrounded by greenery, books, baskets, or other simple decorative objects.
Style a Relaxing Bedroom Corner
Warm decorative lights can make a bedroom feel especially inviting in the evening. Place a small grouping on a dresser or shelf where the lanterns can provide a soft accent without dominating the room.
Use Them for Parties and Gatherings
Yarn lanterns can also work as handmade party decor. Their lightweight visual texture makes them suitable for casual celebrations, craft-themed gatherings, dinner parties, and other occasions where you want the setting to feel personal.
Try coordinating the yarn color with the rest of the decoration. Matching tones can create a polished look, while contrasting shades can make the lanterns stand out.
How to Personalize Your Yarn Lanterns
One of the best things about DIY lanterns is how easily the basic idea can be adapted. You do not have to recreate the same color, size, or arrangement every time.
- Change the yarn color: Choose neutral shades for understated decor or brighter colors for a cheerful display.
- Vary the sizes: Make several balloon sizes and group them together for dimension.
- Experiment with density: Use fewer strands for a lighter, more open appearance or more strands for a fuller texture.
- Try different arrangements: Display the lanterns individually, in clusters, or along a decorative surface.
- Coordinate the lighting: Use a consistent warm light tone across a group for a cohesive appearance.
Pro Tip: Before making a large batch, create one test lantern. It lets you see how the yarn density, color, and light source work together before you commit to the entire display.
Tips for a Better DIY Lantern Result
A little planning can make this craft easier and help you achieve a more polished result. Keep your yarn tension reasonably consistent as you wrap, but do not worry about making every strand perfectly placed.
It is also useful to consider the viewing angle. If the lanterns will sit on a table, make sure the most attractive sections of the yarn pattern face outward. If they will be viewed from several directions, distribute the strands more evenly around the balloon.
When selecting lights, use small LED lights that are appropriate for decorative use. Avoid placing a heat-producing light source inside a handmade yarn structure. The goal is a gentle decorative glow that complements the craft rather than overpowering it.
Common Mistakes to Avoid
Even simple crafts can become frustrating when a few basic details are overlooked. Fortunately, most issues with yarn balloon lanterns can be avoided with a little preparation.
- Wrapping too tightly: Excessive tension can make the yarn difficult to arrange and may affect the shape.
- Leaving too few openings: A very dense shell can reduce the amount of light visible through the yarn.
- Removing the balloon too soon: Give the yarn structure adequate time to become firm.
- Using an unsuitable light: Choose a small LED source designed for decorative use.
- Ignoring the display space: Consider the final size and color before making multiple lanterns.
Why Handmade Lighting Feels So Special
There is something naturally appealing about decor that shows signs of the maker’s hand. Store-bought lighting can be beautiful, but handmade pieces offer a different kind of character. Each yarn lantern can have its own pattern, density, and subtle imperfections.
That handmade quality also makes the project easy to adapt to changing seasons and decorating preferences. You can create a neutral set for everyday use, then make another collection with different yarn colors when you want a fresh look.
Most importantly, DIY lighting encourages creativity. Instead of simply choosing an object from a shelf, you get to decide how it looks, how large it should be, and where it belongs in your space.
At a Glance
- Simple concept with a charming handmade finish
- Customizable yarn colors, sizes, and patterns
- Warm LED lighting creates a cozy decorative glow
- Works beautifully in tabletop and home decor displays
- Great project for creative craft and lighting inspiration
Final Thoughts on DIY Lanterns
DIY yarn balloon fairy lanterns prove that beautiful home decor does not have to be complicated. With a simple rounded form, textured yarn, and a gentle light source, you can create decorative pieces that instantly make a space feel warmer and more inviting.
The beauty of this project is its flexibility. Keep the colors neutral for a calm, natural look, experiment with bright shades for a playful display, or make several sizes and arrange them together for a layered effect. The irregular yarn pattern ensures that every lantern has its own personality.
If you enjoy handmade home decor, easy DIY lighting, and creative yarn crafts, this is a project worth adding to your inspiration list. Gather a few simple materials, choose your favorite yarn, and let the texture of the finished lantern become part of your decor.
Ready to bring a little handmade glow into your space? Start with one yarn lantern, experiment with the design, and build a cozy collection that reflects your personal style.
Tags
DIY Lanterns Yarn Crafts DIY Lighting Fairy Lanterns DIY Home Decor Craft Ideas Cozy Decor Handmade Decor