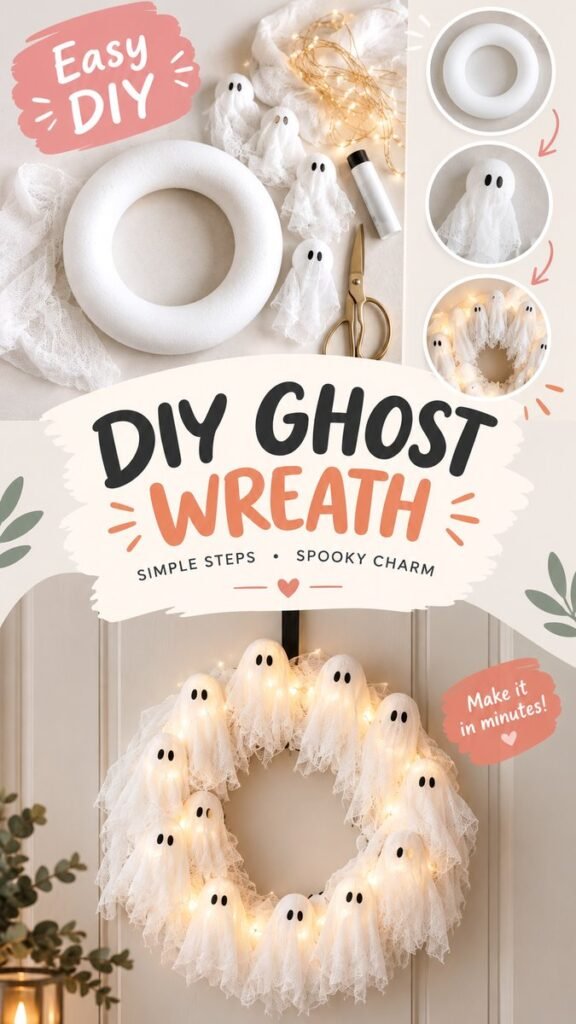
Give your Halloween decorating a charming handmade twist with a DIY ghost wreath that combines soft white gauze, warm fairy lights, and adorable little ghost figures. This cozy craft is a wonderful way to bring seasonal personality to a front door, entryway, mantel, or interior wall without relying on complicated materials or advanced crafting skills. The finished wreath has a playful Halloween feel while keeping a soft, neutral aesthetic that blends beautifully with modern, minimalist, farmhouse, and cozy home decor.
Key Takeaways
- A foam wreath form creates a simple foundation for the project.
- White gauze gives the ghosts their soft, floating appearance.
- Small black eyes instantly transform the fabric into friendly ghosts.
- Warm fairy lights add a cozy glow and make the wreath stand out.
- Neutral materials make this Halloween craft easy to coordinate with existing decor.
Why a DIY Ghost Wreath Makes a Great Halloween Decoration
A wreath is one of the easiest ways to make a seasonal decorating statement because it uses vertical space that might otherwise go unnoticed. Instead of filling a room with dozens of Halloween decorations, one carefully designed wreath can become the focal point of an entryway or wall.
This particular style feels especially inviting because it uses white fabric rather than the traditional combination of orange and black. The result is light, airy, and slightly whimsical. The glowing lights underneath the ghosts create a warm atmosphere that works especially well during autumn evenings.
The secret to a polished ghost wreath is layering. A simple wreath base becomes much more interesting when gauze, small ghost shapes, and warm lights are arranged at different depths around the form.
Another advantage is that the project can be adapted to suit your decorating style. You can make the ghosts cute and playful, keep them elegant and understated, or make the overall wreath more dramatic by increasing the number of lights and adding additional fabric texture.
Materials for a Simple DIY Ghost Wreath
The visual concept is built around a few straightforward craft supplies. You do not need a large collection of specialty tools to create a similar look.
- One white foam or lightweight wreath form
- White gauze or cheesecloth-style fabric
- Small lightweight white balls or rounded shapes for ghost heads
- Black marker or small black craft pieces for the eyes
- Warm white battery-operated fairy lights
- Scissors for trimming the fabric
- Craft adhesive or another suitable method for securing pieces
- Optional ribbon or hanging loop
Choose lightweight materials whenever possible. The finished wreath should be easy to hang and should not place unnecessary stress on a door hook or wall hanger. Battery-operated lights are particularly convenient because they eliminate the need to keep the wreath close to an electrical outlet.
Choosing the Right Wreath Base
A white foam wreath form is an easy starting point because it already has the circular shape needed for the design. It also provides a light-colored background beneath the gauze, helping the finished piece maintain a soft monochromatic appearance.
You can use a different wreath base if that is what you already have available. A lightweight grapevine-style base can create a more rustic appearance, while a smooth foam base produces a cleaner, contemporary finish. The important thing is to create a stable circular foundation that can hold the fabric and decorative elements securely.
Picking Fabric for the Ghosts
Gauze is ideal because its open weave creates a delicate, slightly transparent texture. When it is draped around a rounded shape, it naturally resembles a little ghost costume. The uneven edges can actually make the design look more charming, so there is no need to make every piece perfectly symmetrical.
For a softer appearance, use fabric with a loose weave and gently pull the edges apart after cutting. This creates wispy strands around the bottom of each ghost. If you prefer a cleaner aesthetic, trim the fabric into more consistent shapes.
How to Make a DIY Ghost Wreath
The beauty of this Halloween craft is that the construction can be broken into a few simple stages. Prepare the individual ghosts first, then build the wreath around them.
1. Prepare the Ghost Shapes
Begin by preparing the rounded forms that will become the heads of the ghosts. Small lightweight balls work well because they provide enough structure for the gauze to drape naturally.
Cover each rounded form with a piece of white gauze. Let the fabric extend below the head so it creates the familiar flowing ghost shape. Do not worry about making every ghost identical. Slight variations in height and fabric length will give the wreath a more natural, handcrafted appearance.
2. Add the Friendly Ghost Faces
Once the gauze is positioned, add two small black eyes to each ghost. The image uses simple oval-shaped eyes, which gives the figures a cute rather than frightening expression.
Keep the faces consistent enough that the ghosts look like part of the same collection, but allow a little variation in placement. Slightly different eye positions can make each figure feel unique.
3. Wrap the Fairy Lights Around the Wreath
Before attaching all the ghosts permanently, arrange the warm fairy lights around the wreath base. Wrapping the lights loosely around the circle allows the glow to appear between the fabric layers rather than concentrating in one area.
Battery-powered lights are especially useful for this design. Hide the battery pack behind the wreath or position it where it can be reached easily when the lights need to be switched on or off.
Expert Insight
Place the lights before finishing the ghost arrangement. This makes it much easier to distribute the glow evenly and prevents you from having to move the ghosts after they are secured.
4. Arrange the Ghosts Around the Circle
Now begin positioning the ghosts around the wreath. Instead of placing every figure at exactly the same height, create a gentle rhythm by alternating taller and shorter ghosts. Some can sit closer to the outer edge while others can overlap slightly toward the center.
The overlapping fabric is part of what makes the finished design visually appealing. It creates depth and helps the individual figures look connected rather than scattered around a plain wreath.
5. Secure Everything in Place
Once you are happy with the arrangement, secure the ghosts to the wreath base using an appropriate craft adhesive or another lightweight attachment method. Make sure the fabric is not covering the lights so completely that their warm glow disappears.
Step back occasionally while working. Looking at the wreath from a distance makes it much easier to notice empty areas, uneven spacing, or places where the lighting needs to be repositioned.
6. Finish With a Simple Hanging Detail
Add a discreet ribbon, loop, or other hanging method to the back of the wreath. A simple finish keeps attention on the ghosts and glowing lights instead of adding unnecessary visual clutter.
For a modern look, choose a neutral hanging material that blends into the background. If your Halloween decorating style is more playful, a seasonal ribbon can introduce another small accent without overwhelming the main design.
How to Make the Wreath Look More Professional
A handmade project does not have to look messy. A few small design choices can make a major difference in the finished appearance.
Create Variation Instead of Perfect Symmetry
Perfect symmetry can make a wreath look overly arranged. Try creating a balanced composition without making both sides identical. Vary the height of the ghosts and allow some gauze to hang lower than the rest.
This approach keeps the wreath visually interesting while still giving it an intentional shape. The eye naturally follows the circular arrangement, while the varied fabric lengths provide movement.
Keep the Color Palette Simple
The combination of white fabric, black eyes, and warm lighting is enough to create a strong visual identity. You do not need numerous colors or accessories to make the wreath feel festive.
A restrained palette also makes the craft easier to coordinate with existing autumn home decor. It can sit comfortably alongside cream textiles, wood finishes, neutral walls, dried foliage, and other cozy seasonal accents.
Pro Tip: Let the warm lights do some of the decorating work. A simple wreath with evenly distributed illumination often looks more sophisticated than a heavily decorated wreath with too many competing accents.
Where to Display Your Ghost Wreath
This DIY ghost wreath is flexible enough for several areas of the home. Its light color makes it particularly easy to use indoors, where it can become part of a cozy seasonal decorating scheme.
- Front door: Create a welcoming Halloween entrance with a playful handmade focal point.
- Entryway: Hang it where guests can see the glowing details as they arrive.
- Living room: Use it above a console, cabinet, or mantel-style display.
- Dining area: Add seasonal character to a neutral dining space.
- Bedroom or craft room: Bring a subtle Halloween accent into a personal space.
If you place it outdoors, consider the weather and protect fabric, lights, and other materials from moisture. For a longer-lasting decoration, indoor placement or a covered area is the safer choice.
Easy Ways to Customize Your Halloween Wreath
One of the best parts of making your own wreath is the ability to adjust the design to match your home. The basic concept can be transformed without changing the main construction.
Make It Extra Cozy
Increase the amount of warm lighting behind the ghosts for a stronger evening glow. You can also use a slightly fuller layer of gauze to create a softer, cloud-like effect.
Create a Minimal Version
For minimalist Halloween decor, use fewer ghosts and leave more of the wreath base visible. Keep the fabric neat and use a small amount of lighting so the design feels understated.
Add a Rustic Touch
A natural wreath base, simple twine, or subtle dried foliage can shift the look toward rustic autumn decor. Keep the additions restrained so the white ghosts remain the main feature.
Make the Ghosts Playful
Experiment with different eye shapes and expressions. Slightly larger eyes can make the ghosts look extra cute, while smaller eyes create a more understated Halloween aesthetic.
Tips for a Successful DIY Ghost Wreath
Taking a little time during the preparation stage can make the assembly much easier. Cut your gauze pieces in advance and prepare all of the ghost heads before attaching anything to the wreath.
- Lay out all materials before beginning.
- Prepare the ghost shapes in one batch.
- Keep the gauze slightly loose rather than pulling it tight.
- Test the fairy lights before securing them.
- Arrange the ghosts first and attach them only after you like the composition.
- Check the wreath from several angles before displaying it.
It is also helpful to work on a flat surface. A table gives you room to spread out the fabric, lights, scissors, and ghost pieces without accidentally crushing the finished shapes.
Why Neutral Halloween Decor Is So Appealing
Traditional Halloween decorations often rely on strong orange, black, and purple tones. While those colors can be fun, a neutral Halloween palette offers a different approach. White and cream shades create a calmer appearance while still allowing seasonal decorations to feel unmistakably festive.
The ghost wreath works particularly well with this trend because ghosts naturally translate into white fabric. Adding warm illumination brings dimension without introducing another strong color.
That makes this style a useful choice for anyone who wants Halloween decorating to feel connected to the rest of their home rather than looking like an entirely separate theme.
At a Glance
Quick Points
- Use a lightweight circular wreath base.
- Layer white gauze over small rounded ghost forms.
- Add simple black eyes for a cute Halloween character.
- Wrap warm fairy lights around the wreath for a cozy glow.
- Vary ghost heights to create a lively, handcrafted composition.
A Simple Craft With a Big Seasonal Impact
A DIY ghost wreath proves that Halloween decorating does not need to be complicated to be memorable. With a basic circular form, lightweight fabric, simple ghost faces, and warm lights, you can create a decorative piece that feels handmade, welcoming, and full of personality.
The finished wreath is especially effective because it combines several visual details without becoming overwhelming. The circular silhouette provides structure, the flowing gauze adds texture, the black eyes create character, and the tiny lights bring everything together with a gentle evening glow.
The best DIY decorations are often the ones that feel achievable. This wreath gives you plenty of room to experiment while keeping the basic design simple enough for a relaxed afternoon craft session.
Whether you prefer modern neutral decorating, cozy autumn interiors, or playful Halloween crafts, this ghost wreath can be adapted to fit your style. Change the number of ghosts, adjust the fabric, experiment with the lighting, or keep the entire design beautifully simple.
Most importantly, have fun with the imperfections. Uneven gauze edges, slightly different ghost heights, and tiny variations in the faces can give a handmade wreath its personality. When the lights are glowing and the ghosts are gathered around the circle, the result becomes a cheerful seasonal accent that can instantly transform an ordinary space.
Conclusion
A DIY ghost wreath is an easy and creative way to bring Halloween spirit into your home while keeping the overall look soft, cozy, and stylish. The combination of white gauze, friendly ghost figures, and warm fairy lights creates a welcoming decoration that works beautifully in an entryway, living room, or covered outdoor space.
With simple materials and a little imagination, you can create your own version and customize it to match your seasonal decor. Keep it minimalist, make it extra cozy, or fill the circle with playful ghosts for a bigger statement. However you style it, this handmade wreath is a charming project to save for your next Halloween decorating session.
Tags
DIY Ghost Wreath Halloween DIY Halloween Wreath DIY Halloween Decor Ghost Crafts Cozy Halloween Decor Autumn Home Decor span style=”display:inline-block; background:#ffffff; color:#302a27; padding:7px 12px; margin:4px; border-radius:20px; font-size:14px;”>Handmade Wreath