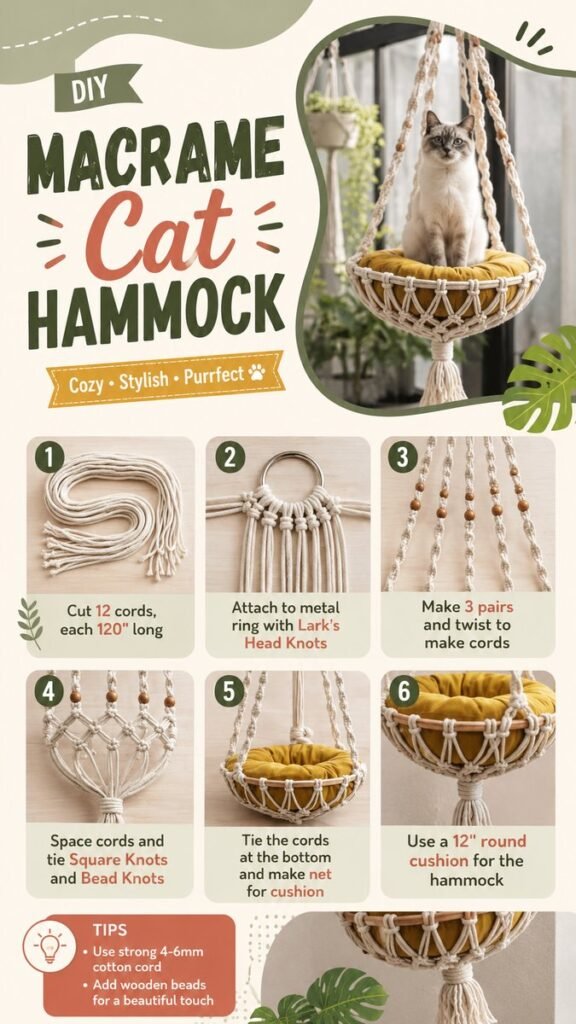
A cozy cat hammock can turn an unused corner into a comfortable retreat while adding a handmade touch to your home. This macrame cat hammock DIY combines simple knotting techniques with sturdy cotton cord, a circular metal ring, decorative wooden beads, and a soft round cushion. The finished design creates a suspended resting spot that looks attractive enough to become part of your room decor.
If you enjoy cats DIY projects, this is a particularly rewarding project because it blends creativity with something your cat can actually use. The reference design shows a woven macrame structure built around a round frame, with twisted cords forming the suspension lines and a knotted net supporting the cushion. With a little patience and careful measuring, you can create your own version while adjusting the size, colors, and decorative details to suit your space.
Key Takeaways
- Use strong cotton cord suitable for a suspended craft project.
- A circular metal ring provides the foundation for the hammock.
- Twisted cords create the main suspension structure.
- Square knots and bead knots add both structure and decoration.
- A soft round cushion makes the finished hammock more inviting.
- Check every knot and connection carefully before allowing your cat to use it.
Why Make a DIY Macrame Cat Hammock?
Cats naturally appreciate elevated spaces where they can relax, observe their surroundings, and settle into a comfortable position. A cat hammock offers that combination in a compact format. Instead of buying another piece of bulky pet furniture, a handmade hammock can add function without taking over the room.
Macrame is especially well suited to this kind of project because knotted cotton cord creates an open, airy structure. The natural rope color shown in the design works beautifully with neutral interiors, while the warm cushion adds a cozy accent. You can also customize the project with a different cord color or cushion fabric to coordinate with your existing decor.
Important: A decorative macrame hammock should never be treated as automatically safe simply because it looks sturdy. Before use, inspect the ring, attachment points, knots, cords, and supporting hardware carefully. The finished hammock should remain secure and stable under the conditions in which it will be used.
Materials for a Cats DIY Project
The design uses a relatively straightforward collection of craft materials. The exact quantities can be adjusted depending on the size of your hammock and the dimensions of the frame.
- Strong cotton macrame cord: The design suggests approximately 4 to 6 mm cord.
- Metal ring: This acts as the central attachment point for the hammock cords.
- Wooden beads: These can be incorporated as decorative accents between sections of knots.
- Round cushion: A soft circular cushion provides the comfortable resting surface.
- Scissors: Use sharp scissors for clean cord ends.
- Measuring tool: Consistent measurements help keep the hammock balanced.
The reference tutorial uses 12 cords measuring about 120 inches each as its starting point. Treat those measurements as a guide rather than an absolute rule. The appropriate cord length will depend on your ring size, desired hammock depth, knot density, and finishing style.
Choosing the Right Cord
Cord selection has a major effect on the appearance and feel of a macrame cat hammock. A 4 to 6 mm cotton cord gives the project a substantial appearance while remaining flexible enough for common macrame knots. Natural cotton also creates the soft, handcrafted look shown in the design.
Before cutting all your cord, consider making a small knot sample. This helps you understand how much length each knot consumes. It can also reveal whether your cord feels too thin, too stiff, or difficult to manipulate.
Step 1: Prepare and Cut the Cords
Begin by measuring the cords carefully. The illustrated design starts with 12 individual cords, each approximately 120 inches long. Keeping the strands consistent is important because uneven cords can make the finished hammock look unbalanced.
Lay the cut pieces together and check that their ends are reasonably even. If you plan to change the dimensions of the project, make a test section first. Macrame knots consume more cord than many beginners expect, so having extra material is preferable to discovering that the strands are too short halfway through the project.
Create an Organized Work Area
Macrame becomes much easier when the cords stay organized. Work on a flat surface where you can separate groups without creating tangles. You can also secure the metal ring temporarily while attaching the cords. Keeping the working strands separated will make the knotting process considerably more manageable.
Step 2: Attach the Cords to the Metal Ring
The next stage is attaching the prepared cords to the metal ring with Lark’s Head Knots. This is a common macrame technique that creates a neat connection between the cord and the ring.
Fold each cord according to the method you are using, pass the folded section around the ring, and pull the loose ends through the loop. Keep the knots facing consistently in the same direction. This small detail makes the finished project look much cleaner.
Once the cords are attached, gently arrange them around the ring so the groups are distributed evenly. Even spacing is especially important for a suspended hammock because the cords will form the supporting structure below the ring.
Step 3: Create the Twisted Suspension Cords
The illustrated design groups the hanging strands into pairs and twists them together. This produces attractive spiral-like cords that connect the upper attachment point with the lower hammock structure.
Try to keep the amount of twisting consistent from one pair to another. If one section is tightly twisted while another is loose, the finished hammock can have an uneven appearance. Work slowly and compare the groups as you go.
Expert Insight
Consistency is one of the biggest secrets to attractive macrame. Rather than rushing through the knots, periodically stop and compare the spacing, tension, and length of neighboring sections. Small adjustments made early are much easier than correcting an uneven structure at the end.
Step 4: Add Square Knots and Bead Knots
With the main suspension cords prepared, the next stage is building the decorative net that supports the cushion. The design uses square knots to connect neighboring cords and create a repeating geometric pattern.
Begin by working with adjacent groups of cords. Keep the knots at similar heights so the pattern develops evenly. As you move around the hammock, check that the openings between the cords are reasonably consistent.
Wooden beads can be added to selected sections for visual interest. The warm brown tones of natural wood complement cream cotton cord particularly well, creating a relaxed, handmade aesthetic.
Keep the Net Balanced
The net should gradually form a supportive basket-like structure rather than bunching toward one side. If the cords begin pulling unevenly, stop and redistribute them before continuing. Working around the entire circle in stages can help maintain a more symmetrical result.
Step 5: Finish the Lower Knots
After the main net pattern has been established, the lower cords are gathered and tied to create the base of the hammock. This section helps bring the loose strands together and gives the finished piece its distinctive suspended shape.
Take your time with the final gathering knots. The reference design shows the cords converging beneath the cushion area before forming a decorative hanging finish. The result is both functional and visually appealing, especially when viewed from the side.
Pro Tip: Before adding the cushion, inspect the entire structure from several angles. Look for loose knots, uneven cord tension, frayed strands, or attachment points that do not sit correctly. Correcting these details before use will give you a more polished and dependable finished project.
Step 6: Add a Round Cushion
The final illustrated step is adding a round cushion to the hammock. The design suggests a 12-inch round cushion, but the ideal size depends on the finished dimensions of your hammock and the amount of usable space inside the ring.
A cushion transforms the open macrame structure into a soft resting area. A mustard or golden cushion creates a striking contrast against neutral cord, but you can choose virtually any color that fits your room.
Make sure the cushion sits securely inside the hammock rather than sliding through the macrame openings. The hammock should support the cushion evenly, with no sharp hardware or rough cord ends exposed where your cat will rest.
How to Customize Your Macrame Cat Hammock
One of the best parts of cats DIY projects is the ability to make small changes that give a familiar design a completely different personality. You can keep the basic structure while experimenting with color, texture, size, and decorative details.
Try Different Color Combinations
Natural cream cord creates a soft minimalist appearance, while darker brown, sage, terracotta, or muted gray can create a more contemporary look. If your room already has a strong color palette, matching the cushion to an existing accent color can make the hammock feel intentionally integrated into the decor.
Experiment With Decorative Beads
Wooden beads add texture and warmth without overwhelming the macrame pattern. Use them sparingly for a subtle look or place them at repeating points around the net for a more decorative design.
Adjust the Cushion
The cushion is an easy element to change seasonally. A warm mustard tone can create a cozy autumn-inspired look, while cream, dusty green, soft beige, or another neutral shade can create a calmer year-round appearance.
Important Safety Checks Before Use
A suspended cat hammock needs more attention to construction than a purely decorative macrame project. The hammock will experience movement, shifting weight, and repeated use, so every connection deserves careful inspection.
- Check that the metal ring is appropriate for the intended project.
- Inspect every Lark’s Head Knot and decorative knot for looseness.
- Make sure the suspension cords are evenly distributed.
- Look for damaged, frayed, or weakened cord before use.
- Confirm that the mounting point and supporting hardware are suitable and securely installed.
- Regularly inspect the hammock after it has been used for a while.
Safety is particularly important when creating elevated DIY cat furniture. If you are uncertain about the strength of a connection, mounting location, ring, or hardware, do not rely on appearance alone. Choose stronger materials or seek appropriate guidance before allowing your pet to use the hammock.
Why This DIY Project Works So Well
This macrame cat hammock combines several qualities that make handmade pet projects appealing. It is functional, decorative, customizable, and visually interesting. The woven pattern gives the project a handcrafted character, while the cushion makes it feel more like a dedicated little lounging area.
It also makes a great introduction to structured macrame because the project demonstrates several useful techniques in one design. Beginners can practice Lark’s Head Knots, twisted cord sections, square knots, bead placement, gathering, and finishing techniques while working toward a practical result.
At a Glance
- Project: DIY macrame cat hammock
- Main material: Strong cotton macrame cord
- Key techniques: Lark’s Head Knots, twists, square knots, and gathering
- Decorative detail: Wooden beads
- Cushion idea: Round cushion sized to fit the finished hammock
Conclusion: Create a Cozy Handmade Cat Retreat
A DIY macrame cat hammock is a charming way to combine pet comfort with creative home decor. Starting with strong cotton cord, a circular metal ring, and a carefully planned knot pattern, you can build a lightweight-looking but structured resting space with plenty of personality.
The beauty of this cats DIY project is that the basic concept leaves plenty of room for creativity. Keep the natural cream-and-mustard combination for a warm, modern aesthetic, or customize the cord, beads, and cushion to match your own space. Focus on even knots, balanced spacing, strong connections, and careful safety checks throughout the process.
Whether you are an experienced macrame maker or simply looking for a rewarding weekend craft, this project offers a practical reason to learn new knotting techniques. Once complete, the hammock can become a cozy little feature that gives your cat a dedicated place to relax while adding handmade character to your home.
Tags
Macrame Cat Hammock Cats DIY Projects DIY Cat Furniture DIY Cat Bed Macrame DIY Pet DIY Cat Room Ideas Macrame Projects