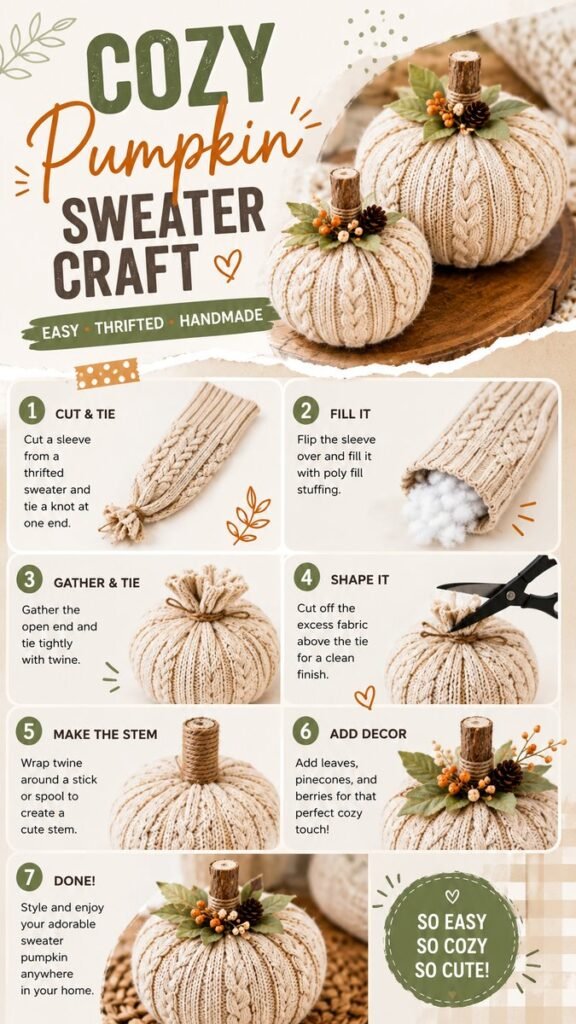
Give your fall decorating a cozy handmade touch with this charming DIY sweater pumpkin craft. It is a simple way to transform an old knitted sweater sleeve into a soft, textured pumpkin that looks right at home on a mantel, shelf, coffee table, entryway, or autumn centerpiece. The finished pumpkin combines warm neutral tones, chunky knit texture, twine, wood, pinecones, leaves, and small berries for a rustic fall look that feels both welcoming and personal.
Key Takeaways
- Repurpose a thrifted or unused sweater sleeve into cozy fall decor.
- Use soft stuffing to create a rounded pumpkin shape.
- Twine helps define the pumpkin sections and adds rustic texture.
- A simple wood stem gives the pumpkin a natural handmade finish.
- Leaves, pinecones, and berries can add seasonal character.
- Neutral colors make the finished pumpkin easy to mix with many decorating styles.
If you love fall decor DIY projects that look beautiful without requiring complicated supplies, this sweater pumpkin is a wonderful project to try. The process is straightforward, and much of the charm comes from using materials that already have texture and character. An old cable-knit or ribbed sweater can become something completely new, making this craft especially appealing for anyone who enjoys thrifted decor and creative upcycling.
Why Sweater Pumpkins Are Perfect for Fall Decor
Pumpkins are one of the easiest ways to bring an unmistakable autumn feeling into your home. Traditional orange pumpkins are classic, but fabric pumpkins offer a softer alternative that can work beautifully with neutral, farmhouse, rustic, cottage-inspired, and cozy seasonal interiors.
A sweater pumpkin adds another layer of visual interest because the knitted fabric creates natural lines across the surface. Cable patterns, ribbing, and woven textures make the pumpkin look substantial and handcrafted. Cream, beige, oatmeal, and other warm neutral shades also allow the decoration to blend naturally with wood furniture, baskets, dried foliage, candles, and other fall accents.
Important: The texture of the sweater is one of the most important elements of this craft. A knit with visible cables, ribs, or raised patterns can create beautiful vertical sections once the finished pumpkin is gathered with twine.
What You Need for a DIY Sweater Pumpkin
The beauty of this fall decor DIY is that the supply list can stay relatively simple. The image centers on a knitted sweater sleeve, stuffing, twine, a small piece of wood for the stem, scissors, and decorative natural-looking accents.
- An old or thrifted knitted sweater
- Polyfill or another suitable craft stuffing
- Strong twine or jute cord
- Scissors
- A small stick, branch, or wooden piece for the stem
- Leaves or faux foliage
- Small pinecones
- Decorative berries or similar autumn accents
You do not need to make the decorations identical. In fact, using slightly different sweater textures, stems, and embellishments can make a collection of handmade pumpkins look more natural. Try combining different sizes for a relaxed display.
How to Make a Sweater Pumpkin Step by Step
1. Cut a Section From a Sweater Sleeve
Start by choosing a section of a knitted sweater that has enough length and width to create the pumpkin size you want. A sleeve works particularly well because its tubular shape can be adapted into a stuffed form with minimal construction.
Cut a section from the sleeve and inspect the edges. If the knit is likely to unravel, handle it carefully and keep the cut reasonably clean. You can create a smaller pumpkin with a shorter section or a fuller pumpkin with a larger piece of fabric.
Tie one end securely with twine. This becomes the closed bottom of your pumpkin. Make the knot tight enough to hold the stuffing securely inside.
2. Turn the Sleeve and Fill It
Turn the sweater section so the desired outer surface is positioned correctly. Then begin adding polyfill. Place the stuffing inside gradually instead of pushing one large amount into the opening.
Work the filling into the corners and center of the fabric as you go. The goal is a firm but rounded shape. If you want a plumper pumpkin, add more stuffing. If you prefer a softer, slightly relaxed shape, use less.
Pro Tip: Do not worry if the pumpkin looks a little uneven while it is being filled. The shaping stage will pull the fabric inward and create the distinctive rounded pumpkin sections.
3. Gather and Secure the Open End
Once the pumpkin has been filled, gather the open end of the sweater tightly. Pull the fabric together and tie it securely with twine. This closes the stuffed shape and creates the basic pumpkin form.
Take a moment to adjust the stuffing before tightening everything completely. Move the filling around with your hands until the pumpkin looks pleasantly rounded rather than overly lopsided.
4. Trim the Excess Fabric
After securing the opening, trim away excess sweater fabric above the tie. Use sharp scissors and cut carefully so you do not accidentally loosen the knot.
This step gives the top of the pumpkin a cleaner shape and prepares the area for the stem. The remaining gathered fabric will sit underneath the decorative stem and foliage, so it does not need to look perfectly finished on its own.
5. Create a Simple Rustic Stem
A small piece of wood makes a wonderful stem because it contrasts with the softness of the knitted fabric. Choose a stick or wooden piece that is proportionate to the pumpkin.
Wrap the stem area with twine to give it a more finished appearance. The natural brown color of the twine works particularly well with cream or beige sweaters and helps connect the fabric pumpkin to other rustic fall decorations.
You can keep the stem simple or make it more prominent depending on your decorating style. A short, chunky stem creates a traditional handmade appearance, while a slightly taller stem can give the pumpkin a more whimsical silhouette.
6. Add Seasonal Details
This is where you can personalize your fall decor DIY. Add small leaves, pinecones, berries, or other autumn-inspired accents around the stem. The example style uses a natural arrangement that makes the pumpkin feel like a miniature seasonal centerpiece.
Keep the decoration balanced rather than covering the entire top. A few carefully placed elements can be enough to create visual interest while allowing the knitted texture to remain the star of the project.
Expert Insight
The most attractive handmade pumpkins often combine contrasting textures. Pairing soft knitted fabric with rough twine, natural wood, pinecones, and delicate foliage creates depth without requiring elaborate decoration.
7. Shape the Pumpkin Sections
To give the pumpkin its recognizable segmented appearance, use long pieces of twine to create sections around the stuffed form. Start at the top and guide the twine down toward the bottom, pulling gently enough to create an indentation in the stuffing.
Continue around the pumpkin, spacing the sections as evenly as practical. The knitted pattern of the sweater can help guide your placement. If one section looks wider than another, adjust the twine until the overall shape feels balanced.
There is no need for mathematical precision. Handmade fall decor looks best when it retains a little natural variation. The goal is a pleasing pumpkin silhouette rather than perfect symmetry.
How to Make Your Sweater Pumpkin Look Fuller
The shape of the finished pumpkin depends heavily on how the stuffing is distributed. A common mistake is concentrating the filling in the middle while leaving the edges soft and empty. Instead, work small amounts of stuffing throughout the entire form.
As you shape the pumpkin, gently press the filling outward toward the sweater. Then use your hands to smooth the surface. Once the twine sections are added, the fabric will naturally pull inward and create a fuller, rounded appearance.
If the pumpkin looks too tall, you can adjust the stuffing and tighten the twine sections more firmly. If it looks too flat, add a little more filling before completing the final shaping.
Choosing the Best Sweater for This Craft
Not every sweater will create exactly the same result. Chunky knits and textured patterns are especially effective because their raised surfaces become part of the pumpkin’s decoration.
Neutral sweaters are a natural choice for a cozy fall aesthetic. Cream, ivory, oatmeal, taupe, warm beige, and soft brown can all create a calm seasonal palette. If your home has more color, you could also experiment with muted autumn shades.
Before cutting a sweater, consider whether the fabric stretches significantly. A very stretchy knit may require more careful shaping, while a structured knit can help the pumpkin hold its form.
Easy Ways to Style Sweater Pumpkins at Home
Once your pumpkin is finished, the decorating possibilities are almost endless. Its soft neutral appearance makes it particularly versatile for seasonal displays.
- Place one on a wooden tray with candles and small autumn accents.
- Arrange several pumpkins in different sizes on a mantel.
- Use them as part of an entryway display.
- Group them with baskets, blankets, and other cozy textures.
- Add them to a fall centerpiece on a dining or coffee table.
- Mix neutral sweater pumpkins with traditional autumn colors for contrast.
For a layered display, place the largest pumpkin toward the back and smaller pieces in front. Add greenery, pinecones, or other seasonal textures around the base to make the arrangement feel collected rather than overly coordinated.
Make a Collection Instead of Just One
One of the best things about this DIY pumpkin idea is how easy it is to create a coordinated collection. Save different sweater sleeves and vary the size of each pumpkin. You can also experiment with different knit patterns while keeping the color palette similar.
Try making one large statement pumpkin, two medium pumpkins, and several smaller ones. Arrange them together for a cozy autumn vignette. Because the materials are simple and the finished designs can vary naturally, the collection can look handmade and relaxed.
Pro Tip: Use different sweater textures within the same neutral color family. The subtle differences in cable patterns and ribbing will make a group of pumpkins more interesting while keeping the display visually cohesive.
A Budget-Friendly Approach to Autumn Decorating
Fall decorating does not have to mean buying an entirely new collection of seasonal accessories. Repurposing clothing and basic craft materials can give you a way to create decorations that feel personal and distinctive.
This sweater pumpkin project is particularly suited to thrifted materials. An old sweater that is no longer being worn can gain a second life as home decor. Small leftover pieces of twine, natural branches, and simple seasonal embellishments can also contribute to the finished look.
The result is more than a decorative pumpkin. It is a small upcycling project that brings texture, warmth, and personality into your home while making use of materials you might otherwise overlook.
Frequently Asked Questions
Can I use any type of sweater?
You can experiment with many knitted sweaters, but textured fabrics tend to create the most visually interesting pumpkins. Cable-knit and ribbed designs are especially appealing because their patterns emphasize the vertical pumpkin sections.
What can I use instead of polyfill?
A suitable soft craft stuffing is ideal, but the important goal is to create a firm, rounded shape without stretching the sweater excessively. If you are experimenting with alternatives, choose a clean, lightweight material that can be safely enclosed inside the fabric.
Do the pumpkins need to be orange?
Not at all. Neutral sweater pumpkins are a beautiful option for autumn decorating, especially if you prefer a soft, understated palette. Cream, beige, taupe, and brown can create a cozy look while still feeling distinctly seasonal.
How can I make the pumpkin look more rustic?
Use natural-looking materials such as jute twine, unfinished wood, pinecones, dried foliage, and muted berries. Keeping the embellishments simple will allow the knitted texture and earthy materials to work together naturally.
Quick Points
- Repurpose a knitted sweater sleeve.
- Stuff and shape it into a rounded pumpkin.
- Use twine to create defined sections.
- Finish with a rustic stem and seasonal accents.
- Display several sizes together for a cozy fall vignette.
Conclusion: Create Cozy Fall Decor With What You Have
This DIY sweater pumpkin is a simple reminder that beautiful fall decor can come from unexpected materials. An old knitted sleeve, a little stuffing, twine, a wooden stem, and a handful of seasonal accents can become a warm and inviting decoration with plenty of handmade character.
The finished pumpkin works beautifully as part of a larger autumn display, but it can also stand alone as a small seasonal accent. Experiment with different sweater patterns, sizes, textures, and embellishments to create a collection that feels uniquely yours.
Whether you are decorating a mantel, refreshing a coffee table, creating a rustic centerpiece, or simply looking for a fun fall decor DIY project, sweater pumpkins are an easy way to bring warmth and texture into your space. Gather an old sweater and a few simple supplies, and turn something ordinary into a cozy autumn favorite.