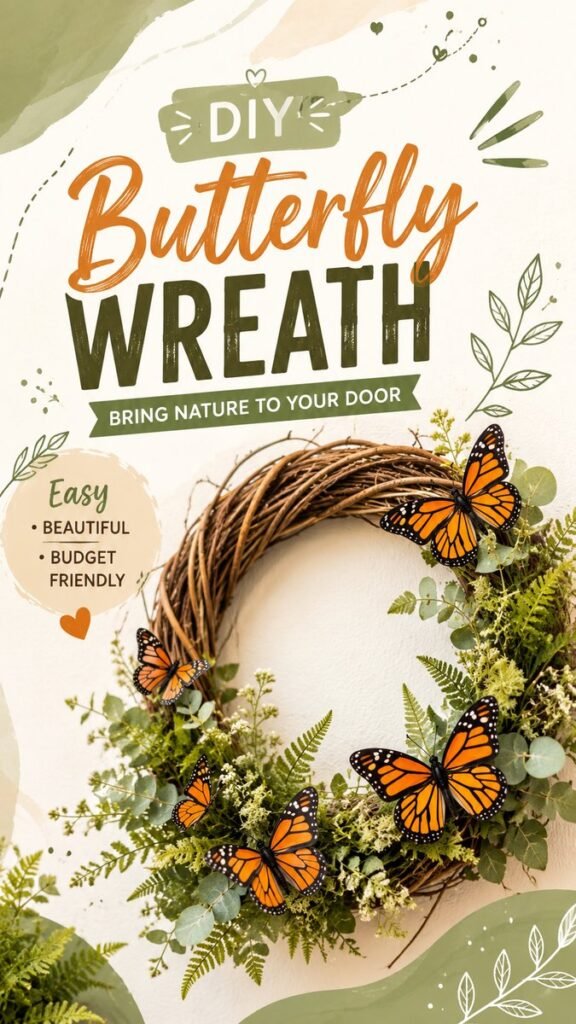
There is something instantly inviting about a beautiful DIY wreath. It can turn a plain door, empty wall, or quiet corner into a welcoming display with very little effort. A grapevine base, layers of greenery, delicate flowers, and bright butterfly accents create the kind of natural decoration that feels handmade, relaxed, and full of personality. The design shown here offers plenty of inspiration for creating your own wreath while leaving room to experiment with colors, textures, and seasonal details.
Key Takeaways
- A grapevine wreath creates an easy natural foundation for DIY decorating.
- Layer greenery at different heights to give the wreath a fuller appearance.
- Butterfly accents can add color and a playful garden-inspired touch.
- Mixing foliage, flowers, moss, and branches creates visual texture.
- Keep the arrangement balanced without making both sides perfectly identical.
- Choose lightweight decorative elements so the wreath remains easy to hang.
Why DIY Wreaths Are So Appealing
A wreath is one of those home decor projects that can be adapted to almost any style. The basic circular shape provides structure, while the decorations determine the mood. A simple arrangement of leaves can feel minimalist, while flowers, moss, ribbons, butterflies, and textured branches can create something much more detailed.
DIY wreath decorating is especially appealing because you do not need to create a perfectly symmetrical arrangement. Natural-looking designs often work best when the greenery flows around part of the wreath rather than covering every inch of the base. This leaves some of the grapevine visible and gives the finished piece a rustic character.
Important: The strongest DIY wreath designs usually combine contrast with repetition. Repeat a few colors or textures throughout the arrangement, but vary the size and direction of individual elements so the wreath feels organic rather than overly arranged.
Start With a Natural Wreath Base
A grapevine wreath is an excellent starting point for a nature-inspired DIY wreath. Its twisted branches provide plenty of texture and already have a warm, earthy appearance. They also make it easy to attach lightweight decorative pieces without requiring a complicated construction method.
When choosing a base, consider the size of the area where you plan to display the wreath. A smaller wreath can work beautifully on an interior wall or cabinet, while a larger version can become a focal point on a front door or entryway wall.
Leave Some of the Base Visible
One of the most attractive details in a rustic wreath is the exposed branchwork. Instead of covering the entire circle with greenery, allow sections of the grapevine to remain visible. The contrast between brown branches and fresh-looking foliage gives the arrangement depth and prevents it from appearing too heavy.
Build Layers With Greenery
Greenery is what gives a DIY wreath its fullness. The example features several types of leafy foliage with different shapes and textures. Fern-like leaves create a soft, feathery effect, while rounded leaves provide a broader visual surface. Smaller sprigs fill spaces between the larger pieces.
When arranging greenery, begin with your largest pieces. Position a few stems around the lower or side sections of the wreath, then add smaller foliage to soften the transitions. Avoid placing every stem at the exact same angle. Slight variations make the arrangement feel more natural.
Create a Focal Area
Instead of distributing every decorative element evenly around the circle, consider creating one main focal area. This could be a fuller cluster of greenery, a group of flowers, or a collection of butterfly decorations. The rest of the wreath can remain lighter, allowing the focal point to attract attention immediately.
A strong focal area also makes the wreath easier to design. You can think of the circle as a frame and decide where you want the eye to land first. Once that area is established, smaller elements can be arranged around it to guide the eye through the rest of the composition.
Expert Insight
A visually pleasing wreath benefits from a clear focal point, varied textures, and intentional empty space. You do not need to fill every gap. Small areas where the base remains visible can actually make the greenery and decorative accents stand out more.
Add Flowers for Delicate Detail
Small flowers are a wonderful way to soften the stronger textures of branches and greenery. Tiny white blooms, for example, can create a light contrast against darker foliage without competing with larger decorative elements.
For a natural effect, place flowers in small clusters instead of creating a continuous ring. A few blossoms tucked into greenery can look more relaxed and garden-inspired. If you prefer a more colorful design, introduce small groups of complementary flowers rather than using many unrelated shades.
Use Texture to Make the Wreath Interesting
Texture matters just as much as color. Smooth leaves, feathery foliage, rough grapevine, delicate flowers, and moss-like details create layers that are interesting even from a distance. This is particularly useful for neutral or earthy color palettes because texture keeps the design from feeling flat.
Try combining at least three different visual textures. A woody base can be paired with soft greenery, while small flowers or decorative butterflies provide a crisp finishing detail.
Bring the Wreath to Life With Butterfly Accents
The bright orange and black butterfly accents are the standout feature of this style of DIY wreath. They immediately introduce a cheerful garden feeling and create a striking contrast against the green foliage and brown grapevine.
Butterflies can be positioned as though they are landing on the greenery or moving around the wreath. Using several sizes can make the arrangement feel more dynamic. Place one larger butterfly near the focal area and use smaller butterflies to create a visual path around it.
Pro Tip: When using colorful butterfly accents, let them provide most of the visual contrast. Keep the surrounding foliage in natural greens and earthy tones so the orange details remain easy to notice without making the wreath look overly busy.
How to Arrange the Elements
Before permanently attaching anything, lay your materials around the wreath and experiment with different compositions. This simple step can save time and makes it easier to discover an arrangement that feels balanced.
- Place the grapevine wreath on a flat work surface.
- Choose the area that will become the main focal point.
- Position the largest greenery pieces first.
- Fill open areas with smaller leaves and delicate stems.
- Add flowers in small groups for contrast.
- Position butterfly accents where they can be seen clearly.
- Step back and check the overall balance before securing everything.
Think in Odd Numbers
When adding repeated accents such as flowers or butterflies, odd-number groupings can often create a pleasing visual rhythm. For example, three butterflies may feel more naturally arranged than placing two identical butterflies directly opposite one another.
This does not mean every wreath must follow a strict rule. The goal is simply to avoid an arrangement that looks too rigid. Slight differences in spacing and height can make handmade decor feel more expressive.
Choose a Color Palette That Feels Natural
The beauty of this wreath style comes from its earthy color combination. Warm brown branches provide the foundation, while different shades of green create depth. Bright orange accents then add energy and draw attention to the decorative details.
You can adapt the same concept to create many different color palettes. Soft cream flowers and sage greenery can produce a calm look. Lavender and muted green can create a more romantic garden mood. Yellow flowers paired with fresh green foliage can make the wreath feel sunny and cheerful.
For a polished result, choose one dominant color family, one supporting neutral, and one accent color. This approach makes it easier to coordinate the finished wreath with existing home decor.
DIY Wreath Ideas for Different Spaces
A nature-inspired wreath does not have to be reserved for a front door. Its organic materials can work throughout the home, especially in spaces that benefit from a little softness and greenery.
Front Door Decor
A large grapevine wreath can make a welcoming statement at an entryway. Choose weather-appropriate materials if the wreath will be displayed outdoors, and keep delicate decorations protected from harsh conditions whenever possible.
Living Room Wall
A decorative wreath can fill an empty wall without requiring a large piece of furniture or artwork. Hang it above a console, near a reading area, or as part of a larger gallery-style arrangement.
Seasonal Decorating
The basic wreath can also become a flexible seasonal decoration. Swap the butterflies for autumn leaves, winter greenery, spring flowers, or summer-inspired accents while keeping the same grapevine foundation.
Simple Ways to Personalize Your Wreath
The best DIY wreath is one that reflects your own decorating style. You can make the arrangement rustic and understated, colorful and playful, or elegant and minimal. The foundation does not need to change dramatically to create a completely different result.
- Add a linen or cotton ribbon for a softer finish.
- Use eucalyptus-style foliage for a clean, modern appearance.
- Introduce small berries for seasonal color.
- Combine faux flowers with greenery for a longer-lasting arrangement.
- Use wooden or lightweight decorative accents for a rustic theme.
- Change the focal decoration whenever you want a refreshed look.
Important: Balance is more important than perfection. If one side of your wreath is fuller, echo a color, leaf shape, or decorative accent on the opposite side rather than trying to mirror the entire arrangement exactly.
Keeping a DIY Wreath Looking Fresh
If you are working with faux greenery and decorative butterflies, maintenance is relatively simple. Dust can collect between leaves and along textured branches, so gently cleaning the wreath from time to time can help preserve its appearance.
Keep delicate decorations away from areas where they can easily be bent or crushed. If you store the wreath between seasons, use a spacious container rather than placing heavy objects on top of it. Protecting the shape of the greenery and decorative accents will make the wreath easier to reuse.
If your wreath includes natural materials, check them periodically for signs of moisture damage or deterioration. Store natural wreaths in a dry location when they are not being displayed.
Why This Matters
- A simple base gives you flexibility to update the decoration later.
- Natural textures make even a simple wreath look thoughtfully designed.
- A focused color palette helps different decorative elements work together.
A Simple Formula for a Beautiful DIY Wreath
If you are unsure where to begin, use a simple three-layer formula. Start with the structural layer, which is your grapevine base. Add a greenery layer that establishes the shape and fullness. Finish with an accent layer made from flowers, butterflies, ribbon, or another decorative feature.
This formula is flexible enough for beginners while still allowing experienced crafters to create more elaborate arrangements. You can add more detail gradually instead of trying to complete the entire wreath at once.
Another useful approach is to photograph your wreath during the process. Looking at a photo from a little distance can reveal areas that appear too crowded or too empty. It can also help you see whether the focal point is obvious.
At a Glance
- Begin with a textured grapevine wreath.
- Layer different greenery for depth and movement.
- Use small flowers to soften the arrangement.
- Add colorful butterflies as a focal accent.
- Keep the palette coordinated and the composition balanced.
Conclusion
A DIY wreath is a simple way to bring creativity and nature-inspired style into your home. With a grapevine base, layered greenery, delicate flowers, and a few eye-catching butterfly accents, you can create a decoration that feels both rustic and cheerful.
The key is to build the design gradually. Start with the base, establish your greenery, create a focal area, and then add the finishing details. Do not worry about making every section identical. A little asymmetry can give the finished wreath a more natural and handcrafted appearance.
Whether you are decorating a front door, refreshing a living room wall, or creating a seasonal accent, this DIY wreath concept offers plenty of room for personalization. Experiment with foliage, colors, flowers, and decorative accents until the arrangement feels like your own. A thoughtfully made wreath does more than fill an empty space. It gives that space a welcoming, creative touch.
Tags
DIY Wreath Wreath Ideas Door Decor Grapevine Wreath DIY Home Decor Nature Inspired Decor Butterfly Decor Rustic Decor