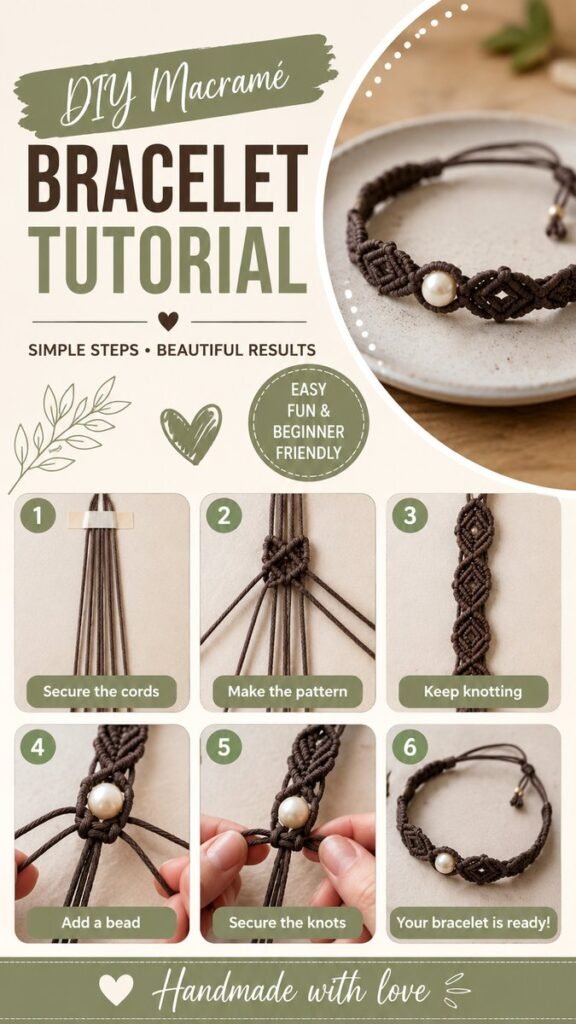
DIY bracelets patterns are a fun way to turn simple cords, knots, and a little creativity into something you can actually wear. A macramé-inspired bracelet with a woven pattern and a decorative bead can look detailed and polished while still being approachable for beginners. The key is to work slowly, keep the cords organized, and repeat the same knotting sequence until the pattern begins to take shape.
Key Takeaways
- Macramé bracelets can be made with a simple collection of cords and basic knots.
- Keeping the working strands separated makes each pattern easier to follow.
- Consistent tension helps create an even, professional-looking bracelet.
- A bead can become a simple focal point in an otherwise woven design.
- Different cord colors and bead styles can make the same pattern feel completely different.
Why DIY Bracelets Patterns Are So Popular
Handmade bracelets are appealing because they combine creativity with a practical result. Instead of simply following a craft project and putting it away, you finish with a wearable accessory that can reflect your preferred colors, textures, and style.
Macramé is particularly satisfying because the design develops gradually. Several loose strands become a structured woven band through repeated knots. As the bracelet grows, geometric shapes and textured sections appear almost like a small piece of textile art.
The visual appeal of this type of DIY bracelet comes from repetition. A carefully repeated knot can create diamonds, braided sections, raised ridges, and other decorative details without requiring complicated equipment.
What You Need to Make a Macramé Bracelet
One advantage of DIY bracelets patterns is that the basic supplies are relatively simple. The exact amount of cord depends on the bracelet design and desired length, so it is helpful to start with enough material to comfortably practice the knots.
- Macramé or suitable bracelet cord
- Sharp scissors for cleanly trimming the ends
- A small piece of tape or another simple method for securing the cords while working
- A decorative bead if you want a focal detail
- A flat work surface where the strands can remain organized
For a design inspired by the woven bracelet shown here, a darker brown cord creates a warm, earthy appearance, while a light bead provides contrast. You can easily change that combination to create something brighter, softer, or more colorful.
Important: Cord tension matters more than speed. Pull each knot firmly enough to hold its shape, but avoid tightening one strand dramatically more than the others. Even tension is one of the simplest ways to make a handmade bracelet look neat.
How to Start the Bracelet Pattern
1. Prepare and Secure the Cords
Begin by cutting your cords to an appropriate working length. If you are new to macramé, giving yourself extra cord is usually more comfortable than trying to work with strands that are too short.
Arrange the strands neatly and secure the upper section to your work surface. The goal is to create a stable starting point so the cords do not move around while you are forming the first knots.
Take a moment to identify the individual working strands. Keeping them in the same order throughout the project makes it much easier to recognize the developing pattern.
2. Begin the Repeating Knots
The next stage is where the bracelet starts to look like a recognizable macramé pattern. Work the cords into small knot clusters, following a consistent sequence from one section to the next.
Rather than trying to rush through the entire bracelet, concentrate on one small section at a time. After completing a group of knots, check that the strands are still positioned correctly before moving on.
Repetition is your friend here. Once your hands become familiar with the movement, the process becomes much more natural and rhythmic.
3. Build the Woven Design
Continue repeating the knot structure to create the central decorative portion. In a geometric bracelet design, the cords can form diamond-like openings and raised woven edges as the sections connect.
Keep checking the width as you work. If one portion becomes noticeably wider or narrower, gently adjust the tension in the next few knots rather than pulling aggressively on the finished section.
Expert Insight
A bracelet pattern becomes easier to manage when you think in small repeats instead of one long sequence. Finish one motif, inspect it, then repeat the same structure. This approach also makes it easier to spot a misplaced knot before it becomes buried beneath several more rows.
Adding a Bead for a Finished Detail
A decorative bead can transform a simple knotted bracelet into a more distinctive piece. In the finished design, the bead acts as a central accent within the woven cord pattern, giving the eye a natural place to focus.
Choose a bead with a hole large enough for the cord to pass through comfortably. A smooth round bead works especially well with a textured macramé design because the contrast between the polished surface and knotted cord adds visual interest.
Before permanently securing the bead, position it against the bracelet to check its placement. You can experiment with the surrounding knots so the bead sits securely and remains visually centered.
4. Secure the Bead and Surrounding Knots
Once the bead is positioned, continue working the cords around it. The surrounding knots should hold the bead in place without creating unnecessary bulk.
This is also a good time to inspect the bracelet from different angles. Make sure the woven sections remain aligned and that the bead does not cause the cord arrangement to twist.
Small adjustments at this stage can make a significant difference in the final appearance.
Finishing the DIY Bracelet
5. Tighten and Secure the Final Knots
After the main pattern and bead are complete, bring the remaining strands together and create a secure finishing section. Keep the knots compact and check the bracelet length as you go.
Do not trim the excess cords immediately. Leave enough material to make the final closure and to adjust the fit. Once you are satisfied with the size and security of the bracelet, trim the ends neatly.
Pro Tip: Test the bracelet’s closure before cutting away the remaining cord. A little extra material is useful while adjusting the fit, but once it has been trimmed, making further changes can be difficult.
6. Check the Finished Bracelet
Lay the completed bracelet flat and look over the entire woven section. The knots should feel secure, the central design should remain recognizable, and the bead should sit naturally within the pattern.
Run your fingers gently along the bracelet to check for loose sections. If you notice a knot that is visibly looser than the surrounding ones, correct it before wearing the piece.
The final result should feel flexible enough to wear while retaining the structured appearance created by the repeating knots.
Tips for Better DIY Bracelet Patterns
Once you understand the basic process, there are plenty of ways to make your bracelet look more polished. The most important improvements usually come from careful preparation rather than complicated techniques.
- Keep your cords separated: Tangled strands make repeated knot patterns much harder to follow.
- Maintain steady tension: Try to pull each knot with a similar amount of pressure.
- Work on a stable surface: A secure starting point lets both hands concentrate on the knotting.
- Check your pattern frequently: Catching an error early saves time later.
- Leave extra cord: Extra length gives you more flexibility when finishing the bracelet.
Creative Ways to Personalize Your Bracelet
DIY bracelets patterns are especially enjoyable because one basic structure can produce many different looks. You do not have to change the knotting technique to create a new style. Simply changing the materials and finishing details can make the bracelet feel completely different.
Experiment With Cord Colors
Brown cord gives the bracelet a natural, understated appearance, but there is no reason to stop there. Try cream, black, sage, rust, dusty pink, blue, or a combination of two complementary shades.
For a subtle look, use one color throughout. For stronger contrast, use different shades for the working and central strands. Alternating colors can also make the knot structure easier to see.
Try Different Bead Styles
A bead is an easy way to change the personality of a bracelet. A light-colored round bead creates a soft focal point, while a darker or more colorful bead can create a stronger contrast.
You can also explore different bead sizes. Just keep the overall scale of the bead proportional to the width of the woven bracelet so that the finished piece remains comfortable to wear.
Create a Matching Set
Once you are comfortable with the pattern, consider making several bracelets using the same basic design. Change the cord color, bead, or pattern spacing for each version.
Matching handmade bracelets can make thoughtful gifts for friends and family, especially when each one is personalized with a different color combination.
Common Mistakes Beginners Can Avoid
Learning a knotting pattern rarely goes perfectly on the first attempt. That is part of the process. Fortunately, most early mistakes are easy to prevent once you know what to watch for.
One common issue is inconsistent tension. If some knots are pulled tightly while others remain loose, the pattern can become uneven. Another is losing track of the working strands. Keeping the cords arranged in their original order helps prevent this problem.
It is also tempting to focus only on the knot directly in front of you. Instead, pause occasionally and look at the entire motif. Seeing the larger pattern can help you recognize whether the bracelet is developing symmetrically.
If you make a mistake, avoid immediately pulling apart a large section. Carefully identify the last correct knot and work backward from there. Patience usually saves more time than starting over.
A Relaxing Handmade Project to Keep Exploring
There is something satisfying about watching a collection of simple cords turn into a detailed bracelet. The repetitive nature of macramé can make the project enjoyable from beginning to end, while the finished accessory gives you something tangible to show for the time spent crafting.
Once the basic DIY bracelet pattern feels comfortable, you can start experimenting. Change the colors, alter the bead, adjust the length, or try arranging the knots into a different geometric motif. Each small variation can create a new handmade style.
At a Glance
- Secure the cords before beginning.
- Repeat the knot pattern carefully and consistently.
- Add a bead as a simple focal detail.
- Check the fit before trimming the finishing cords.
- Personalize the design with colors and beads you love.
Conclusion
DIY bracelets patterns offer an approachable way to explore handmade jewelry while creating something useful and personal. A macramé bracelet built from repeated knots, carefully arranged cords, and a simple bead can have plenty of visual character without requiring an elaborate collection of supplies.
Take your time with the first few sections, pay attention to cord tension, and let the pattern develop one repeat at a time. With practice, the movements become easier and your bracelets can become more consistent, creative, and uniquely yours.
Whether you are making one bracelet for yourself or creating several handmade gifts, this type of macramé project is a rewarding craft to keep in your collection. Save your favorite DIY bracelets patterns, gather your cords and beads, and start creating your next wearable piece.