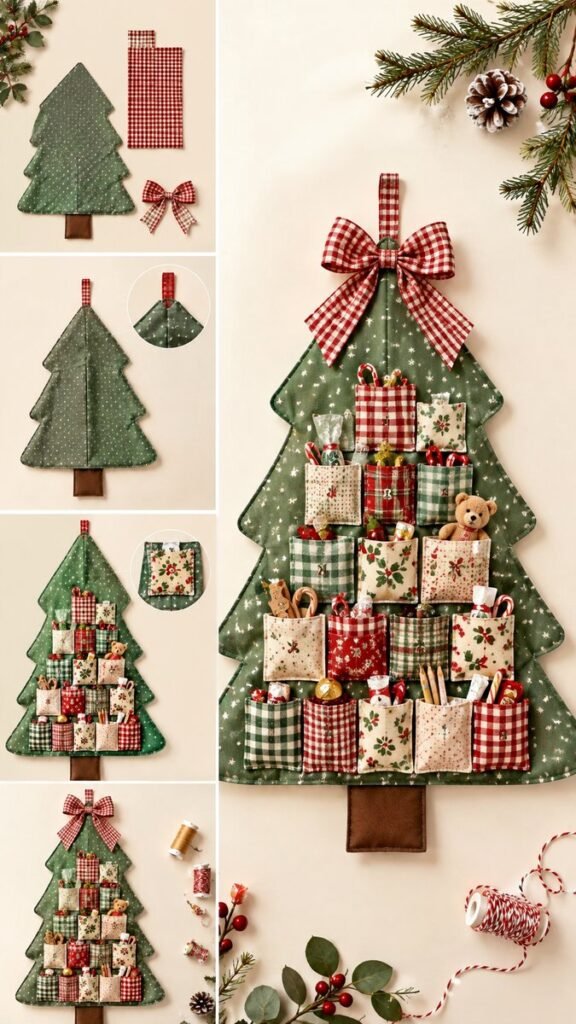
A handmade advent calendar can turn the days before Christmas into a warm, creative tradition, and this fabric Christmas tree design is a beautiful example of how practical sewing can become festive home decor. Instead of using a traditional hanging calendar, this project transforms a fabric tree into a decorative countdown filled with 24 small pockets for treats, notes, or tiny surprises. The finished piece combines cozy gingham, floral prints, patchwork details, and a large decorative bow for a cheerful holiday look.
Whether you enjoy sewing, love handmade Christmas decorations, or are searching for a memorable DIY advent calendar idea, a fabric tree calendar offers plenty of room for creativity. You can change the colors, fabrics, pocket arrangement, and embellishments to create something that fits your own holiday style.
Key Takeaways
- Create a reusable fabric Christmas tree advent calendar with 24 pockets.
- Mix gingham, floral, plaid, and coordinating fabrics for a cozy handmade appearance.
- Plan the pocket layout before attaching pieces to keep the countdown organized.
- Add a hanging loop so the finished tree can become part of your seasonal decor.
- Personalize the pockets with small treats, notes, toys, or creative surprises.
Why a Fabric Advent Calendar Is Worth Making
Reusable advent calendars have a special charm because they can become part of your holiday traditions year after year. A fabric version also adds texture and personality to a room in a way that a disposable calendar cannot. The tree shape makes the project especially appropriate for Christmas decorating, while the pockets give you a practical place to create a daily countdown.
The design shown here has a soft, homespun character. Green fabric forms the tree, while red-and-white gingham and assorted patterned fabrics bring contrast to the pockets. A large plaid bow at the top adds a finishing detail that makes the calendar feel more like a decorative Christmas tree than a simple storage organizer.
Important: The beauty of a handmade advent calendar is its flexibility. You do not need to reproduce one exact fabric combination. Choose a small collection of prints that share a few colors, then let the patterns create the visual interest.
Planning Your DIY Advent Calendar
Before cutting fabric, take a moment to think about the finished size and how you want the calendar to hang. The tree silhouette needs enough surface area to accommodate 24 pockets without making the pockets feel crowded. A simple paper template can help you establish the overall shape before you begin working with your final fabric.
The reference design uses a classic Christmas tree silhouette with several gently curved branches and a separate brown trunk. This shape is easy to recognize and works well as a wall decoration. The top also includes a fabric hanging loop, making it possible to display the completed calendar from a suitable hook or peg.
Think About the Pocket Layout First
One of the most important planning decisions is where the 24 pockets will go. A staggered grid works particularly well because it follows the triangular shape of the tree while keeping the numbers easy to see. Begin with a light arrangement on paper, then adjust the spacing until every pocket feels balanced.
- Keep the pockets visually balanced from top to bottom.
- Leave enough space between rows for easy access.
- Make the pocket openings clearly accessible.
- Use numbering that remains readable against each fabric.
- Reserve enough room near the top for the bow and hanging loop.
Choosing Fabrics for a Cozy Christmas Look
Fabric selection is where you can give this DIY advent calendar its personality. The pictured design demonstrates how several small-scale patterns can work together without looking chaotic. Red gingham creates a classic holiday feeling, green fabric establishes the main tree color, and floral and plaid prints add variation to the pockets.
For a cohesive result, choose a main fabric first. A green, cream, red, or neutral background can serve as the foundation. Then select two or three supporting colors and look for prints that repeat those shades. This simple approach helps different fabrics look intentionally coordinated.
Fabric Combinations to Try
For a traditional Christmas palette, combine forest green with cranberry red, cream, and warm brown. For a softer farmhouse-inspired version, try sage green, muted red, ivory, and natural beige. You could also create a modern calendar with deep green, burgundy, neutral linen, and small geometric prints.
Do not be afraid to combine gingham with floral or plaid designs. Small patterns are especially useful for pockets because they add visual texture while keeping the overall tree easy to read.
Cutting the Main Christmas Tree Pieces
Once the design has been planned, transfer the tree shape onto fabric and cut the main body pieces. The illustrated tutorial shows two tree body pieces, a separate trunk piece, and a bow. Keeping the tree body symmetrical helps the finished calendar look polished.
When cutting fabric, take your time around the curves and branch edges. Smooth, consistent edges make sewing easier later. If you are using a fabric pattern, consider how its direction will appear on the tree before cutting.
Allow for Seam Considerations
A fabric project with curved or pointed edges benefits from careful seam planning. Follow the seam allowance appropriate to your chosen pattern and fabric rather than cutting directly to the final finished dimensions. Marking important points and matching corresponding sections can also make assembly easier.
Sewing the Tree Layers Together
The next stage is assembling the tree body with the trunk and hanging loop. The hanging loop is particularly important because it allows the calendar to function as a wall decoration. Position it carefully at the top and secure it before completing the final stitching.
Leave an opening where needed so the project can be turned right side out after sewing. Once turned, gently shape the edges and press the seams. Taking a few extra minutes with pressing can make a handmade project look considerably more refined.
Expert Insight
- Press fabric layers carefully as you work for cleaner edges.
- Secure the hanging loop firmly because it supports the finished calendar.
- Arrange the pockets before permanent stitching so you can adjust the composition.
Creating and Attaching the 24 Pockets
The pockets are the feature that transforms the fabric tree into an advent calendar. The illustrated layout uses 24 individual pockets arranged in staggered rows across the tree. Each pocket can be made from a different coordinating fabric, creating a patchwork effect that makes the finished piece especially cheerful.
Keep the top of each pocket open while securing the remaining edges. This gives you a functional compartment for small items. A contrasting blanket stitch or another decorative edge treatment can also add handmade character around the pocket perimeter.
Make the Numbers Easy to Read
Numbering the pockets is an important part of the countdown experience. Use simple, high-contrast numbers that remain visible against patterned fabrics. You can sew, embroider, print, applique, or attach fabric numbers depending on your preferred crafting method.
For a coordinated appearance, keep the number style consistent throughout all 24 pockets. The pockets themselves can vary in fabric while the numbering provides a visual element that ties everything together.
Adding the Decorative Bow
A large bow at the top gives the advent calendar an unmistakably festive finish. The pictured design uses a red plaid bow with long tails that frame the upper portion of the tree. This is a simple detail that creates a strong focal point without requiring complicated embellishment.
You can make the bow from the same fabric used on several pockets or choose a contrasting plaid for more impact. A structured bow works particularly well because it remains visible even after the pockets have been filled.
Filling Your Handmade Advent Calendar
Once the sewing is complete, the most enjoyable part begins: filling the 24 pockets. The pockets can hold many different kinds of small surprises, depending on the recipient and the size of each compartment.
- Wrapped chocolates or small sweets
- Short handwritten holiday messages
- Small craft supplies
- Miniature toys or accessories
- Festive stickers or paper surprises
- Simple family activity ideas
For children, mixing treats with activities can make the countdown more memorable. For adults, the pockets could hold handwritten compliments, recipe cards, small craft materials, or ideas for relaxing seasonal activities.
Pro Tip: Plan your pocket contents before the first day of December. A quick list of 24 ideas makes it easier to create a balanced countdown and prevents last-minute scrambling.
How to Style the Advent Calendar in Your Home
A fabric Christmas tree advent calendar can stand alone as a statement decoration, but it can also become part of a larger holiday display. Hang it on a plain wall where the tree silhouette and colorful pockets can be appreciated. A neutral background allows the red and green fabrics to stand out beautifully.
For a coordinated Christmas corner, pair the calendar with natural greenery, warm wood accents, woven textures, or simple holiday ornaments. Avoid overcrowding the area around the tree so the pockets remain the main visual focus.
Keep the Display Practical
Because the calendar will be opened repeatedly, place it somewhere that is easy to reach. The hanging loop should be attached securely, and the calendar should have enough clearance around it for the pockets to be accessed comfortably.
Easy Ways to Personalize the Project
The basic tree shape provides a starting point rather than a strict formula. You can personalize nearly every decorative element while keeping the same overall concept.
- Change the color palette: Try neutral linen, burgundy, sage, cream, or classic red and green.
- Mix pocket shapes: Keep the pockets rectangular, or experiment with rounded or decorative edges.
- Add embroidery: Small stitched stars, initials, snowflakes, or simple seasonal motifs can add character.
- Personalize the numbers: Use different fabrics or embroidery styles while maintaining a consistent size.
- Vary the bow: Choose velvet, cotton, plaid, gingham, or another fabric that complements the tree.
Why Handmade Holiday Decor Feels Special
Projects like this fabric advent calendar bring together creativity and tradition. Instead of simply placing a seasonal decoration in a room, you create something that can participate in a daily family ritual. The pockets introduce a sense of anticipation, while the handmade construction gives the calendar a personal quality.
It can also become a keepsake. As the years pass, a reusable advent calendar may collect memories through the people who fill it, the treats placed inside, and the traditions built around opening each pocket.
Quick Points
- Use a simple tree silhouette as the foundation.
- Coordinate several fabrics instead of relying on one print.
- Plan all 24 pockets before attaching them.
- Add a sturdy hanging loop and a festive bow.
- Fill the pockets with a mixture of treats and thoughtful surprises.
Conclusion: Create a Christmas Tradition You Can Reuse
This DIY advent calendar is more than a sewing project. It is a creative way to bring handmade charm into Christmas decorating while creating a countdown that can be enjoyed year after year. The fabric Christmas tree shape, 24 colorful pockets, coordinating patterns, decorative bow, and practical hanging loop come together to create a piece that is both useful and beautiful.
The best part is how easily the concept can be adapted. Choose fabrics that match your home, adjust the pocket details, personalize the numbers, and fill each compartment with surprises that mean something to you. Whether you are making one for children, family members, or simply to add a cheerful handmade touch to your own space, this advent calendar can become a favorite part of the holiday season.
If you have been looking for a festive sewing project that combines Christmas decor with a meaningful daily tradition, a fabric tree advent calendar is a wonderful place to start. Gather your favorite fabrics, plan your 24 pockets, and enjoy creating a handmade countdown that brings a little more excitement to every December morning.