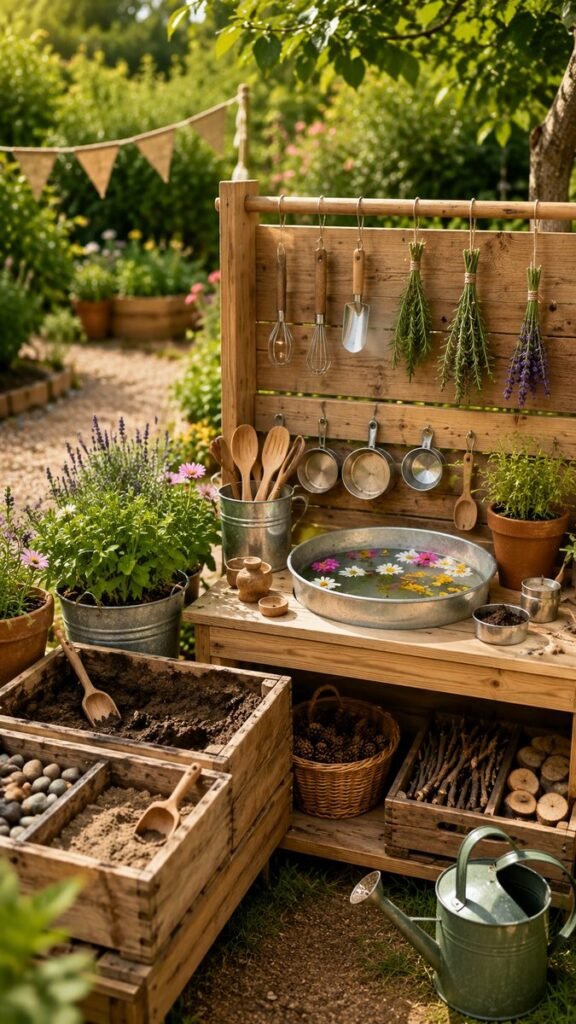
A DIY mud kitchen can turn an ordinary backyard corner into a wonderfully creative space for outdoor play. With a simple wooden workbench, old pots and pans, garden tools, soil, sand, water, flowers, herbs, pebbles, and natural materials, children can explore imaginative play while enjoying the sights, textures, and sounds of the garden. The charming setup shown here combines rustic wood with lush planting, making the play area feel like a natural extension of the outdoor space rather than a separate plastic toy zone.
Important: The best mud kitchen does not need to be complicated. A sturdy surface, a few safe containers, natural loose parts, and plenty of room for messy exploration can provide hours of open-ended outdoor fun.
Key Takeaways
- Use a simple wooden station as the foundation for a DIY mud kitchen.
- Add old cookware, wooden utensils, scoops, pots, and bowls for pretend cooking.
- Combine mud, sand, water, stones, leaves, flowers, and herbs for sensory play.
- Use crates, baskets, and shelves to keep natural materials organized.
- Let the garden itself become part of the play space with plants, paths, and natural textures.
What Is a DIY Mud Kitchen?
A DIY mud kitchen is an outdoor pretend-play station designed around the idea of cooking with natural materials. Instead of real food, children can mix soil, sand, water, petals, leaves, grass, and other loose materials to create imaginative recipes. The result might be a pretend soup, a muddy cake, a flower potion, or simply a bowl of something wonderfully messy.
The concept is intentionally open-ended. There is no single correct way to build or use a mud kitchen. Some setups are made from a recycled pallet, while others use a small outdoor table, wooden bench, crates, or a purpose-built play station. The image inspiration here uses a warm wooden structure with a work surface, hanging utensils, storage areas, planted containers, and several sensory stations.
What makes this type of setup especially appealing is the combination of practical-looking objects and natural materials. A metal basin filled with water and floating flowers can become a pretend washing station. A tray filled with soil becomes a mixing area. Wooden spoons and small pots encourage role-play, while baskets filled with pinecones, sticks, stones, and wood pieces provide an ever-changing collection of ingredients.
How to Create a Charming Outdoor Mud Kitchen
You do not need a large garden or an elaborate construction project to create an inviting mud kitchen. Start by choosing a practical location where messy play is acceptable and where children have enough room to move around the station.
A garden corner with some greenery can work beautifully. Positioning the kitchen near plants, flowers, or a gravel path helps it blend naturally into the landscape. The rustic wooden appearance shown here also creates a relaxed cottage-garden feeling that works well with outdoor décor.
Choose a Simple Work Surface
The work surface is the heart of the mud kitchen. A sturdy wooden table, old potting bench, outdoor workbench, or suitable collection of timber crates can provide a useful starting point. Look for a surface that is comfortable for the intended users and strong enough to hold bowls, containers, and loose materials.
Storage underneath is a major advantage. The pictured setup uses open wooden compartments for sticks, wood slices, baskets, and stones. This keeps frequently used materials close at hand while giving the station a tidy, organized appearance.
Add Hanging Tools and Utensils
One of the most attractive details of a mud kitchen is the collection of tools displayed above the work surface. Simple hooks and a wooden rail can hold child-safe utensils, small pans, measuring cups, whisks, spoons, and garden tools.
Wooden utensils add warmth and texture, while metal pots and pans introduce a different material and sound. The mixture creates a kitchen-like appearance without requiring expensive accessories.
- Install a sturdy rail or hooks where appropriate.
- Add lightweight utensils that are easy to handle.
- Include bowls, cups, spoons, and small pans.
- Keep heavier or sharp objects away from the play area.
- Check tools regularly for damage, rust, or loose parts.
Build a Sensory-Rich Mud Kitchen
The magic of a mud kitchen comes from its sensory possibilities. Children can scoop, pour, stir, squeeze, crumble, arrange, and combine materials. Each texture behaves differently, giving the play experience plenty of variety.
Mud, Soil, and Sand
Soil provides the classic ingredient for mud play. Add water gradually and children can experiment with different consistencies. Dry soil can be scooped and sprinkled, while wetter mixtures can be stirred in bowls or pressed into containers.
Sand provides another useful texture. A shallow wooden tray or crate can become a dedicated sand station. Keeping sand and soil in separate containers gives children more control over what they want to combine.
Water and Natural Ingredients
Water transforms the experience. A basin, shallow tub, or sturdy container can become the center of pretend recipes and sensory experiments. The reference-inspired setup includes a broad metal basin with water and colorful flowers floating on the surface, creating an especially inviting focal point.
Natural ingredients can be collected from appropriate areas of the garden. Fallen leaves, petals, small twigs, pinecones, pebbles, grass, and herbs can all become pretend ingredients. These materials also change with the seasons, so the mud kitchen can feel different throughout the year.
Pro Tip: Keep a small collection of loose natural materials in baskets or shallow trays. Rotating the selection every so often can make a familiar mud kitchen feel fresh without adding more equipment.
Use Herbs and Flowers to Bring the Garden Into Play
The most beautiful mud kitchens often feel connected to the surrounding garden. Pots of herbs, flowering plants, lavender-like foliage, and leafy greenery can frame the station and provide visual inspiration for pretend play.
Small herb containers can also introduce different scents and textures. Children may enjoy smelling leaves, comparing textures, or using fallen petals as pretend decorations. If plants are included specifically for play, choose varieties appropriate for the setting and supervise young children around unfamiliar plants.
Flowers do not need to be placed directly into the soil mixtures. A bowl of water decorated with fallen petals can provide a simple sensory activity. The colorful floating pieces shown in the inspiration image demonstrate how even a basic basin can become an attractive centerpiece.
Create Smart Storage for a Tidy Outdoor Space
A mud kitchen naturally collects lots of small objects, so storage is worth planning from the beginning. Open shelves, wooden crates, baskets, and shallow trays make it easy to see what is available and return items after play.
Use separate containers for different categories. One basket might hold pinecones and sticks, while another stores stones or wood slices. Pots and pans can hang from hooks, and small scoops can sit inside a metal cup or container.
Open storage also contributes to the visual appeal of a rustic garden play area. Natural wood, woven baskets, metal containers, and earthy materials work together to create a cohesive look.
Why This Matters
- Accessible storage encourages children to choose and return materials independently.
- Natural loose parts can be changed easily as seasons and interests change.
- Organized tools make a busy outdoor play station feel calmer and easier to maintain.
Encourage Open-Ended Outdoor Play
A strong mud kitchen does not tell children exactly what to make. Instead, it provides enough materials to let their imagination take over. A bowl might become a soup pot, a wooden spoon might become a mixing paddle, and a pile of petals might become a special ingredient.
This flexibility is one of the biggest strengths of outdoor sensory play. There is no need for a finished product. The enjoyment comes from experimenting with materials and creating imaginary scenarios.
One day the kitchen might become a pretend café. Another day it could be a garden laboratory, a bakery, a restaurant, or a place for mixing colorful nature-inspired creations. Keeping the setup simple leaves plenty of room for new ideas.
Simple Mud Kitchen Activity Ideas
- Flower soup: Fill a bowl with water and add fallen petals, leaves, and herbs.
- Mud pies: Mix soil and water, then shape the mixture in old bowls or molds.
- Nature café: Arrange stones, leaves, petals, and pinecones as pretend menu items.
- Sand recipes: Layer dry sand with natural materials in small containers.
- Texture trays: Create separate trays containing stones, bark, sand, soil, and leaves for comparison.
Make the Mud Kitchen Blend Into Your Garden
The visual appeal of the inspiration setup comes partly from its surroundings. Instead of placing the play station in an empty area, it is surrounded by flowers, shrubs, herbs, gravel, timber, and mature greenery. This makes the kitchen feel like part of the landscape.
You can achieve a similar effect without recreating the exact arrangement. Use potted plants to soften the edges, add a gravel or stepping-stone path, and choose natural wood finishes. A few woven baskets can add warmth, while galvanized metal containers provide a practical rustic accent.
Soft neutral colors work especially well with garden settings. Natural timber, muted metal, terracotta pots, green foliage, and earthy soil create a palette that feels relaxed and timeless.
Practical Safety and Maintenance Tips
A mud kitchen is designed for messy play, but thoughtful planning makes the experience safer and easier to manage. Inspect the structure regularly and make sure the work surface and shelves remain stable. Smooth rough timber and remove protruding nails, screws, splinters, or damaged hardware.
Use sturdy, age-appropriate utensils and avoid sharp tools or fragile cookware. Natural materials should be checked before use, particularly sticks, stones, containers, and plant materials. Encourage hand washing after outdoor sensory play, especially before eating.
It is also helpful to establish a simple cleanup routine. Keep a dedicated basket for dirty utensils and allow wet materials to dry before storing them. Empty standing water regularly and keep the play station in reasonable condition between sessions.
How to Keep a DIY Mud Kitchen Interesting
You do not have to constantly add new toys to maintain interest. Small changes can make a big difference. Introduce a new collection of pinecones, add a different type of container, rearrange the storage baskets, or create a temporary flower-and-water station.
Seasonal materials are another easy way to refresh the space. Spring can bring petals and fresh greenery, summer can inspire flower-filled water play, autumn can introduce fallen leaves and seed pods, and winter can shift the focus toward sticks, bark, stones, and dry materials where appropriate.
Important: A mud kitchen becomes more valuable when children can change the materials themselves. Keep the basic structure consistent, but allow the loose parts, pretend recipes, and play themes to evolve naturally.
At a Glance
- Start with a sturdy outdoor work surface.
- Add safe cookware, spoons, scoops, bowls, and containers.
- Provide soil, sand, water, stones, leaves, petals, and sticks.
- Use crates and baskets for simple, accessible storage.
- Let the surrounding garden become part of the imaginative play experience.
Conclusion: Create a Mud Kitchen Full of Possibilities
A DIY mud kitchen can be as simple or detailed as you want, but its appeal comes from the freedom it gives children to explore. A wooden bench, a few well-loved utensils, some soil and sand, a basin of water, and a collection of natural materials can become an imaginative world in the garden.
The rustic design shown here demonstrates how practical play equipment can also become an attractive feature of an outdoor space. Wooden crates provide storage, hanging tools add character, plants soften the structure, and natural materials create endless opportunities for sensory exploration.
Most importantly, there is no need to make everything perfect. A little mess is part of the fun. Let the station evolve with the garden, rotate natural materials when inspiration strikes, and leave plenty of room for creative experimentation.
Whether you are planning a dedicated backyard play area or simply want to transform an unused outdoor corner, a homemade mud kitchen is a rewarding project to explore. Gather a few containers, collect some natural treasures, build a simple work surface, and let imaginative outdoor play begin.