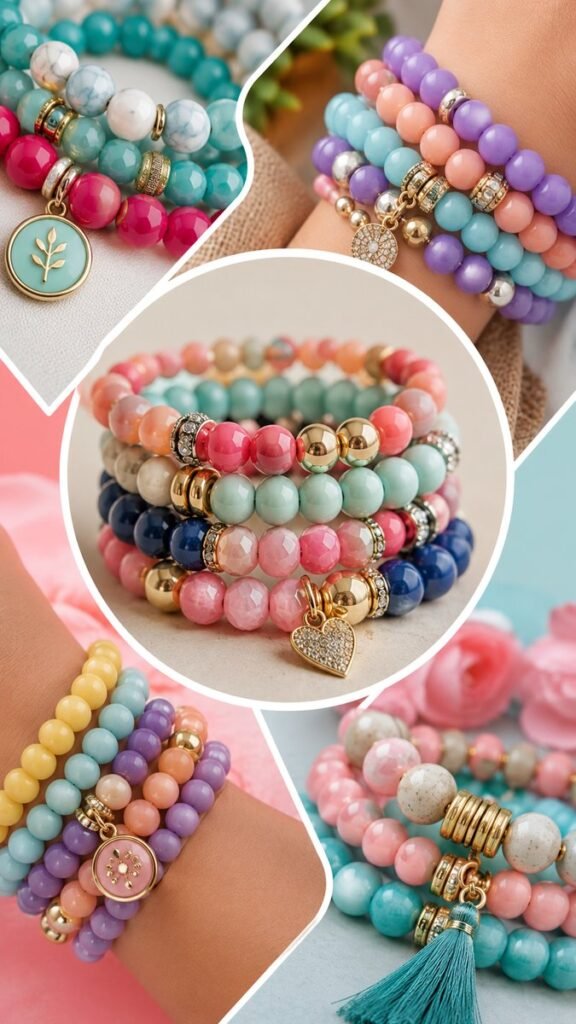
Beaded bracelets are one of the easiest ways to turn simple jewelry-making supplies into colorful, personalized accessories. With a handful of round beads, decorative accents, metallic spacers, and a little creativity, you can create stacks that feel playful, polished, and completely your own. Whether you prefer soft pastels, bright jewel tones, coastal-inspired colors, or mixed bead combinations, DIY beaded bracelets offer endless room for experimentation.
The ideas in this collection focus on colorful stretch bracelets featuring smooth beads, contrasting color combinations, elegant spacer beads, charms, and layered designs. They are especially inspiring if you want to make handmade jewelry for yourself, friends, gifts, craft projects, or a fun weekend activity.
Key Takeaways
- Stretch cord makes beaded bracelets simple to assemble and comfortable to wear.
- Pastel beads create a soft, cheerful look, while saturated colors make a bolder statement.
- Metallic spacers and decorative beads can give a simple bracelet a more finished appearance.
- Combining several colors lets you create personalized bracelets for different outfits and moods.
- Layering multiple bracelets adds dimension without requiring complicated jewelry-making techniques.
Why DIY Beaded Bracelets Are So Fun to Make
DIY beaded bracelets are appealing because they give you plenty of creative freedom without requiring an advanced jewelry-making skill set. The basic concept is straightforward: choose your beads, arrange them in a pleasing pattern, thread them onto elastic stretch cord, and secure the ends carefully.
The real creativity comes from the design. You can create a bracelet using one color family, alternate two shades, combine several contrasting colors, or add decorative focal beads between sections of smaller beads. The same basic materials can produce completely different results.
Important: The strongest bracelet designs usually have a simple visual idea. Instead of adding every decorative element you have, choose a small group of colors and accents that work together. A clear color story often makes handmade jewelry look more polished.
Choosing Beads for a Colorful Bracelet
The beads are the stars of your bracelet, so choosing a thoughtful combination is one of the most important parts of the process. The colorful examples shown here demonstrate how dramatically the mood can change when you switch between pastel, bright, and deeper shades.
Pastel Bead Combinations
Pastel beads are ideal when you want a soft and cheerful bracelet. Shades such as lavender, blush pink, mint, light blue, peach, and creamy white can be combined for a gentle palette. Pastels also work beautifully when several bracelets are worn together because they create a coordinated appearance without looking too heavy.
For an especially balanced design, choose three or four main pastel shades and repeat them throughout the bracelet. You can then add a few gold or silver spacer beads to provide contrast.
Bright and Playful Colors
Bright pink, turquoise, orange, purple, yellow, and red beads create a much more energetic look. These combinations are perfect when you want your handmade jewelry to stand out.
When working with vibrant colors, repetition can keep the design from feeling random. For example, alternate pink and turquoise beads, then place a metallic accent between small sections. Another option is to use one dominant color with two smaller accent colors.
Classic Neutral Accents
Neutral beads can make colorful bracelets easier to coordinate with everyday outfits. White, cream, gray, beige, and translucent beads can act as visual breaks between stronger colors.
Gold and silver-tone spacer beads are another easy way to introduce a more refined detail. A few metallic elements can make an otherwise simple stretch bracelet feel intentionally designed.
Essential Supplies for DIY Stretch Bracelets
You do not need a large collection of equipment to begin making beaded bracelets. A small selection of supplies is enough for many different designs.
- Stretch jewelry cord: Choose a suitable elastic cord designed for bracelets.
- Beads: Round glass, acrylic, stone-look, ceramic, or other craft beads can all create interesting results.
- Spacer beads: Metallic or textured spacers add contrast between larger beads.
- Decorative focal beads: Use these sparingly to create a visual centerpiece.
- Charms: Small decorative charms can personalize the bracelet.
- Scissors: Use sharp scissors to cut the stretch cord cleanly.
- Bead tray or small containers: These help keep colors and sizes organized while you work.
If you are making several bracelets at once, sorting your beads into small groups before stringing them can make the process faster and more enjoyable.
How to Make a DIY Beaded Stretch Bracelet
Once you have selected your colors and gathered your materials, the actual assembly can be surprisingly quick. The key is to plan your pattern before permanently securing the cord.
1. Plan Your Color Pattern
Start by arranging your beads on a flat surface. Try a few combinations before threading anything. You might create a repeating sequence, a gradual color transition, or a mostly single-color bracelet with decorative accents.
Lay the beads in a row so you can see how they look together. This simple step helps you spot colors that compete with one another before you begin.
2. Measure the Bracelet
Determine the approximate amount of stretch cord you need based on the intended wearer. Leave additional cord at both ends so you have enough material to tie and secure the finished bracelet.
A bracelet should be comfortable rather than extremely tight. Remember that the beads and their hole sizes can affect the final fit, so it is useful to test your arrangement before tying the cord.
3. String the Beads
Thread each bead onto the elastic cord according to your planned pattern. Keep the beads close together as you work, but avoid stretching the cord excessively.
If your bracelet includes a larger decorative bead or charm, consider placing it in the center. This creates an obvious focal point and gives the surrounding beads a supporting role.
4. Check the Design
Before securing the ends, hold the bracelet in a circle and inspect the arrangement. Look for gaps, accidental color clusters, or sections that feel visually unbalanced.
This is the easiest moment to make changes. Move beads around until the bracelet looks cohesive from every angle.
5. Secure the Ends Carefully
Once you are happy with the pattern, bring the ends of the elastic together and create a secure knot appropriate for your jewelry cord. Pull the knot firmly, but avoid damaging or overstretching the material.
Trim excess cord carefully after checking that the knot is secure. If your design allows it, the knot can be tucked inside a larger bead for a cleaner finish.
Creating Beautiful Bracelet Color Combinations
Color is one of the easiest ways to make a handmade bracelet look distinctive. You do not need complicated patterns to achieve an attractive result. Instead, focus on how the shades relate to one another.
- Use neighboring colors: Combine shades that naturally sit close together, such as pink, peach, and coral.
- Add a contrasting accent: Introduce a small amount of turquoise, purple, or another contrasting shade for visual energy.
- Repeat your accent: If one color appears as a focal bead, repeat that shade elsewhere to create cohesion.
- Balance light and dark: Pairing pale beads with deeper colors can add depth to the bracelet.
- Use metallic details sparingly: A few gold or silver accents can separate color groups without overwhelming them.
Expert Insight
Think of each bracelet as a tiny color palette. Choose one dominant shade, one or two supporting colors, and a small accent. This simple formula makes it easier to create coordinated designs even when you are working with many different beads.
Add Charms and Decorative Details
A charm can transform a basic strand of beads into a more personalized accessory. The designs shown in the collection use decorative focal elements and metallic details to create points of interest between the colorful beads.
When adding charms, think about placement. One larger focal charm can work well in the center, while several smaller accents can be spaced throughout the bracelet. Try not to crowd the design with too many focal elements.
Decorative spacer beads are another useful option. Textured, rhinestone-style, or metallic spacers can separate blocks of color and add a little sparkle without changing the overall simplicity of the bracelet.
Layering Beaded Bracelets for a Trendy Look
One bracelet can look lovely on its own, but stacking several coordinated bracelets creates a more expressive style. The colorful combinations in this collection are particularly suited to layering because different shades can complement one another.
For a cohesive stack, choose bracelets that share at least one color. For example, a lavender bracelet can be paired with a pastel pink and turquoise bracelet if each design includes a small amount of a related shade.
You can also vary bead sizes. A bracelet made with smaller beads can sit next to one featuring larger statement beads, creating texture and contrast.
Pro Tip: When stacking bracelets, let one piece be the visual star. If every bracelet has large charms and intense colors, the stack can become visually crowded. Combining one statement bracelet with simpler strands usually creates a more balanced result.
DIY Bracelet Ideas for Different Styles
Soft Pastel Bracelet
Combine lavender, blush pink, baby blue, and mint beads with a few silver-tone spacers. This palette creates a light, playful design that works especially well as part of a layered bracelet stack.
Colorful Rainbow-Inspired Bracelet
Arrange several bright bead shades in a repeating sequence. You can keep the pattern symmetrical or let the colors transition gradually from one shade to another. A simple metallic accent can help separate the colors.
Pink and Turquoise Bracelet
Pink and turquoise make a lively pairing. Use turquoise as the dominant color and introduce pink beads as accents, or divide the bracelet into balanced sections. Gold-tone details can warm up the combination.
Elegant Neutral and Metallic Bracelet
For a more understated design, combine cream, white, gray, or translucent beads with gold or silver-tone spacers. This approach works well when you want handmade jewelry that can complement a wide range of outfits.
Tips for Making Handmade Bracelets Look More Polished
Small design decisions can make a noticeable difference in the finished bracelet. A few thoughtful adjustments can turn a simple bead arrangement into something that looks carefully planned.
- Keep repeated patterns consistent.
- Use similar bead sizes when you want a clean, uniform appearance.
- Introduce different sizes when you want texture and dimension.
- Repeat important colors throughout the design.
- Use decorative beads as accents rather than filling every space.
- Inspect the bracelet from multiple angles before tying it.
- Make sure the finished knot is secure before wearing the bracelet.
Easy Ways to Personalize DIY Beaded Jewelry
One of the best things about making your own jewelry is the ability to customize every detail. You can select colors that match your wardrobe, create bracelets around seasonal palettes, or make coordinating pieces for friends and family.
Personalization can be as simple as choosing someone’s favorite colors. You can also create a set of bracelets where each piece has a slightly different pattern but shares the same overall palette.
For gifting, consider making several bracelets in complementary colors and presenting them as a small handmade collection. A coordinated group can feel more intentional than a single piece and gives the recipient options for mixing and matching.
At a Glance
- Choose a simple color palette before stringing.
- Use stretch cord for an easy bracelet-making project.
- Add metallic spacers or one focal charm for extra interest.
- Mix bracelet colors and bead sizes when creating a stack.
- Check the fit and knot security before wearing the finished piece.
Conclusion
DIY beaded bracelets are a creative, approachable way to make colorful handmade jewelry without needing an elaborate collection of tools. A few carefully selected beads can become a soft pastel accessory, a bright statement piece, an elegant neutral bracelet, or part of a fun layered stack.
The most important part is experimenting with color, spacing, bead size, and decorative accents until the design feels right. Start with a simple pattern, then gradually explore charms, metallic spacers, mixed colors, and layered combinations as your confidence grows.
Whether you are creating a bracelet for yourself, preparing a handmade gift, or simply looking for a relaxing craft project, these beaded bracelet ideas provide plenty of inspiration. Gather your favorite beads, create a color palette, and start building a bracelet that reflects your own style.
Tags
Beaded Bracelets Bracelet DIY DIY Jewelry Beading Ideas Stretch Bracelets Handmade Jewelry Jewelry Making Craft Ideas