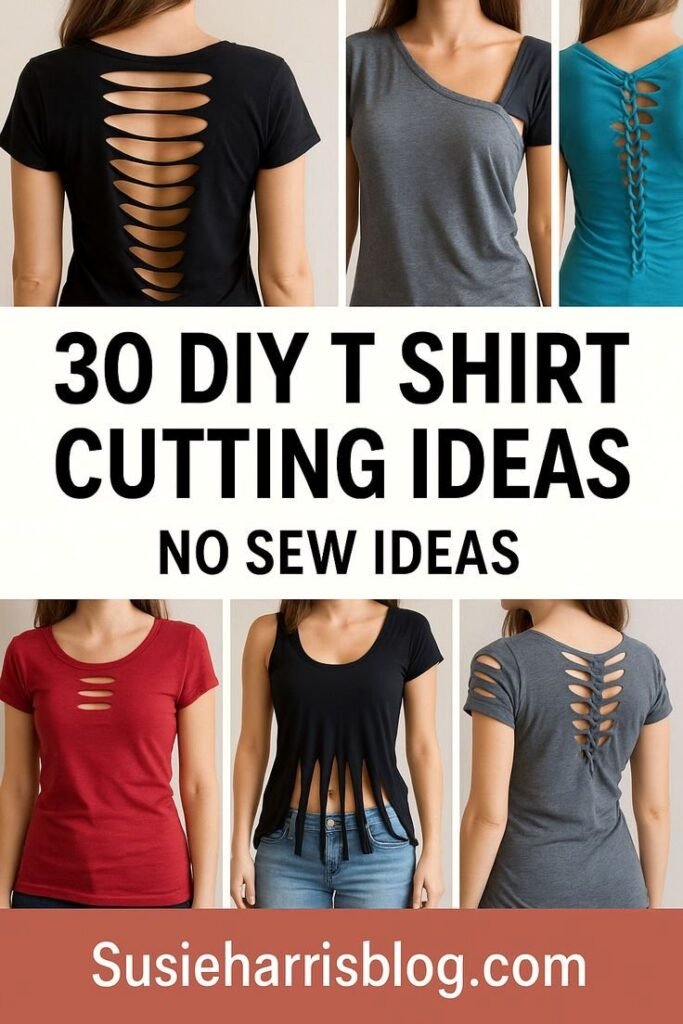
Old T-shirts do not have to stay in the back of your closet. With a pair of sharp fabric scissors and a little creativity, a basic tee can become a completely different piece of clothing. From bold back cutouts and lace-up details to playful fringe and simple front slits, DIY cut shirts offer an easy way to refresh your wardrobe without sewing.
Key Takeaways
- DIY shirt cutting is an easy way to customize plain T-shirts.
- No sewing machine is required for many simple designs.
- Back cutouts, lace-up details, slits, and fringe can create different looks.
- Always measure and mark your design before making permanent cuts.
- Practice on an old or inexpensive shirt before trying a favorite tee.
Why DIY Cut Shirts Are So Popular
DIY cut shirts combine creativity, affordability, and personal style in one simple project. A plain cotton T-shirt can look completely different after a few carefully placed cuts. You can make a design subtle and casual or create something much more dramatic with larger openings, fringe, or decorative shapes.
One of the biggest advantages is that many T-shirt cutting projects require no sewing. The fabric can often be cut directly with scissors, making these ideas accessible even if you have never used a sewing machine or worked with fabric before.
Important: The best shirt cutting designs are planned before the first cut. A few minutes spent measuring, marking, and checking the placement can make the difference between a polished DIY makeover and an uneven result.
These projects are also a practical way to give unworn clothing a second life. Instead of throwing away a shirt because the fit feels boring or the style is outdated, you can experiment with a new neckline, open back, side details, or a cropped silhouette.
30 DIY T-Shirt Cutting Ideas to Try
The designs shown in this collection demonstrate just how many directions you can take a simple tee. You do not need complicated equipment or advanced sewing skills. Start with an idea that matches your comfort level and gradually experiment with more detailed cuts.
1. Layered Back Cutouts
Create several horizontal openings down the back of a T-shirt for an edgy, eye-catching effect. Keep the cuts evenly spaced and similar in length for a clean appearance. This style works especially well on a relaxed-fit black or dark-colored tee.
2. Lace-Up Back Shirt
A lace-up back adds a decorative detail without requiring traditional sewing. Make paired openings down the back and connect them by weaving thin fabric strips through the openings. You can create a symmetrical pattern or adjust the spacing for a more relaxed look.
3. Braided Back Cut
For a more intricate design, narrow strips of fabric can be arranged into a braided or woven pattern. This gives a basic tee a handmade appearance while keeping the original shirt structure mostly intact.
4. Simple Front Slits
If you want an understated makeover, try a few short vertical or horizontal slits across the front. Small cuts can add visual interest without dramatically changing the overall shape of the shirt.
5. Decorative Chest Cutouts
Small horizontal openings across the upper front create a playful detail. Keep the openings narrow and evenly spaced if you want a neat, modern appearance. This is a good beginner project because you can start with just a few cuts.
6. Fringe Bottom Tee
Transform the bottom edge of a T-shirt into fringe by cutting multiple vertical strips upward from the hem. Keep the strips approximately the same width for an orderly look, or vary them slightly for a more relaxed handmade effect.
7. Long Fringe Crop
Combine a cropped silhouette with longer fringe for a bold casual style. Before cutting, decide how short you want the shirt to be and mark the desired hemline. Then create evenly spaced strips below that line.
8. Side Slit T-Shirt
Cutting slits along the sides can give a loose T-shirt more movement. This technique is particularly useful when you want to change the shape of an oversized shirt without removing large sections of fabric.
9. Open Shoulder Style
Cut around the shoulder area to create a casual open-shoulder effect. Work carefully around the seams because these areas help maintain the structure of the garment.
10. Cutout Sleeve Detail
Give short sleeves a fresh look by adding small decorative openings. A row of slits can create a subtle pattern while keeping the rest of the shirt simple.
11. Wide Neckline Makeover
A plain crew-neck T-shirt can be changed by carefully widening the neckline. Draw the shape first and make small cuts rather than removing too much fabric at once. You can always enlarge an opening, but you cannot easily restore fabric once it has been cut away.
12. Off-Shoulder Tee
For a relaxed, casual look, modify the neckline so it sits farther across the shoulders. This works particularly well with soft T-shirt fabric that naturally drapes around the upper body.
13. Back Triangle Cutout
A geometric cutout can create a modern focal point on the back of a shirt. Use a ruler to draw the shape before cutting so the edges remain balanced.
14. Diamond Cutout
Diamond-shaped openings offer another simple geometric option. Start with a small shape and enlarge it gradually if you want a more dramatic result.
15. Vertical Back Strips
Instead of horizontal openings, create vertical strips down the back. The strips can remain connected at the top and bottom, producing a structured cutout pattern.
16. Curved Back Slits
Curved cuts can make a design feel softer than straight geometric lines. Lightly sketch the curve with fabric chalk before cutting to help maintain a consistent shape.
17. Heart-Inspired Cutout
A simple heart-inspired opening can turn an ordinary tee into a playful statement piece. Keep the design centered and make sure both sides are balanced before cutting.
18. Starburst Slits
Arrange short cuts radiating outward from a central point for a starburst effect. This style can be used on the front, back, or sleeve depending on how noticeable you want the design to be.
19. Ladder Cut Design
A ladder-style pattern uses parallel strips connected at the sides. It creates a decorative open effect while preserving some of the original fabric.
20. Narrow Horizontal Slits
Small horizontal slits can be placed in rows for a subtle distressed effect. This is one of the easiest ways to experiment with T-shirt cutting because the individual cuts are small and simple.
21. Large Back Opening
For a bold transformation, remove a larger section from the back while leaving enough fabric around the edges to preserve the shirt’s shape. This approach works best when you have already practiced on another tee.
22. Double-Slit Side Design
Create two or more coordinated slits along each side for a balanced look. Matching the placement on both sides helps the finished shirt appear intentional.
23. Cropped T-Shirt
One of the simplest shirt modifications is cutting away part of the lower section to create a cropped silhouette. Try the shirt on first and mark the approximate length you prefer.
24. Cropped Fringe Tee
Take the cropped style one step further by turning the remaining lower edge into fringe. The combination adds texture and movement to an otherwise basic shirt.
25. Uneven Hem Design
An asymmetrical hem can create a less traditional silhouette. Instead of cutting in a perfectly straight line, create a gentle diagonal or uneven shape that suits the style of the shirt.
26. Deep Side Cut
A deeper side opening can make an oversized tee feel looser and more relaxed. If the opening becomes large, consider how you will layer the shirt and how much coverage you want.
27. Multiple Sleeve Slits
Add several narrow openings to the sleeve for a distressed, textured effect. Space them carefully so the sleeve remains comfortable and visually balanced.
28. Back-and-Side Combination
Combine two simple techniques rather than trying to create one complicated design. For example, a few back slits can be paired with small side openings for a coordinated makeover.
29. Minimalist Cut Detail
You do not need dozens of cuts to make a shirt interesting. One carefully placed opening can become the focal point while keeping the overall design clean and wearable.
30. Mix-and-Match Custom Shirt
Once you understand the basic techniques, combine your favorites. Try a cropped hem with side slits, a decorative back with modified sleeves, or a simple front detail paired with a more dramatic back design.
Expert Insight
The strongest DIY T-shirt designs usually have one clear focal point. If the back already has a detailed lace-up or cutout pattern, keep the front and sleeves relatively simple. Balance makes a homemade makeover look more intentional.
What You Need for DIY Shirt Cutting
One reason these projects are so approachable is that the supply list is short. You can begin with basic items already found around the house.
- A clean T-shirt you are comfortable modifying
- Sharp fabric scissors
- Fabric chalk or a washable marking tool
- A ruler for straight lines and even spacing
- A flat, clean work surface
- Optional paper or cardboard for creating templates
Sharp scissors are especially useful because they make cleaner cuts and reduce the need to repeatedly snip the fabric. Dull scissors can create uneven edges and make simple patterns harder to control.
How to Cut a T-Shirt Without Sewing
The easiest way to approach a no-sew shirt makeover is to work slowly. Start by washing and drying the shirt according to its normal care instructions. Place it flat and smooth out wrinkles before measuring your design.
- Choose the cutting pattern you want to create.
- Lay the T-shirt flat on a stable surface.
- Use chalk to mark the lines, openings, or hem.
- Measure both sides when symmetry is important.
- Cut small sections first and check the result.
- Stretch the fabric gently to see how the openings settle.
- Trim uneven edges carefully if necessary.
- Try on the finished shirt and evaluate the fit.
Pro Tip: When working with stretchy T-shirt fabric, remember that a small cut can open up more after the fabric is gently stretched. Start conservatively and enlarge the design gradually rather than cutting a large opening immediately.
How to Make Your Cut Shirt Look More Professional
The difference between a rushed project and a polished DIY shirt often comes down to preparation. Even the simplest cutting pattern can look intentional when the spacing, proportions, and placement are consistent.
Measure Before You Cut
If you are creating multiple slits, use a ruler to mark their positions. Equal spacing creates a cleaner appearance, particularly for ladder designs, horizontal back cutouts, and repeated sleeve details.
Use a Template for Shapes
For hearts, diamonds, triangles, or other geometric designs, create a paper template first. Place it on the shirt and trace around it. This is easier than trying to freehand a complicated shape directly onto the fabric.
Think About the Fabric
Different T-shirts behave differently after cutting. Lightweight and stretchy fabrics may curl or relax around the cut edges, while thicker fabric can maintain a more defined shape. Consider the existing texture and fit before selecting a dramatic design.
Practice on an Old Shirt
If you are trying a complicated cutting technique for the first time, practice on a shirt you no longer wear. This lets you understand how the fabric responds and helps you become more confident with the scissors.
Styling Your DIY Cut Shirts
A customized T-shirt can become a versatile part of a casual wardrobe. Pair a simple cut shirt with jeans or denim shorts for an everyday outfit. A cropped design can work well with high-waisted bottoms, while an open-back style can be layered over a fitted tank top for additional coverage.
Color can also change the entire mood of a design. A black shirt can give dramatic back cutouts a bold appearance, while red, gray, teal, white, and other colors can create a softer or brighter result.
Accessories can be kept simple when the shirt itself has a detailed design. If the cut pattern is subtle, you can add jewelry, a hat, a belt, or a favorite pair of shoes to complete the outfit.
Common DIY T-Shirt Cutting Mistakes to Avoid
Cutting fabric is permanent, so a little patience goes a long way. Avoid starting with oversized openings or complicated patterns if you are new to DIY clothing.
- Do not cut before checking the shirt’s placement and fit.
- Avoid cutting through important seams unless the design specifically requires it.
- Do not remove large sections before testing a smaller version.
- Avoid uneven spacing when creating repeated patterns.
- Do not assume every fabric will react the same way after cutting.
- Keep your cutting surface flat and free of objects that could interfere with the scissors.
It is also helpful to remember that perfection is not always necessary. Many distressed and fringe styles are intentionally relaxed. The goal is to create a design that looks purposeful and suits your personal style.
A Simple Way to Plan Your First Shirt Makeover
If you are unsure where to begin, choose one area of the shirt and one technique. For example, start with three or four small horizontal back slits. Once you are comfortable with the result, you can experiment with more openings or combine techniques.
Another useful approach is to sketch your idea on paper before touching the shirt. Draw the front and back of a basic T-shirt and mark exactly where you want the cuts. This gives you a visual reference and makes it easier to identify areas that may look too crowded.
Quick reminder: A successful DIY cut shirt does not need to be complicated. A simple, well-placed design can have more impact than a shirt covered in random cuts.
Quick Points
- Start with an old T-shirt when learning.
- Mark every design before making permanent cuts.
- Use sharp scissors for cleaner edges.
- Begin with small openings and enlarge them gradually.
- Balance detailed cutouts with simple styling.
Final Thoughts on DIY Cut Shirts
DIY cut shirts are a fun way to turn simple T-shirts into personalized wardrobe pieces. With basic tools, thoughtful planning, and a willingness to experiment, you can create everything from subtle slit details to bold open-back designs, lace-up patterns, fringe hems, and cropped silhouettes.
The key is to start small and let your creativity develop as you gain confidence. Measure before cutting, pay attention to the natural stretch of the fabric, and remember that you can always make an opening larger later. You cannot undo a cut once it has been made.
Whether you are refreshing an old favorite or customizing a plain tee for a completely new look, these no-sew T-shirt cutting ideas provide plenty of inspiration. Choose a design that fits your style, gather your scissors, and give an ordinary shirt a creative second life. Save your favorite ideas so you can come back to them whenever your wardrobe needs a fresh DIY makeover.