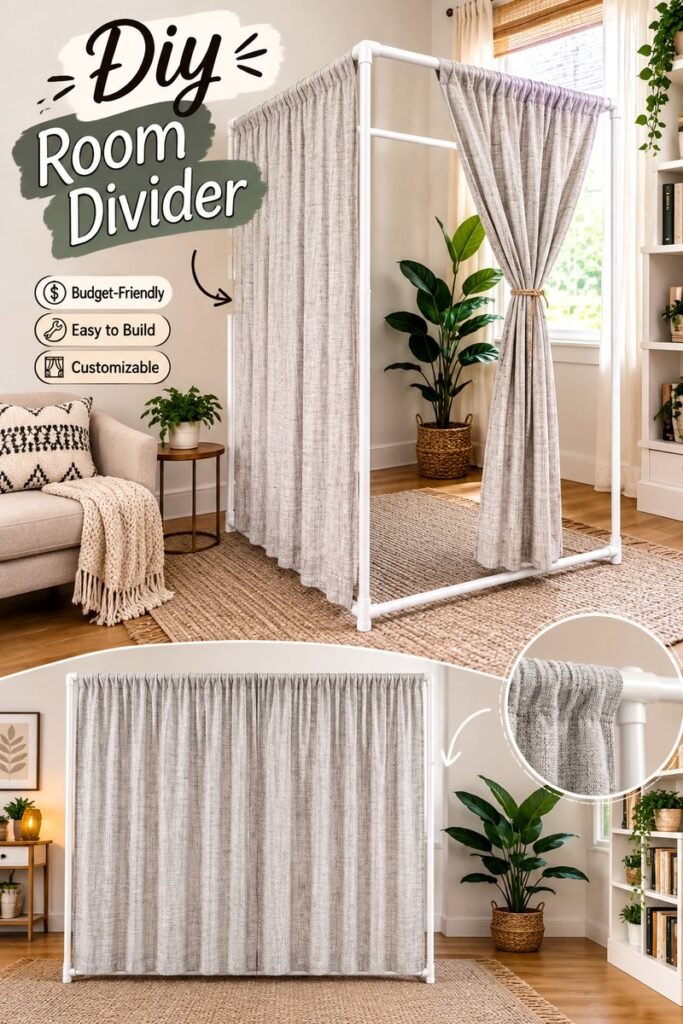
A DIY room divider can be one of the simplest ways to make an open room feel more organized, private, and intentional. Instead of committing to a permanent wall, a lightweight fabric divider gives you the flexibility to separate areas while keeping the room bright and visually connected. The design shown here pairs a simple white frame with soft neutral fabric, creating a practical solution that also feels polished enough to become part of the decor.
This type of room divider works especially well in bedrooms, studio apartments, home offices, shared spaces, dressing areas, and multipurpose rooms. The neutral palette blends easily with modern, Scandinavian, minimalist, and cozy interiors, while the curtain-style panels can be adjusted whenever you want to open or close the space.
Key Takeaways
- A freestanding divider can define separate zones without permanent construction.
- Fabric panels add privacy while keeping the overall look soft and inviting.
- A simple frame can be customized with different fabrics, colors, and dimensions.
- Neutral materials make the divider easy to coordinate with existing furniture.
- The design can work in bedrooms, living rooms, offices, studios, and shared spaces.
Why a DIY Room Divider Is Worth Trying
Open-concept rooms are flexible, but they can sometimes feel difficult to organize. A living area may need to double as a workspace, a bedroom may share space with a dressing area, or a studio apartment may need clearly defined zones. A room divider solves this visual problem without requiring a major renovation.
Unlike a fixed partition, a freestanding divider can be moved, repositioned, or redesigned as your needs change. That flexibility is particularly useful when you rent, frequently rearrange furniture, or simply enjoy refreshing your home from time to time.
Important: The best room divider does more than block a view. It should help define how a space is used while still supporting the room’s overall style. Choosing a fabric and frame that coordinate with the surrounding furniture makes the divider feel like intentional decor rather than an afterthought.
The Look: Simple, Soft, and Modern
The inspiration behind this design is its combination of structure and softness. The white frame creates a clean architectural outline, while the fabric curtains soften the appearance and add warmth. Together, these elements create a divider that feels functional without looking bulky.
The neutral fabric is another important design choice. Light beige, cream, taupe, gray, and oatmeal shades can complement a wide range of interiors. They also work beautifully with natural textures such as woven baskets, jute rugs, wooden furniture, linen upholstery, and indoor plants.
For a more contemporary look, choose a fabric with a subtle geometric, herringbone, striped, or textured pattern. If your room already has several patterns, a solid neutral curtain may create a calmer visual balance.
Why Neutral Fabric Works So Well
Neutral fabric has a practical advantage beyond its appearance. It does not compete heavily with surrounding furniture or artwork, so the divider can become a visual backdrop rather than the main focal point. This makes it easier to update other elements of the room later.
- Light neutrals: Help maintain an airy, open feeling.
- Warm beige tones: Add softness and a cozy atmosphere.
- Gray neutrals: Work well with contemporary interiors.
- Textured fabrics: Add visual interest without requiring bold colors.
- Subtle patterns: Give the divider personality while remaining versatile.
How to Plan Your DIY Room Divider
Before building or assembling anything, think about what you want the divider to accomplish. Is the primary goal privacy, visual separation, decoration, or a combination of all three? Your answer will influence the width, height, fabric coverage, and placement.
1. Decide Where the Divider Will Go
Start by identifying the exact area you want to separate. A divider can sit between a bed and a living space, behind a desk, beside a dressing area, or across part of an open room. Avoid placing it where it interferes with doors, windows, walkways, or frequently used furniture.
Use painter’s tape on the floor to outline the approximate footprint. This simple step makes it much easier to visualize the divider before you commit to its final position.
2. Measure the Available Space
Measure the width and height of the area carefully. Remember that curtains need enough material to create natural folds, so the finished fabric width should not necessarily match the exact width of the frame.
Also consider the scale of the room. A very tall or wide divider can become visually dominant in a small space, while a narrow divider may not provide enough separation in a larger room.
3. Choose the Frame Style
A simple white pipe-style frame creates the clean appearance seen in this concept. The advantage of a lightweight freestanding frame is that it keeps the divider visually simple and allows the fabric to do most of the decorative work.
Whatever frame material you choose, make sure it is appropriately sturdy for its size and intended use. A divider should remain stable when curtains are opened, closed, or gently moved.
4. Select the Curtain Fabric
Fabric is where you can make the design truly personal. Look for a material that fits the atmosphere you want to create and is practical for the room where the divider will be used.
- Choose a light, airy fabric when you want separation without making the room feel closed in.
- Select a denser textile when privacy is more important.
- Use a subtle pattern to add character to a minimalist room.
- Pick a washable or easy-care material for frequently used spaces.
- Coordinate the fabric with existing rugs, cushions, curtains, or upholstery.
Expert Insight
Think of the divider as a piece of furniture rather than simply a barrier. Repeating one or two colors or textures from the rest of the room helps the new element feel integrated. A neutral curtain paired with wood, woven textures, and greenery can create a particularly relaxed and cohesive look.
Creative Ways to Use a DIY Room Divider
The beauty of a freestanding room divider is that it does not have to serve only one purpose. Once you have a suitable frame and curtain system, you can adapt the concept to different parts of your home.
Create a Cozy Bedroom Zone
In a studio apartment or open-plan bedroom, a fabric divider can visually separate the sleeping area from the rest of the room. Closing the curtain creates a more intimate atmosphere, while opening it restores the feeling of a larger room.
Pair the divider with soft bedding, a textured rug, warm lighting, and a small bedside table for a comfortable retreat. Keeping the colors consistent helps the entire zone feel intentional.
Define a Home Office
A room divider can also establish a dedicated work zone without permanently changing the layout. Position it behind or beside a desk to create visual boundaries between work and relaxation.
This can be particularly helpful in multipurpose rooms where a desk shares space with a living area. When the workday ends, closing the curtain can provide a simple visual cue that the workspace is separate from the rest of the room.
Build a Dressing Area
Place a divider near a wardrobe or clothing rack to create a compact dressing zone. A fabric panel provides a softer alternative to an exposed clothing area and can make a bedroom feel more organized.
Separate a Shared Room
In a shared bedroom, playroom, or multipurpose space, a divider can help establish individual zones. Each side can have its own furniture arrangement while the curtain provides a degree of visual separation.
How to Make the Divider Look More Expensive
A DIY project does not have to look homemade. Small design decisions can make a simple room divider appear much more polished.
Use Full-Length Fabric
Floor-length curtains generally create a more finished appearance than short panels. They visually emphasize the height of the room and create elegant vertical lines.
Keep the Hardware Consistent
A clean, simple frame looks best when the connectors and supporting pieces have a consistent finish. White or softly colored components can blend into light interiors, while darker finishes can create a stronger contemporary contrast.
Add Gentle Texture
Texture is especially useful when working with neutral colors. Linen-look fabric, woven rugs, baskets, boucle upholstery, and natural wood can keep a pale color scheme from feeling flat.
Repeat the Curtain Color
If possible, repeat the curtain color somewhere else in the room. A cream cushion, beige rug, or soft taupe accessory can subtly connect the divider to the rest of the decor.
Pro Tip: If the room already contains several decorative elements, resist the urge to make the divider overly complicated. A simple frame, well-chosen fabric, and thoughtful placement often create a stronger result than layers of extra decoration.
Ways to Customize Your DIY Room Divider
One of the biggest advantages of creating your own divider is the freedom to customize it. The same basic concept can look completely different depending on the textile and finishing details.
- For minimalist decor: Use plain cream, white, or light gray fabric.
- For boho interiors: Try woven textures, warm neutrals, or natural-looking materials.
- For modern rooms: Choose crisp fabrics with subtle geometric patterns.
- For cozy spaces: Use warmer beige, oatmeal, or taupe tones.
- For playful rooms: Introduce a soft stripe or understated pattern.
You can also change the curtain arrangement. Keep the panels fully closed for maximum visual separation, pull them to one side when you want an open passage, or gather one section to create a decorative focal point.
Common DIY Room Divider Mistakes to Avoid
Even a simple project benefits from a little planning. Avoid making the divider unnecessarily large for the room, especially if the space is already compact. The goal is to define an area, not make the room feel boxed in.
Another common mistake is ignoring the surrounding color palette. A divider can become visually disconnected if its fabric introduces a color or pattern that appears nowhere else in the room. When in doubt, choose a neutral shade that complements existing materials.
Finally, consider stability. A freestanding divider needs a balanced base and an appropriately constructed frame. If the divider is tall or wide, pay particular attention to how it stands on the floor and how easily it could tip when the curtain is moved.
Decorating Around Your Room Divider
Once the divider is installed, style the surrounding area as though it were a permanent part of the room. A woven basket, leafy houseplant, neutral rug, or comfortable chair can reinforce the warm and relaxed aesthetic.
Natural textures work particularly well with fabric room dividers. Wood flooring, jute-style rugs, woven storage, and greenery can create a layered look without overwhelming the simple structure.
Lighting also matters. Soft lamps or warm ambient lighting can make the fabric appear more inviting in the evening. During the day, placing the divider near natural light can help the space remain bright while still providing visual separation.
A Simple Approach to a More Functional Home
The most appealing room divider ideas are not necessarily the most complicated. This concept demonstrates how a straightforward frame and curtain can transform the way a room is organized. Instead of building a wall, you create a flexible visual boundary that can evolve with your lifestyle.
That flexibility is what makes DIY room dividers so useful. You can change the fabric when you redecorate, move the divider when your furniture arrangement changes, or open the panels completely when you want the room to feel spacious again.
For renters and homeowners alike, this makes a freestanding divider an approachable way to experiment with room layouts without committing to permanent structural changes.
At a Glance
- Use a divider to create clear zones in an open room.
- Choose neutral fabric for a versatile, timeless appearance.
- Measure carefully before deciding on the frame size.
- Coordinate textures and colors with nearby furniture.
- Keep the structure stable and easy to reposition.
Final Thoughts on DIY Room Divider Ideas
A DIY room divider is a smart decorating solution when you want more structure, privacy, or visual definition without permanently closing off a room. A simple freestanding frame paired with soft curtains can make an open space feel more purposeful while preserving the flexibility that makes open layouts appealing.
The neutral, fabric-focused approach is especially versatile. It can complement cozy living rooms, modern bedrooms, studio apartments, dressing spaces, and home offices while giving you plenty of opportunities to personalize the final look.
Start with the function of the space, measure carefully, choose a fabric that complements your decor, and keep the overall design simple. With the right proportions and styling, even a basic DIY room divider can become a beautiful and useful feature in your home.
The key is balance: create enough separation to make each area feel purposeful, but keep enough openness for the room to remain comfortable and connected. That is what turns a practical divider into a thoughtful piece of home decor.
Tags
DIY Room Divider Room Divider Ideas DIY Home Decor Small Space Ideas Apartment Decor Home Organization Space Saving Ideas Room Makeover