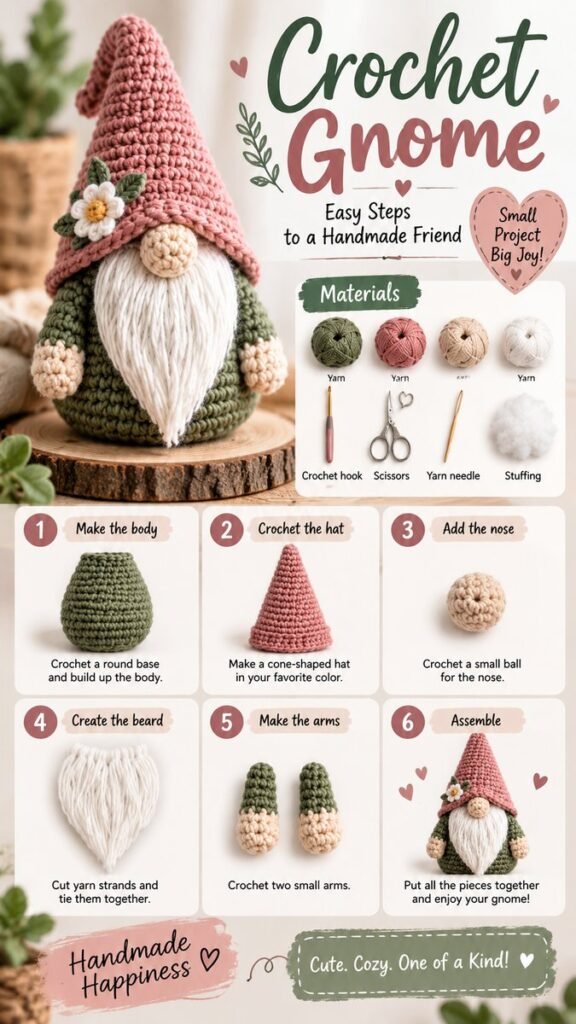
If you love cozy handmade decorations, a crochet gnome is one of those projects that is hard to resist. With a rounded green body, a tall dusty-rose hat, a soft cream beard, and a tiny crocheted nose, this charming DIY craft has plenty of personality without requiring a complicated design. The beauty of making gnomos DIY is that you can keep the colors simple and classic or personalize every little detail to match your home, favorite season, or gifting style.
This project is especially appealing because it breaks the gnome into manageable pieces. The body, hat, nose, hands, and beard can each be created separately before everything is assembled into one adorable finished decoration. Whether you are an experienced crocheter or looking for a creative beginner-friendly project, this crochet gnome offers a satisfying way to practice basic yarn-craft techniques while creating something you can proudly display.
Key Takeaways
- A crochet gnome can be made from a few simple, recognizable components.
- Soft green, blush pink, cream, and beige create a warm handmade color palette.
- The beard adds texture and gives the finished gnome its signature character.
- Small details such as flowers, leaves, and hat trims make each creation unique.
- The finished gnome works beautifully as seasonal decor, a handmade gift, or a cozy craft-room accent.
Why Crochet Gnomos Are So Charming
Gnomos DIY projects have become a favorite among crafters because they combine playful shapes with comforting handmade textures. A crochet gnome does not need a detailed face or complicated accessories to look expressive. The oversized hat, round nose, fluffy beard, and compact body do most of the work.
The pictured style uses a particularly inviting combination of colors. The deep sage-green body creates a natural foundation, while the muted pink hat adds a cheerful accent. Cream yarn softens the design through the beard, and beige details bring warmth to the nose and hands. Small floral embellishments introduce another layer of personality.
Another reason this style works so well is its versatility. You can create one gnome for a shelf, several for a seasonal display, or a collection in different colors. Changing only the hat color can completely transform the personality of the finished piece.
Materials for a DIY Crochet Gnome
A project like this can be approached with a relatively simple craft setup. The visual guide highlights worsted-weight yarn, a 4.0 mm crochet hook, a yarn needle, scissors, stuffing, and an optional stitch marker. You can adapt the yarn colors to your preferred palette while keeping the overall contrast between the body, hat, nose, and beard.
- Worsted-weight yarn: Choose green for the body, pink or another favorite shade for the hat, beige for the nose and hands, and white or cream for the beard.
- Crochet hook: A 4.0 mm hook is shown in the guide and is a practical size for this type of yarn.
- Yarn needle: Useful for weaving in loose ends and attaching individual pieces.
- Scissors: Keep a sharp pair nearby for trimming yarn cleanly.
- Stuffing: Use soft fiber filling to give the body and small crocheted components their shape.
- Stitch marker: This is optional but helpful when working in continuous rounds.
Before beginning, gather all of your materials in one place. Having the yarn colors, hook, stuffing, scissors, and needle ready makes the process more enjoyable and helps prevent interruptions once you get into a rhythm.
Important: Consistent tension is one of the easiest ways to improve the appearance of a stuffed crochet project. Try to keep your stitches even as you work, especially around the body, so the finished shape remains smooth and balanced.
Step 1: Crochet the Gnome Body
The body creates the foundation for the entire gnome. In the pictured design, it has a rounded, slightly tapered shape that becomes wider through the middle and narrows toward the top. This silhouette gives the finished decoration a stable, friendly appearance.
The body is worked in green yarn using rounds of single crochet and increases or decreases to shape the form. Once the crocheted shell reaches the desired size, it is filled with stuffing. Add the stuffing gradually rather than putting everything in at once. This makes it easier to distribute the filling evenly and prevent noticeable lumps.
Getting the Shape Right
A firm but flexible fill usually works well for a decorative gnome. The body should be sturdy enough to stand upright but not so tightly packed that the stitches stretch dramatically. Check the shape as you fill it and adjust the stuffing before closing the piece.
Step 2: Make the Oversized Crochet Hat
The tall pointed hat is arguably the most recognizable feature of the gnome. The reference style uses dusty pink yarn and a long tapered shape that sits over the upper portion of the green body. This contrast makes the hat immediately noticeable and gives the finished gnome its whimsical character.
Work the hat in rounds, gradually increasing the number of stitches until the cone reaches the desired width. Continue building the height before finishing the lower edge. Leaving a long yarn tail can make later assembly easier.
Do not worry if your first hat is slightly different from another one. Handmade pieces naturally have subtle variations, and those variations are part of the appeal. You can also experiment with stripes, neutral colors, textured stitches, or a contrasting brim.
Step 3: Crochet the Nose and Hands
The nose is made as a small beige crocheted ball. Its rounded shape provides a focal point above the beard and creates the suggestion of a face without needing eyes or other facial details.
The hands are also small crocheted pieces. In the illustrated design, they use beige yarn for the hand portion and connect visually with the green sleeves. Because these pieces are small, they can be completed relatively quickly and are a good opportunity to practice working in tight rounds.
Keep Small Pieces Consistent
When making two matching hands, pay attention to their size and stuffing. Creating the first hand and then using it as a visual reference for the second can help keep the pair balanced.
Step 4: Create the Soft Yarn Beard
The beard is where this crochet gnome really comes to life. Instead of creating a traditional crocheted surface, the design uses strands of white yarn to create a soft, flowing beard. This simple technique adds movement and a fluffy texture that contrasts beautifully with the structured crochet stitches.
Cut several strands of white or cream yarn to approximately the same length. The strands can be knotted together near the top and attached beneath the nose. Once secured, trim the ends into the shape you prefer. A pointed or gently rounded beard complements the tapered gnome silhouette particularly well.
Pro Tip: For a fuller-looking beard, vary the placement of the yarn strands slightly instead of arranging every strand in a perfectly straight row. A little natural variation creates a softer, more dimensional handmade texture.
Step 5: Assemble the Crochet Gnome
Once the individual components are finished, the project becomes an assembly exercise. Position the hat over the body, place the nose at the front, attach the hands to the sides, and secure the beard beneath the nose. Take your time with positioning because even small changes can affect the personality of the finished gnome.
- Place the hat over the top of the stuffed body.
- Position the nose near the lower edge of the hat.
- Attach the beard directly beneath the nose.
- Secure one hand to each side of the body.
- Weave in and trim any visible yarn ends.
- Add optional decorative details such as flowers or leaves.
The floral decoration shown on the hat adds a particularly sweet finishing touch. Small crocheted flowers and leaves can be attached near the brim, on the body, or wherever you want a little extra color. These details are optional, so the gnome can remain simple if you prefer a minimalist look.
How to Personalize Your Gnomos DIY Project
One of the best things about gnomos DIY crafts is how easy they are to customize. The basic structure can stay the same while the colors and decorations change dramatically. This makes the project ideal for building a coordinated collection.
Experiment With Color
Try earthy greens and browns for a natural woodland-inspired look. Soft blush, cream, and sage create a gentle cottage-style palette. For a brighter craft-room display, choose cheerful shades for the hats and contrasting bodies. Neutral beige, ivory, and gray can also create an understated version that works with modern interiors.
Change the Hat Details
The hat can become the main feature of your design. Add a contrasting brim, a small flower, a leaf, a pom-pom, or a simple color-blocked pattern. You can also make several hats in different colors and create a small collection of gnomes that feel related without looking identical.
Play With Beard Length
A shorter beard creates a compact, tidy appearance, while longer strands give the gnome a softer and more dramatic silhouette. Trim the beard gradually so you can see how the proportions change before cutting away too much yarn.
Why This Matters
The charm of a handmade gnome comes from personalization. You do not need every piece to look identical. Small changes in yarn color, beard shape, hat decoration, and proportions can turn the same basic idea into a completely different character.
Tips for a Neater Crochet Finish
A few simple habits can make your crochet gnome look much more polished. First, keep your tension as consistent as possible. Uneven tension can cause the body to appear lumpy or make the hat lose its clean cone shape.
- Count stitches regularly when working in rounds.
- Use a stitch marker if you find it difficult to identify the beginning of a round.
- Stuff gradually and shape the body with your fingers as you work.
- Leave enough yarn for sewing pieces securely into place.
- Hide loose ends carefully inside the project whenever possible.
- Check the placement of every component before permanently attaching it.
It is also helpful to pause during assembly and look at the gnome from several angles. A nose or beard that appears centered from the front may look slightly off from the side. A few extra moments of positioning can make a noticeable difference in the finished piece.
Creative Ways to Display a Crochet Gnome
A finished crochet gnome can be used in many corners of the home. Place one on a bookshelf, entryway table, craft-room shelf, mantel, or small decorative tray. Its compact size makes it easy to incorporate into existing displays without taking over the space.
You can also create a small group using different hat colors. Arrange several gnomes together with baskets, plants, books, wooden accents, or other handmade decorations. Keeping a consistent color palette will help the collection feel intentional.
These handmade pieces can also make thoughtful gifts for friends and family members who appreciate crochet, cozy decor, or handmade crafts. Because the design is customizable, you can select colors that reflect the recipient’s style and add a small personal detail to make the gift feel even more special.
At a Glance
- Style: Cozy, whimsical, handmade crochet decor
- Main pieces: Body, hat, nose, beard, hands, and decorative details
- Palette: Sage green, dusty pink, cream, and beige
- Best feature: The soft yarn beard and oversized pointed hat
- Personalization: Colors, beard length, hat decorations, and embellishments
Final Thoughts on This Cozy Gnomos DIY Idea
A crochet gnome is a wonderful example of how a few simple handmade components can come together to create something full of character. The rounded body provides a sturdy base, the pointed hat adds personality, the yarn beard brings softness and texture, and the tiny nose and hands complete the playful silhouette.
What makes this project especially enjoyable is the freedom to make it your own. Follow the basic structure, then experiment with colors, textures, proportions, and decorative accents. A sage-green body with a dusty-pink hat creates a gentle, cozy look, but your own favorite palette may produce an entirely different personality.
Whether you are making your first crochet gnome or adding another handmade character to your collection, this DIY project is a lovely way to slow down, work with your hands, and create something unique. Gather your favorite yarn, choose a cheerful hat color, and enjoy the process of turning simple stitches into a charming piece of handmade decor.
Ready to create your own cozy crochet gnome? Start with your favorite yarn colors, keep the shapes simple, and let the little details bring your handmade character to life.
Tags
Gnomos DIY Crochet Gnome Crochet DIY Yarn Crafts DIY Home Decor Easy Crochet Handmade Crafts Crochet Projects