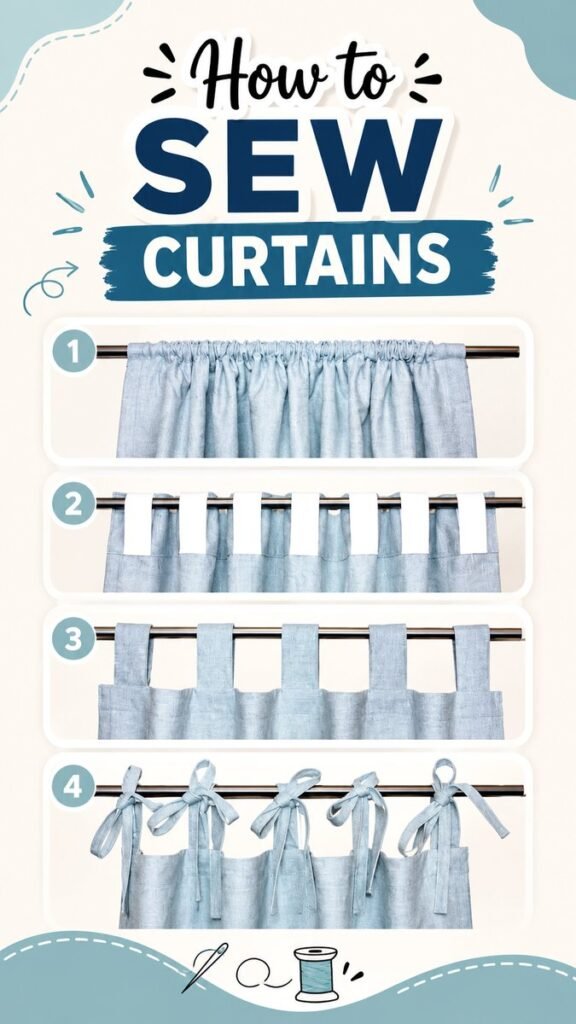
DIY curtains are one of the easiest ways to give a room a fresh, personalized look without completely changing the space. With a few basic sewing skills, some suitable fabric, and careful measuring, you can create window treatments that fit your style and your windows beautifully. The most appealing part of making curtains yourself is the flexibility. You can choose the fabric, length, fullness, and hanging style instead of settling for whatever is available in a store.
The simple curtain styles shown here demonstrate several practical ways to attach fabric to a curtain rod. From a classic gathered rod pocket to fabric tabs and charming tied tops, each method creates a different look while using the same basic concept: prepare the fabric, finish the edges, create a way to hang it, and slide or tie it onto the rod.
Key Takeaways
- Measure your window before buying or cutting fabric.
- Choose a curtain style that matches the look you want.
- Finish raw fabric edges for a cleaner, longer-lasting result.
- Allow enough fabric width for attractive folds and fullness.
- Press seams as you sew for a more polished finish.
- Simple DIY curtains can be adapted to bedrooms, living rooms, kitchens, and other spaces.
Why Make Your Own DIY Curtains?
Ready-made curtains can be convenient, but sewing your own gives you much more control. You can coordinate your window treatments with existing furniture, bedding, rugs, wall colors, or seasonal decor. Even a simple piece of linen-look or cotton fabric can become a beautiful curtain with the right finishing details.
DIY curtains can also be a useful sewing project for beginners. Unlike complicated garments, curtains are generally made from straightforward rectangular fabric pieces. There are no sleeves, fitted curves, zippers, or complicated shaping to worry about. That makes them a practical project for building confidence with measuring, cutting, straight stitching, hemming, and pressing.
One of the biggest advantages of homemade curtains is that the hanging style can completely change the finished appearance. A gathered rod pocket feels classic and soft, fabric tabs create a relaxed modern look, and tied tops add a casual handmade detail. Choosing the right heading style is just as important as choosing the fabric.
Four Simple Curtain Hanging Styles
The visual examples present four approachable curtain-top designs. Although they look different, the construction principles are easy to understand. Start by deciding which appearance best suits your room, then adapt your measurements and fabric accordingly.
1. Classic Rod Pocket Curtains
A rod pocket is one of the simplest ways to sew curtains. The fabric is folded and stitched near the top to create a horizontal channel. The curtain rod slides directly through this pocket, producing the gathered appearance commonly associated with traditional curtains.
This style works especially well when you want a soft, uncomplicated window treatment. Once the curtain is gathered onto the rod, the fabric naturally forms folds across the width. The amount of gathering depends on the relationship between the curtain width and the window or rod width.
How to Create the Rod Pocket
- Measure the finished curtain width and length you need.
- Cut the fabric while keeping the grain straight.
- Finish the side and bottom edges with suitable hems.
- Fold the top edge toward the wrong side of the fabric.
- Press the fold carefully so the pocket stays even.
- Stitch across the fabric to form the channel.
- Slide the curtain rod through the finished pocket.
For a more tailored result, keep the top fold consistent across the entire curtain. Pressing before stitching is especially helpful because it creates a clear fold line and makes sewing much easier.
2. Tab Top Curtains
Tab top curtains use separate strips or loops of fabric attached along the upper edge. The curtain rod passes through these tabs, leaving sections of the rod visible between them. This creates a neat, casual appearance that works well in relaxed interiors.
The tabs can be made from the same fabric as the curtain panel or from a coordinating material. Keeping them evenly spaced helps the finished curtain hang neatly. If you are making multiple panels, use the same tab measurements and spacing for each one so the windows look balanced.
Making Fabric Tabs
Cut narrow fabric strips, fold them lengthwise with the right sides together, and stitch along the long edge. Turn the strips right side out and press them flat. Fold each finished strip into a loop and attach the ends securely to the top of the curtain panel.
The exact dimensions can vary depending on your curtain rod and the look you prefer. Wider tabs create a more noticeable decorative feature, while narrower tabs offer a simpler appearance.
3. Wide Fabric Loop Curtains
A wider fabric loop creates a clean, contemporary alternative to the traditional rod pocket. Instead of gathering the entire top edge, several broad loops hold the panel against the rod. The open spaces between the loops allow the curtain rod to become part of the overall design.
This approach is particularly attractive when you want the curtain fabric to remain relatively flat across the top. It also provides an opportunity to highlight a contrasting fabric, decorative stitching, or a subtle pattern.
Keep the Loops Even
Before sewing the loops permanently, arrange them along the top edge and check the spacing. Even placement will help the curtain hang symmetrically. Pin or baste the loops in position before completing the final stitching.
Expert Insight
The curtain heading determines how the fabric behaves at the window. If you want soft gathers, a rod pocket is a natural choice. If you prefer the rod and hanging details to become part of the decor, tabs or fabric loops can create a more structured look.
4. Tied Top Curtains
Tied top curtains add a playful handmade touch by using fabric ties to secure the curtain directly to the rod. Each tie wraps around the rod and forms a knot or bow, creating a relaxed appearance.
This style is particularly useful when you want the window treatment to feel decorative rather than formal. The ties become a visible feature, so choosing a fabric that complements the room can make the finished curtain feel intentionally designed.
Make the Ties Decorative
Longer ties can be allowed to hang down for a casual look, while shorter ties create a cleaner appearance. You can also experiment with the way you knot them. Simple knots provide a relaxed finish, while bows make the curtains feel softer and more decorative.
How to Measure for DIY Curtains
Accurate measuring is one of the most important parts of any curtain sewing project. A beautiful sewing job will not look right if the finished curtain is too short, too narrow, or poorly proportioned for the window.
Start by measuring the curtain rod rather than simply measuring the glass area. Decide where the rod will sit and where you want the curtain to finish. Curtains that extend farther beyond the window can provide a fuller appearance and allow the fabric to frame the opening more effectively.
Width
Determine the finished width you need and then account for fullness and seam allowances. If you want gathered curtains, you will generally need more fabric than the exact width of the window or rod. Extra width creates folds rather than leaving the curtain stretched flat.
Length
Measure from the point where the curtain will hang to the desired bottom position. Think about whether you want the curtain to finish near the windowsill, below the sill, or closer to the floor. Add additional fabric for hems and the curtain heading.
Always double-check your measurements before cutting. Fabric can be difficult to replace once it has been cut, so taking an extra minute to verify the numbers can prevent an avoidable mistake.
Choosing Fabric for Homemade Curtains
Fabric selection affects both appearance and sewing difficulty. Medium-weight fabrics are often a practical choice for beginner curtain projects because they are substantial enough to hang nicely without being excessively difficult to handle.
Before purchasing a large quantity, consider how the fabric drapes. Hold a sample vertically and see how it falls. A fabric that looks attractive on a bolt may behave differently once it is hanging at full length.
Also consider how much natural light you want in the room. Lightweight materials can maintain an airy appearance, while heavier fabrics provide a more substantial visual presence. Your choice should reflect both the decorative style and the practical purpose of the curtains.
Essential Sewing Supplies
You do not need an extensive sewing studio to make simple DIY curtains. A basic setup can be enough for many straightforward projects.
- Sewing machine
- Suitable sewing thread
- Fabric scissors or a rotary cutter
- Measuring tape
- Fabric pins or clips
- Iron and ironing surface
- Ruler or measuring guide
- Seam ripper for correcting mistakes
For larger curtains, having enough space to lay the fabric flat is also helpful. A large table or clean floor can make measuring and cutting considerably easier.
Beginner Sewing Tips for Better Results
Simple curtains are beginner-friendly, but careful preparation makes the process much smoother. Before sewing the final project, test your machine settings on a scrap piece of the same fabric.
Press as You Sew
An iron is one of the most useful tools in curtain making. Pressing hems and folds before stitching helps create straight, consistent edges. It can make a basic project look much more professional.
Keep Your Edges Straight
Long curtain panels make small inaccuracies more noticeable. Use a measuring guide and mark important folds before sewing. Avoid rushing through long seams because correcting a crooked line later can take more time than sewing it carefully the first time.
Finish Raw Edges
Raw fabric edges can fray with handling and washing. Finishing the edges with an appropriate hem or seam finish gives the curtain a cleaner appearance and helps improve durability.
Customize Your DIY Curtains
Once you understand the basic construction, there are many ways to make the design your own. You can mix fabrics, add decorative trim, adjust the tab width, change the tie length, or choose a completely different fabric color.
For a minimalist room, simple solid-color curtains can keep the window looking clean and uncluttered. For a cozy interior, textured fabric can add warmth. Patterned fabric can become a focal point, especially when the rest of the room uses quieter colors.
You can also make different styles for different rooms. A simple rod pocket may work beautifully in a bedroom, while tied tops can add a relaxed touch to a casual living space. Kitchen windows may benefit from shorter panels, depending on the layout and available space.
A Simple DIY Curtain Workflow
If you are new to sewing curtains, breaking the project into manageable stages can make it feel much less intimidating.
- Measure: Determine the rod position, finished width, and desired length.
- Plan: Select the curtain heading style and calculate the fabric needed.
- Prepare: Wash or otherwise prepare the fabric according to its care requirements before cutting when appropriate.
- Cut: Mark and cut the panels as accurately as possible.
- Hem: Finish the side and bottom edges.
- Create the heading: Sew the rod pocket, tabs, loops, or ties.
- Press: Give the finished seams and folds a final pressing.
- Hang: Install the curtains and adjust the gathers, tabs, or ties.
Following a consistent sequence helps prevent forgotten steps. It also makes it easier to reproduce the same style for additional windows.
Why This Simple Project Is Worth Trying
DIY curtains combine practical sewing skills with home decorating. You get to practice straight seams and accurate measuring while creating something that can have an immediate visual effect on a room.
- It is a useful beginner sewing project.
- You can select the exact fabric and color you want.
- Different heading styles create completely different looks.
- The finished curtains can be customized to your window.
Perhaps the best part is that the project can grow with your skills. Start with a simple rod pocket, then experiment with tabs or tied tops once you are comfortable with basic curtain construction.
Common DIY Curtain Mistakes to Avoid
One of the most common mistakes is cutting fabric before confirming the finished measurements. Remember that the curtain needs extra fabric for hems and the chosen heading construction. Another common issue is forgetting to consider fullness when making gathered curtains.
Uneven tabs or ties can also make a finished curtain look unbalanced. Before permanently stitching these details, lay them out and check their spacing. Taking a moment to step back and inspect the arrangement can make a significant difference.
Finally, avoid skipping pressing. Even excellent stitching can look untidy when folds and hems have not been properly pressed. A little extra preparation can turn a simple handmade curtain into a polished window treatment.
Quick Points
- Measure twice before cutting.
- Choose the heading style before preparing the top edge.
- Use enough fabric width for the fullness you want.
- Press seams and folds for a professional finish.
- Start with the simplest style if you are new to sewing.
Conclusion: Create Curtains That Fit Your Style
Learning how to sew curtains gives you an easy way to combine creativity, sewing practice, and home decorating. The four styles shown here offer a useful starting point, whether you prefer gathered rod pocket curtains, neat fabric tabs, wide loops, or relaxed tied tops.
The key is to focus on accurate measurements, careful cutting, clean hems, and a heading style that suits the look you want. You do not need advanced sewing experience to begin. Start with a simple design, work carefully, and let the fabric and hanging method provide the character.
With a little patience, a basic sewing machine, and fabric you genuinely love, you can create DIY curtains that make your windows feel finished and your space feel more personal. Once you complete your first pair, you may find yourself looking at every room as another opportunity for a handmade window treatment.
Tags
DIY Curtains Curtain Sewing Sewing Projects Beginner Sewing DIY Home Decor Window Treatments Homemade Curtains Curtain Ideas