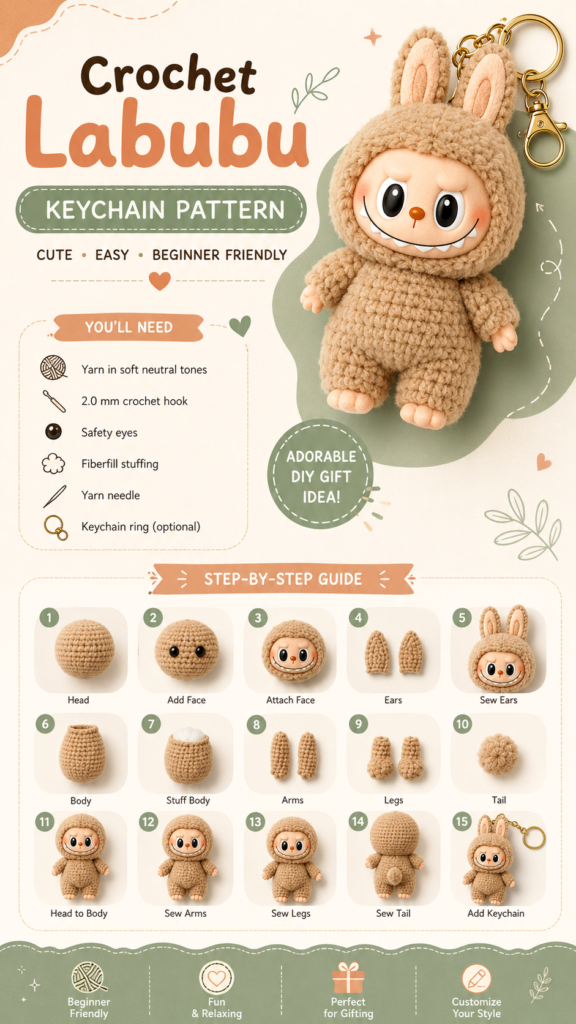
Looking for a cute crochet project that is small enough to finish without feeling overwhelming? This DIY Labubu crochet keychain is a fun beginner-friendly idea that combines amigurumi techniques, soft yarn, and a few simple components into one adorable handmade accessory. The finished character can be attached to a bag, backpack, keys, or gift package, making it a practical little project as well as a charming craft.
The illustrated pattern focuses on building the character from separate crochet pieces, including the head, body, ears, arms, legs, and tail, before bringing everything together with facial details and a keychain ring. The step-by-step layout also makes the project easier to visualize, especially if you are still becoming comfortable with crochet construction.
Key Takeaways
- This DIY Labubu project is designed around a cute crochet keychain concept.
- The project uses small amigurumi-style components assembled into one character.
- Neutral beige yarn creates a soft, cozy appearance that is easy to customize.
- Safety eyes, stuffing, a crochet hook, yarn needle, and keychain hardware are useful supplies.
- The finished piece can become a handmade accessory or a thoughtful craft gift.
- Changing yarn colors and small details can give the finished character a personal style.
What Makes This DIY Labubu Crochet Project So Cute?
The appeal of this crochet keychain comes from its combination of a recognizable character-inspired silhouette and the warmth of handmade crochet. Instead of creating one large stuffed figure, the pattern breaks the project into manageable sections. That approach makes it particularly appealing to crafters who enjoy seeing a project gradually take shape.
The soft beige palette shown in the design gives the character a warm, plush appearance. A contrasting light peach shade is used for the face and hands, while dark facial details create definition. The result is a cozy handmade look that works especially well as a small bag charm.
Another appealing feature is the expressive face. Large eyes, a small nose, rounded cheeks, and a wide smile give the finished figure plenty of personality. These details also demonstrate how small finishing touches can dramatically change the character of an amigurumi project.
Important: When making a small crochet character, accurate shaping is only part of the result. Placement of the eyes, face, ears, and other details has a major effect on the finished expression, so take a moment to check the positioning before permanently attaching everything.
Materials for a Crochet Labubu Keychain
The illustrated project shows a compact materials list, making it a relatively approachable craft setup. You do not need a large collection of specialty tools to begin. Gathering everything before crocheting can make the process much smoother.
- Beige or another neutral-colored yarn for the main body
- Cream or light peach yarn for contrasting details
- Brown and black yarn for small decorative features
- A 2.0 mm crochet hook
- 6 mm safety eyes
- Fiberfill stuffing
- Yarn needle
- Scissors
- A keychain ring or similar hardware
- Optional embroidery supplies for facial details
If you are adapting the project, do not feel restricted to the exact palette shown. Soft pink, cream, light brown, gray, or other gentle colors can create a completely different personality while keeping the same basic crochet concept.
Choosing the Right Yarn
Yarn choice has a noticeable effect on a small amigurumi project. A yarn that produces clear, consistent stitches will make the shape easier to control. For a beginner project, a manageable yarn is often more useful than choosing something simply because it looks luxurious.
Neutral yarn creates the classic cozy appearance shown in the design, but experimenting with colors can make the keychain feel more personal. If you plan to make several versions, consider using a consistent yarn weight while changing the colors to create a small collection.
Why a Small Crochet Hook Helps
The illustrated pattern pairs the project with a 2.0 mm crochet hook. A smaller hook can help create compact stitches, which is useful for stuffed crochet pieces where you want the filling to remain enclosed rather than showing through large gaps.
If your tension is particularly tight, however, pay attention to how comfortable the stitches feel in your hands. Consistent tension is more important than rushing through the rounds.
Understanding the Crochet Construction
The project is easiest to understand when viewed as a collection of individual parts. The illustrated guide moves from the head and facial details to the ears, body, arms, legs, and tail. Once those components are prepared, they are sewn together during the assembly stage.
This modular approach is one of the best things about small amigurumi projects. You can concentrate on one piece at a time instead of worrying about the entire character simultaneously.
1. Crochet the Head
The head begins as a rounded crochet form worked in beige yarn. The illustrated instructions use increasing and decreasing stitches to gradually create the spherical shape. As the rounds progress, the number of stitches changes to expand and then close the form.
Keep your stitches consistent throughout this stage. If the tension changes significantly between rounds, the finished head may become uneven. For beginners, counting stitches at the end of each round can be especially helpful.
2. Add the Eyes and Face
The face is what gives this crochet character its personality. Safety eyes provide the prominent expression shown in the finished example, while embroidered or crocheted details can be added around them.
Before securing facial components, place them temporarily and look at the head from different angles. Even a small adjustment can make the expression appear more cheerful, playful, or relaxed.
3. Make the Ears
The two tall ears are crocheted separately and then folded or shaped before being attached to the head. Their position is important because they help establish the character’s distinctive silhouette.
Try placing both ears before sewing them permanently. Compare their height, spacing, and angle so that the finished piece looks balanced.
4. Build the Body
The body follows a similar amigurumi construction, beginning with a rounded base and gradually developing into a compact stuffed form. The pattern shown divides the body into several rounds, including increases, straight rounds, and decreases.
Stuffing should be added gradually rather than all at once. This gives you more control over the shape and makes it easier to keep the body smooth and rounded.
5. Crochet the Arms and Legs
The arms and legs are small pieces, so they can require more patience than the larger head and body. The illustrated instructions keep these components compact, with decreases used to shape the ends.
Because the limbs are relatively small, careful counting is useful. Make both matching pieces together when possible so that they remain similar in size and shape.
6. Add the Tail
The small rounded tail completes the back of the character. It is another simple component that can be crocheted separately and attached during assembly.
Although the tail is a small detail, it contributes to the finished character’s three-dimensional appearance. Check its position from the side and back before sewing it down.
Expert Insight
Small crochet figures benefit from slow, deliberate assembly. Instead of sewing every piece immediately, arrange the head, ears, limbs, and tail first. This simple dry-fitting step helps you judge proportions before making permanent attachments.
How to Assemble the Crochet Keychain
Once all of the individual crochet pieces are complete, assembly brings the project together. The illustrated guide shows the ears being sewn to the head, followed by the head being attached to the body. The arms and legs are then positioned on the sides and bottom before the tail is added to the back.
- Position and sew the ears securely onto the top of the head.
- Attach the completed head to the body.
- Place the arms evenly on both sides.
- Attach the legs along the lower portion of the body.
- Sew the tail onto the back.
- Check the overall shape and make any small adjustments.
- Attach the keychain ring or hardware securely.
- Add or refine embroidered facial details as desired.
Pro Tip: For a polished handmade finish, hide yarn ends neatly inside the crochet piece whenever possible. Take extra care with the connection between the figure and keychain hardware because that area will experience repeated movement when attached to a bag or set of keys.
Tips for Beginners Making Amigurumi
If this is your first crochet character, the project may look complicated at first because the finished figure contains many details. The key is to treat it as a series of small tasks rather than one large project.
Count Every Round
Small amigurumi pieces can change shape quickly when a stitch is accidentally skipped or added. Counting stitches after each round helps catch mistakes before they affect the following rounds.
Use Stitch Markers
A stitch marker can help you identify the beginning of each round, especially when working continuously in the round. This makes it easier to follow increases and decreases without losing your place.
Do Not Overstuff
Fiberfill should give the character structure without making the stitches stretch excessively. Add small amounts at a time and shape the stuffing with your fingers as you work.
Take Your Time With the Face
The face is one of the most visible parts of the finished project. Position the eyes and other features carefully, and step back occasionally to check the expression. This is often where patience makes the biggest difference.
Creative Ways to Customize Your DIY Labubu
One of the most enjoyable parts of making a crochet keychain is customizing the finished piece. The basic design can serve as a starting point for experimenting with color, accessories, facial expressions, and finishing details.
- Try new colors: Replace the neutral beige palette with pastel pink, blue, green, lavender, or cream.
- Change the face: Experiment with embroidered eyebrows, cheeks, or other small details.
- Personalize the ears: Use a contrasting inner-ear color for extra dimension.
- Create matching sets: Make several characters in different color combinations.
- Choose different hardware: Match the keychain ring to your preferred bag or accessory style.
- Add gift packaging: Pair the finished crochet charm with a simple handmade card for a thoughtful presentation.
Customization also makes this project a great way to use small amounts of leftover yarn. Instead of letting tiny yarn remnants sit unused, you can turn them into colorful character accessories or alternative versions of the same design.
Why Crochet Keychains Make Great Handmade Gifts
A crochet keychain is small, useful, and personal, which makes it a natural choice for handmade gifting. Unlike a larger crochet project, a keychain can be completed with relatively little material and can be attached to an everyday item.
The compact size also makes these projects suitable for craft fairs, gift baskets, party favors, or small surprise gifts. If you enjoy making amigurumi, creating several variations can be an enjoyable way to explore different color combinations and styles.
For someone learning crochet, completing a small character can also provide a satisfying sense of progress. The project introduces several useful skills, including crocheting in the round, increasing, decreasing, stuffing, sewing pieces together, and adding small decorative details.
A Simple Craft Project to Enjoy at Your Own Pace
There is something especially satisfying about watching a ball of yarn gradually become a tiny character. This DIY Labubu crochet keychain captures that appeal in a compact project with plenty of room for creativity.
Whether you are an experienced amigurumi maker or just starting to explore crochet, breaking the project into the head, body, ears, limbs, tail, and assembly stages can make the process feel approachable. Focus on one section at a time, keep your stitch counts consistent, and give yourself plenty of time for the finishing details.
At a Glance
- Gather yarn, a small crochet hook, stuffing, needle, eyes, scissors, and keychain hardware.
- Work the head and body carefully while checking stitch counts.
- Make the ears, arms, legs, and tail separately.
- Position every piece before sewing for better symmetry.
- Customize colors and facial details to create your own handmade style.
Conclusion
This DIY Labubu crochet keychain is a charming project for anyone who enjoys cute handmade crafts, amigurumi, and personalized accessories. Its construction is broken into small, manageable pieces, giving beginners a practical introduction to shaping, stuffing, assembly, and decorative finishing.
The neutral crochet palette shown in the design creates a warm and cozy look, but the real fun begins when you make the idea your own. Switch up the yarn colors, adjust the facial details, or create a collection of different versions to match your style.
Most importantly, enjoy the process. Crochet projects do not need to be rushed. With careful stitch counting, patient assembly, and a little creativity, a simple collection of yarn and basic supplies can become a memorable little keychain ready to decorate a favorite bag or become a handmade gift.