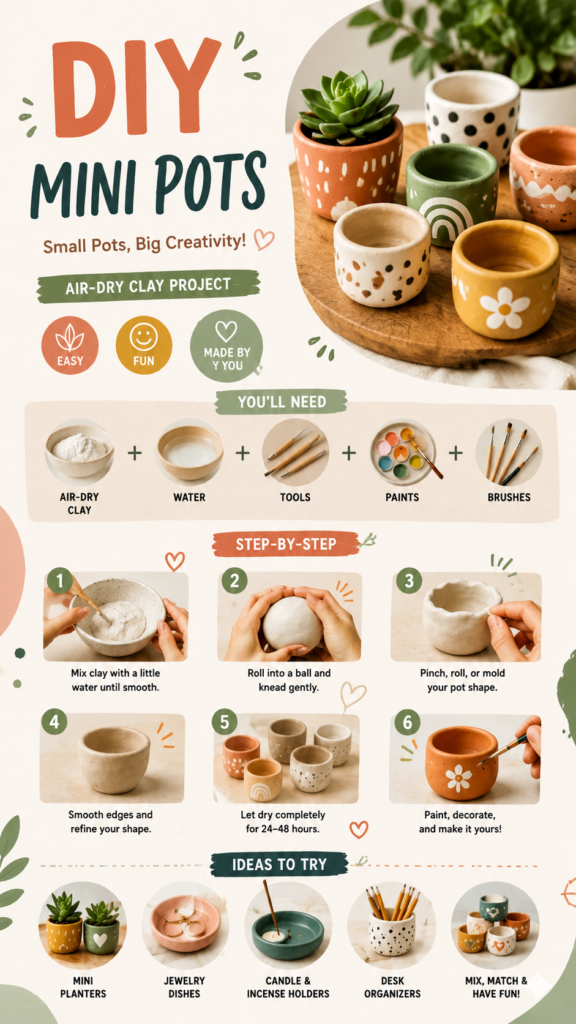
Small handmade projects often deliver the biggest creative rewards, and DIY clay crafts are a perfect example. With a little imagination, simple tools, and a willingness to get your hands messy, you can transform soft air-dry clay into charming mini pots, planters, jewelry dishes, candle holders, and desk accessories. These projects are beginner-friendly, practical, and wonderfully open to personal style.
DIY clay is especially appealing because the process does not need to feel complicated. You can start with a small piece of clay, shape it by hand, allow it to dry, and finish it with paint or decorative details. The result can be playful, modern, rustic, colorful, or minimalist. Whether you are making a tiny planter for a succulent or a hand-painted bowl for everyday items, each piece becomes a small reflection of your creativity.
Key Takeaways
- DIY clay projects are accessible for beginners and experienced crafters.
- Mini pots can be shaped by pinching, rolling, pressing, or molding the clay.
- Air-dry clay is ideal for simple projects that do not require a kiln.
- Paint, patterns, and small details can completely change the final look.
- Finished pieces can be used for décor, storage, gifts, and creative displays.
Why DIY Clay Crafts Are So Popular
The popularity of DIY clay crafts comes from their satisfying combination of creativity and simplicity. Working with clay is tactile and relaxing. Instead of starting with a complicated pattern or a long list of materials, you can begin with a basic form and let the project develop naturally in your hands.
Mini clay pots are particularly popular because they are small enough to finish in a short crafting session while still offering plenty of room for creativity. A simple rounded pot can become a cheerful planter with painted flowers, a modern container with geometric patterns, or a whimsical piece with dots, arches, and hand-drawn details.
Important: The beauty of handmade clay projects is that perfection is not the goal. Slightly uneven edges, subtle fingerprints, and small differences in shape can make a finished piece feel warmer, more personal, and more authentically handmade.
Another reason DIY clay has become a favorite craft is its versatility. The same basic clay can be used to create decorative objects for different rooms and purposes. One weekend you might make a tiny succulent pot, and the next you could create a ring dish, incense holder, pen cup, or decorative bowl.
What You Need to Start a DIY Clay Project
One of the biggest advantages of beginner clay crafts is that you do not need a professional studio to get started. For a simple mini pot project, the materials can remain refreshingly minimal.
Basic Supplies for Air-Dry Clay Crafts
- Air-dry clay: A practical choice for projects that do not require firing in a kiln.
- Water: Helpful for lightly smoothing clay and joining small pieces when needed.
- Simple shaping tools: A craft tool, wooden stick, spoon, or similar item can help refine details.
- A smooth work surface: This gives you better control while rolling and shaping.
- Acrylic paint: Useful for adding color and personality after the clay has dried.
- Paintbrushes: Small brushes are especially useful for patterns and fine details.
You can keep your first project extremely simple. There is no need to collect dozens of specialty tools before you begin. Many of the most charming handmade clay pieces come from basic shaping techniques and a thoughtful finish.
How to Make Mini Air-Dry Clay Pots Step by Step
The general process of making a mini clay pot is easy to understand. The key is to work patiently and allow the material to gradually take shape. A small project is also a great way to practice before attempting larger handmade planters or decorative vessels.
1. Prepare and Soften the Clay
Start with a manageable amount of clay and knead it gently until it feels smooth and workable. Kneading helps create a more consistent texture and makes the clay easier to shape.
Try not to use more clay than you need for your first mini pot. Small projects are easier to control, and working with a compact piece makes it simpler to create an even wall thickness.
2. Roll the Clay Into a Ball
Once the clay is ready, roll it between your hands until you have a smooth, rounded ball. This simple form creates a useful starting point for a pinch pot.
A rounded shape does not have to be perfectly symmetrical. In fact, a slightly organic form can give the finished piece a softer, more handcrafted appearance.
3. Create the Opening and Shape the Pot
Press a finger or thumb gently into the center of the clay ball to create an opening. Slowly pinch and rotate the clay to widen the space and shape the walls.
Take your time during this step. Rushing can make one area much thinner than another. Turn the pot gradually as you work, checking the shape from several angles. You can make a wide bowl-like form, a taller cup shape, or a compact rounded planter.
Pro Tip: Aim for relatively even walls rather than extremely thin ones. A little extra thickness can make a small handmade clay pot feel sturdier and gives you more freedom when smoothing and refining the shape.
4. Smooth and Refine the Edges
After forming the basic pot, use your fingers or a simple tool to soften rough areas and refine the rim. You may prefer a perfectly smooth edge or a more organic, wavy finish. Both styles work beautifully for handmade décor.
Pay attention to the bottom so the pot can sit steadily on a flat surface. Small adjustments at this stage can improve the final appearance without removing the handmade character.
5. Let the Clay Dry Completely
Place the shaped piece in a suitable area and allow it to dry according to the clay product instructions. Drying time can vary depending on the type of clay, the thickness of the piece, and the surrounding environment.
Avoid decorating the surface too early if the clay is still damp and easily changes shape. Patience is an important part of successful air-dry clay projects. A fully dried piece is easier to paint and handle.
6. Paint and Decorate Your Creation
This is where your DIY clay pot can become completely your own. Acrylic paint works well for adding solid colors, tiny flowers, dots, stripes, arches, leaves, abstract shapes, and other decorative patterns.
For a playful look, try a collection of different colors and designs. For a calmer aesthetic, choose a limited palette of earthy greens, warm oranges, soft creams, or muted neutrals. You can also leave some areas unpainted for a natural handmade effect.
Expert Insight
The strongest handmade collections often share a visual connection without looking identical. Try repeating one or two elements, such as a similar color family, flower motif, dotted pattern, or rounded shape, while allowing each clay piece to remain slightly different.
Creative DIY Clay Ideas to Try
Once you understand the basic process, a whole range of small clay projects becomes possible. Mini pots are only the beginning.
Mini Planters
Tiny handmade planters are perfect for small decorative plants or simply for adding a cheerful touch to a shelf or desk. Decorate them with painted flowers, hearts, dots, leaves, arches, or abstract shapes for a custom look.
Jewelry Dishes
A shallow clay dish can become a practical place for rings, earrings, and small everyday accessories. Soft curved edges and hand-painted details make jewelry dishes especially suitable as personalized handmade gifts.
Small Storage Bowls
Mini bowls can be used to hold beads, buttons, paper clips, or other small objects. Their compact size makes them ideal for craft rooms, desks, and bedside tables.
Candle and Incense Holders
Clay can also be shaped into decorative holders for appropriate candles or incense accessories. These pieces can be made with a minimalist form or decorated with playful hand-painted patterns to match your home style.
Desk Organizers
Small clay containers can help organize pens, pencils, brushes, and other creative supplies. A group of matching or coordinating handmade containers can turn ordinary storage into part of your room décor.
How to Create a Cohesive Collection of Handmade Clay Pots
Making several small pots instead of just one can create an eye-catching decorative collection. The secret is not to make every piece exactly the same. Instead, choose a loose theme and let each item develop its own character.
- Choose a simple color palette. Select a few colors that work naturally together.
- Repeat one decorative motif. Flowers, dots, leaves, arches, or simple line patterns can connect the collection.
- Vary the shapes. Combine wide bowls, rounded pots, taller cups, and tiny containers.
- Mix plain and decorated pieces. This gives the overall arrangement visual breathing room.
- Display the finished items together. A tray, shelf, tabletop, or desk can become a small handmade feature area.
This approach is particularly useful for home décor. A group of small clay pots often feels more intentional than a single object, especially when the colors and details complement one another.
Tips for Better Results With Beginner Clay Crafts
Work Slowly Instead of Overworking the Clay
Repeatedly reshaping the same piece can make it difficult to maintain a clean form. Decide on the general shape early, then focus on small refinements.
Keep the Decoration Simple
A small pot has a limited surface area. One bold pattern can often look more effective than several competing designs. Simple dots, tiny flowers, arches, and leaves are easy to see and work especially well on miniature pieces.
Make More Than One Piece
Creating several mini clay pots gives you the chance to experiment with different forms and finishes. It also takes some pressure away from making a single piece perfect.
Use Your Hands as Part of the Design Process
Hand shaping is not a limitation. It is one of the main reasons these projects feel personal. Embrace gentle irregularity and allow the clay to retain some of its handmade texture.
Why DIY Clay Projects Make Great Gifts
Handmade clay items can become thoughtful gifts because every piece can be customized. A jewelry dish can include a favorite color. A mini planter can feature a playful pattern. A small bowl can be designed to match a friend’s décor style.
These projects are also easy to adapt for different occasions. You can create coordinating pieces for birthdays, housewarming gifts, creative celebrations, or simply as a handmade surprise for someone special.
Creative takeaway: A handmade gift does not need to be complicated to feel meaningful. A small clay dish or painted mini pot can stand out because the colors, shape, and decoration were chosen with intention.
Quick Points for DIY Clay Inspiration
- Start with small projects to build confidence.
- Use simple shapes and add personality through paint.
- Create a coordinated set instead of aiming for identical pieces.
- Allow enough drying time before finishing and decorating.
- Turn practical items into decorative handmade accents.
Conclusion: Make Small Pots and Big Creative Moments
DIY clay crafts prove that creative projects do not have to be large or complicated to feel rewarding. A handful of clay, a few basic tools, and some paint can become a collection of colorful mini pots, useful dishes, decorative containers, and personalized handmade accessories.
The most enjoyable part of the process is the freedom to experiment. You can begin with a simple rounded form and gradually discover your own preferred shapes, colors, and patterns. Some pieces may become practical storage, while others may exist simply because they make a space feel brighter and more personal.
Whether you are trying air-dry clay for the first time or looking for fresh DIY clay ideas, start small and enjoy the process. Pinch, roll, smooth, paint, and experiment. Each handmade piece is a chance to turn a simple material into something uniquely yours.